Keycloak and LDAP
Prepare environment
Please refer to API7 EE Introduction to complete the environment preparation.
Prepare Keycloak
Keycloak supports almost all major OAuth/OIDC standards, including the Resources Owner Password Grant Type that we need to use. it is also extremely convenient to complete the connection from Keycloak to LDAP and realize the two-way synchronization of data.
It can perform these functions that we value:
- Multi-tenant
- LDAP/MSActiveDirectory integration
- OAuth2/OIDC specification support
- Flexible configuration
Keycloak system information
Keycloak system port: 8080

Keycloak POC user credentials:
Admin username: admin
Admin password: keycloak-password
Launch POC environment
Please download the docker-compose.yml file from here.
# launch the PostgreSQL, OpenLDAP and Keycloak
docker compose up -d

# find Keycloak container id
docker ps

# since we don't use HTTPS in this case, we will get an error when we access the Keycloak control panel, so we need to go into that container and change the configuration
docker exec -it <container id> bash

# execute the following command inside the container
kcadm.sh update realms/master -s sslRequired=NONE --server http://localhost:8080 --realm master --user admin

# enter the password on the interactive command
# it is keycloak-password
# this's set in docker compose using environment variable
Note that in this case, OpenLDAP automatically writes two users when it starts, but they are not fully compliant with Keycloak requirements, but can still be used for testing purposes.
For production use, you have to fine tune Keycloak's federation settings and its field mapper.
Initial setup
Visit Keycloak's dashboard address and login.
http://<ip>:8080/admin/
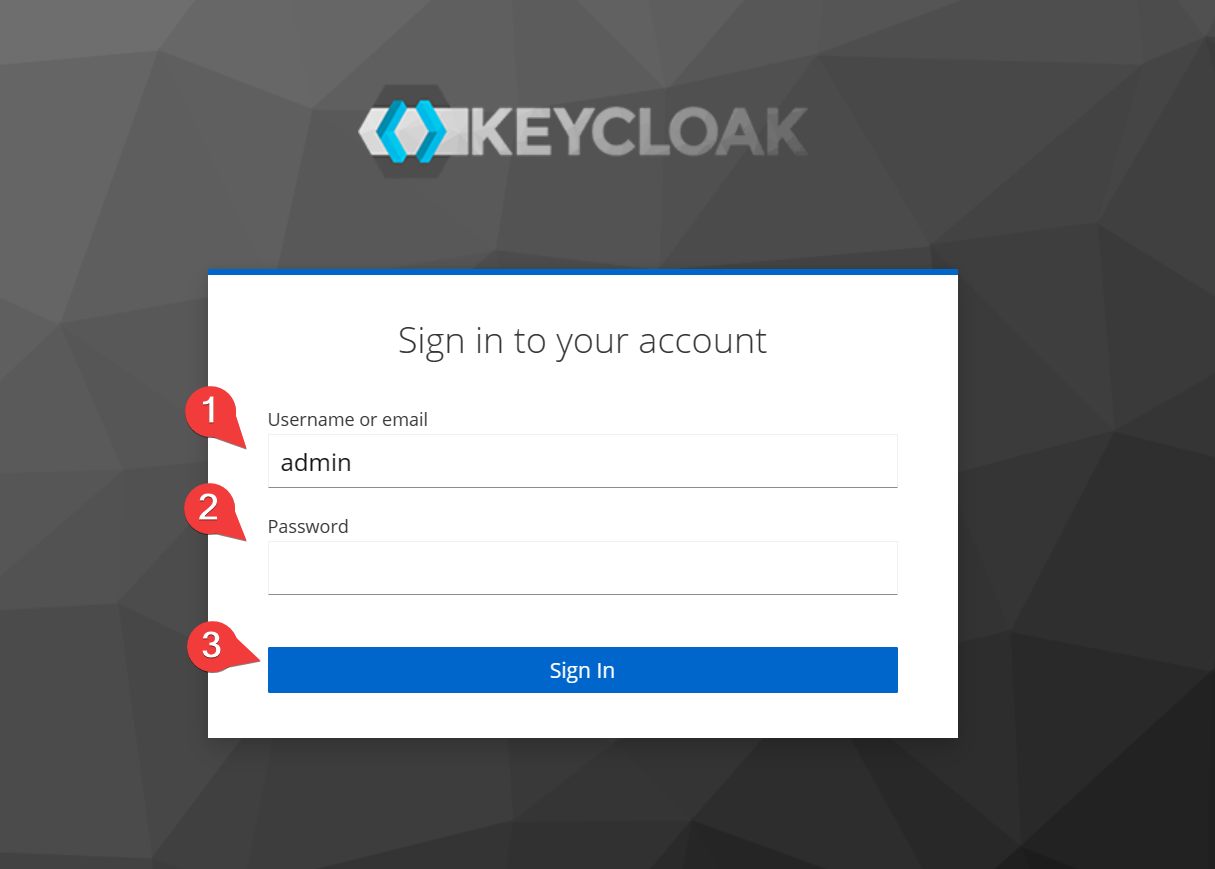
Next we need to create a new realm, which is the concept of a tenant in Keycloak.
Each realm has individual authentication configuration, users, groups, roles, consumers (OAuth2 client), etc. The data of each realm is isolated.
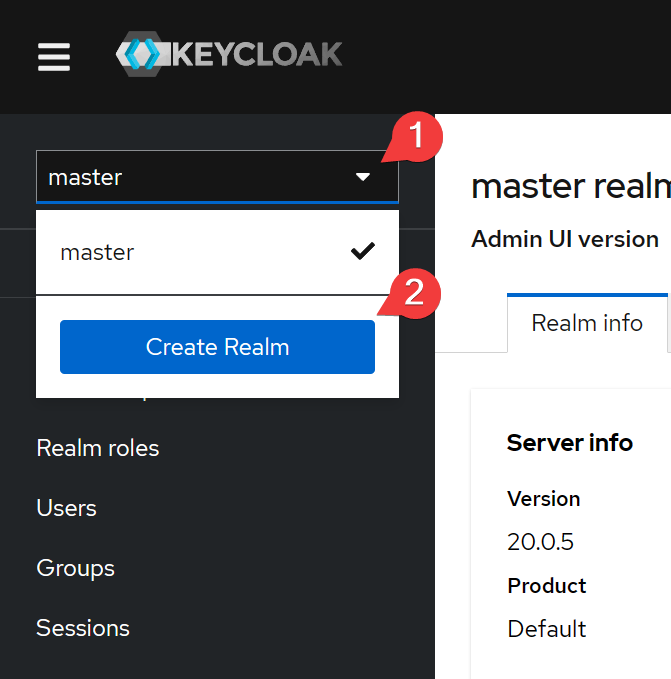
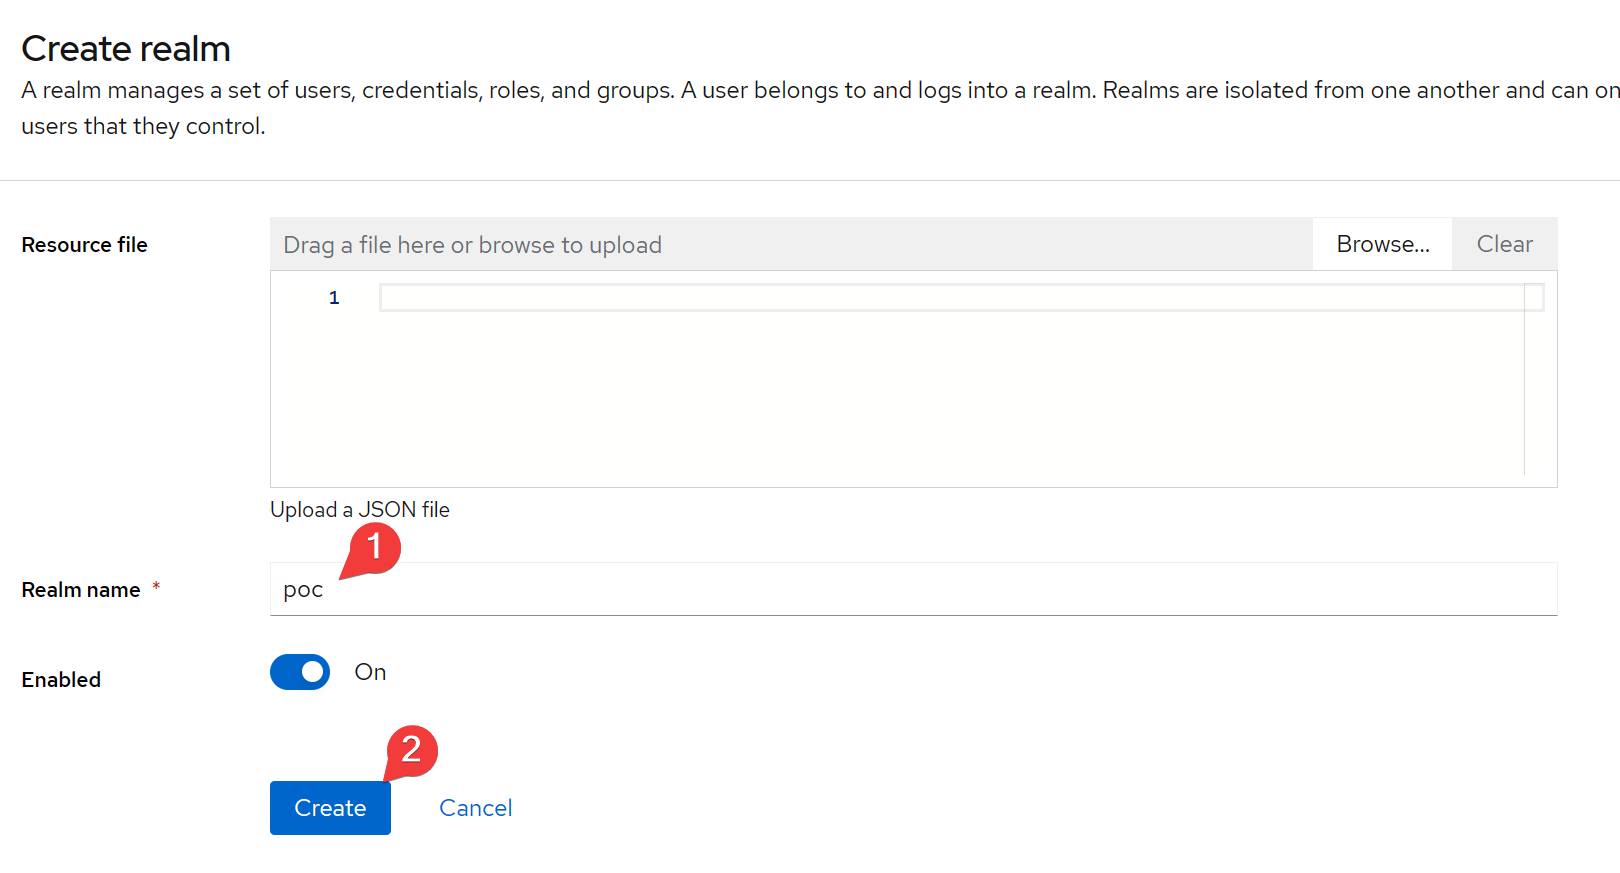
Set the realm name and click Create.
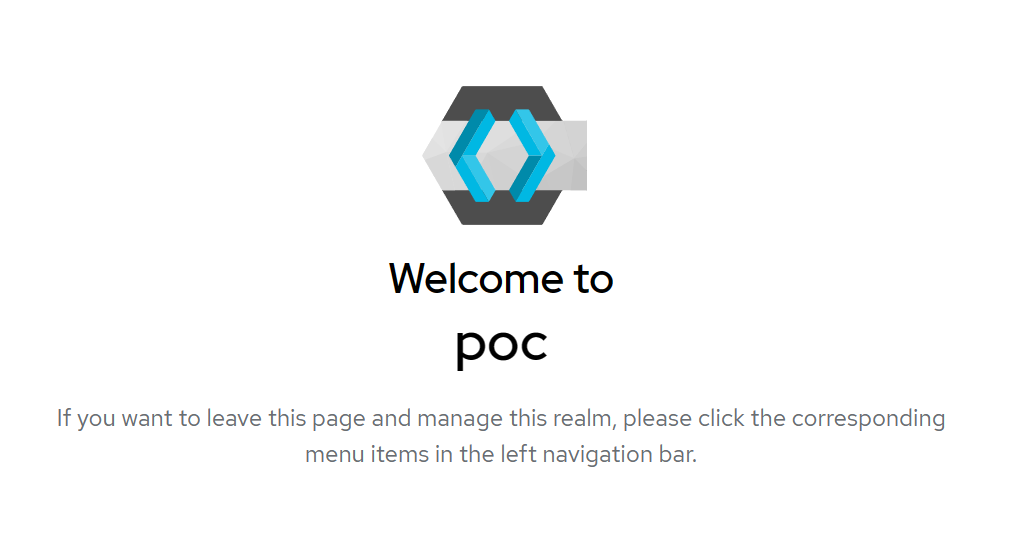
Wait a few moments and the page will jump to the newly created realm.
Integrate with OpenLDAP
Here we integrate Keycloak to OpenLDAP, if you use Microsoft Active Directory, it will be the same steps.
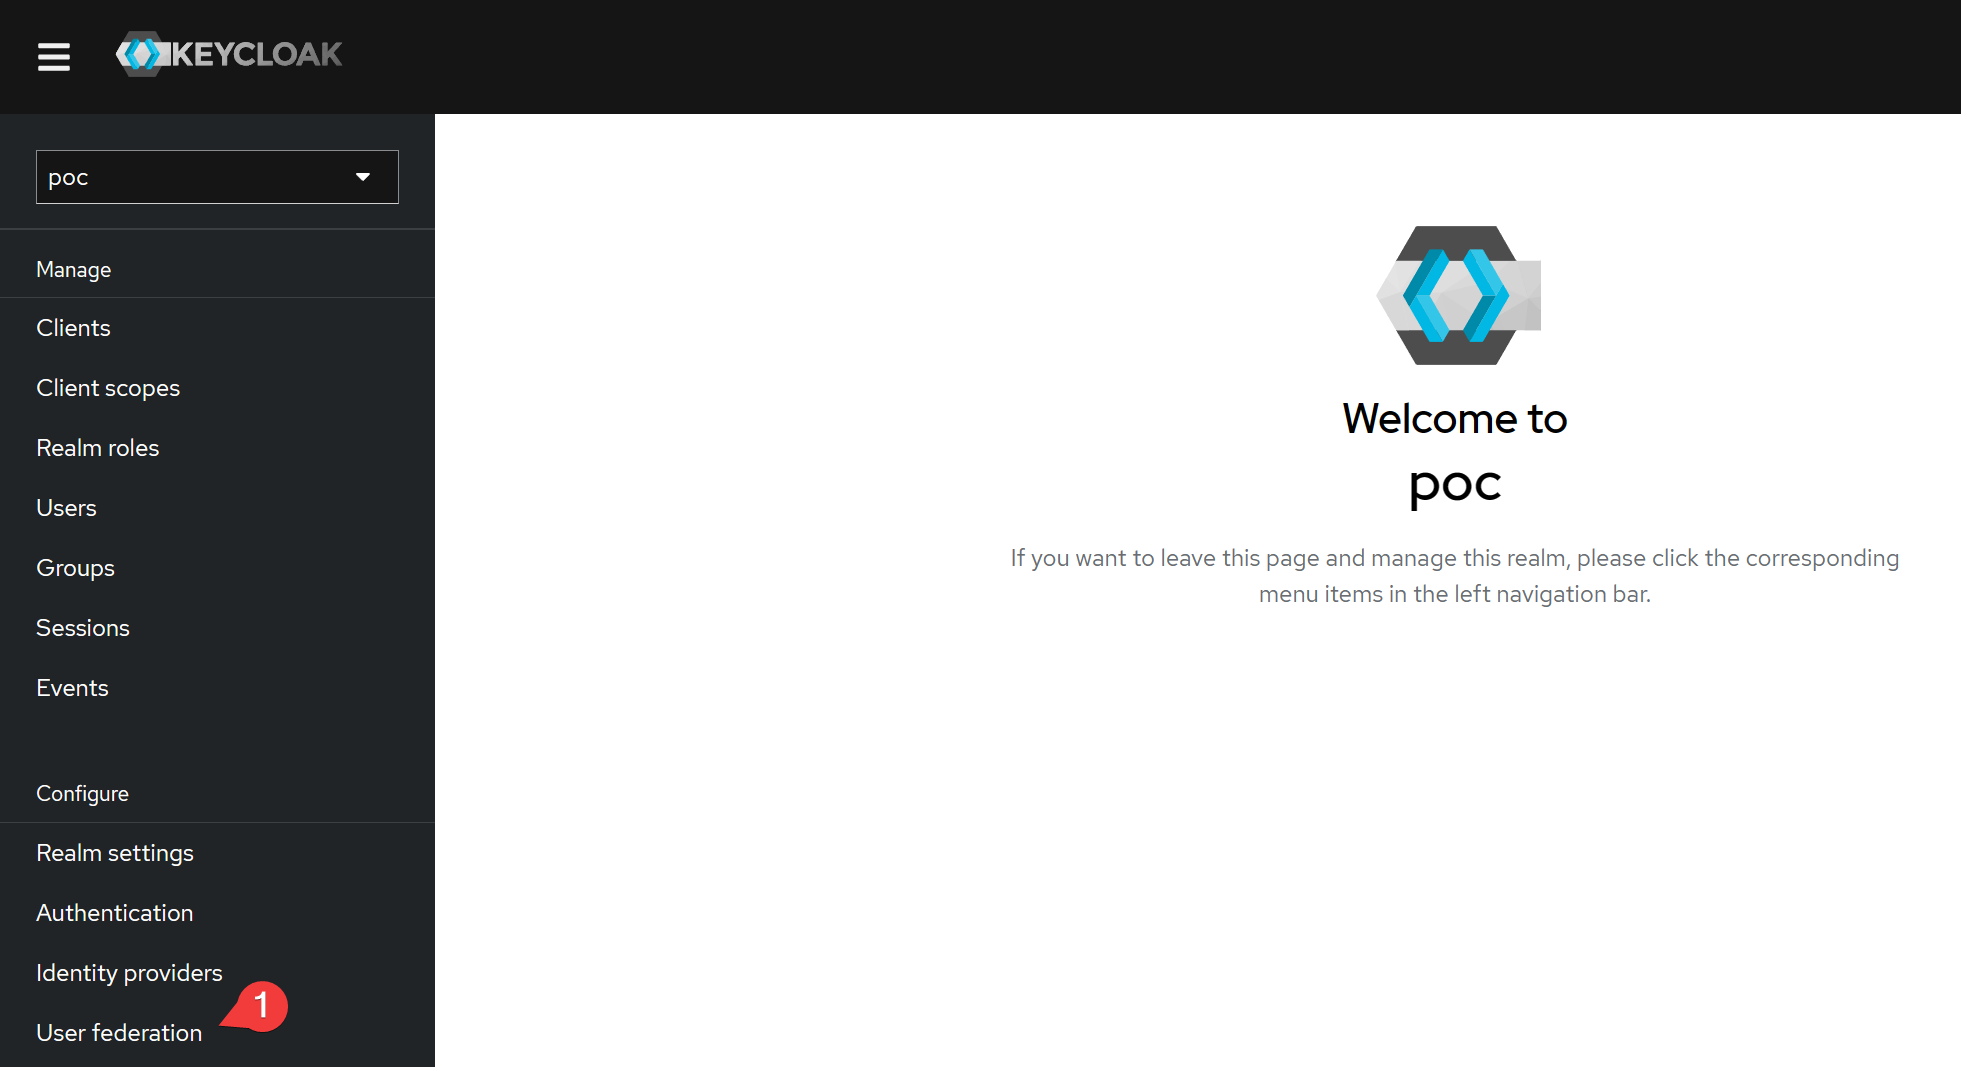
Click User Federation.
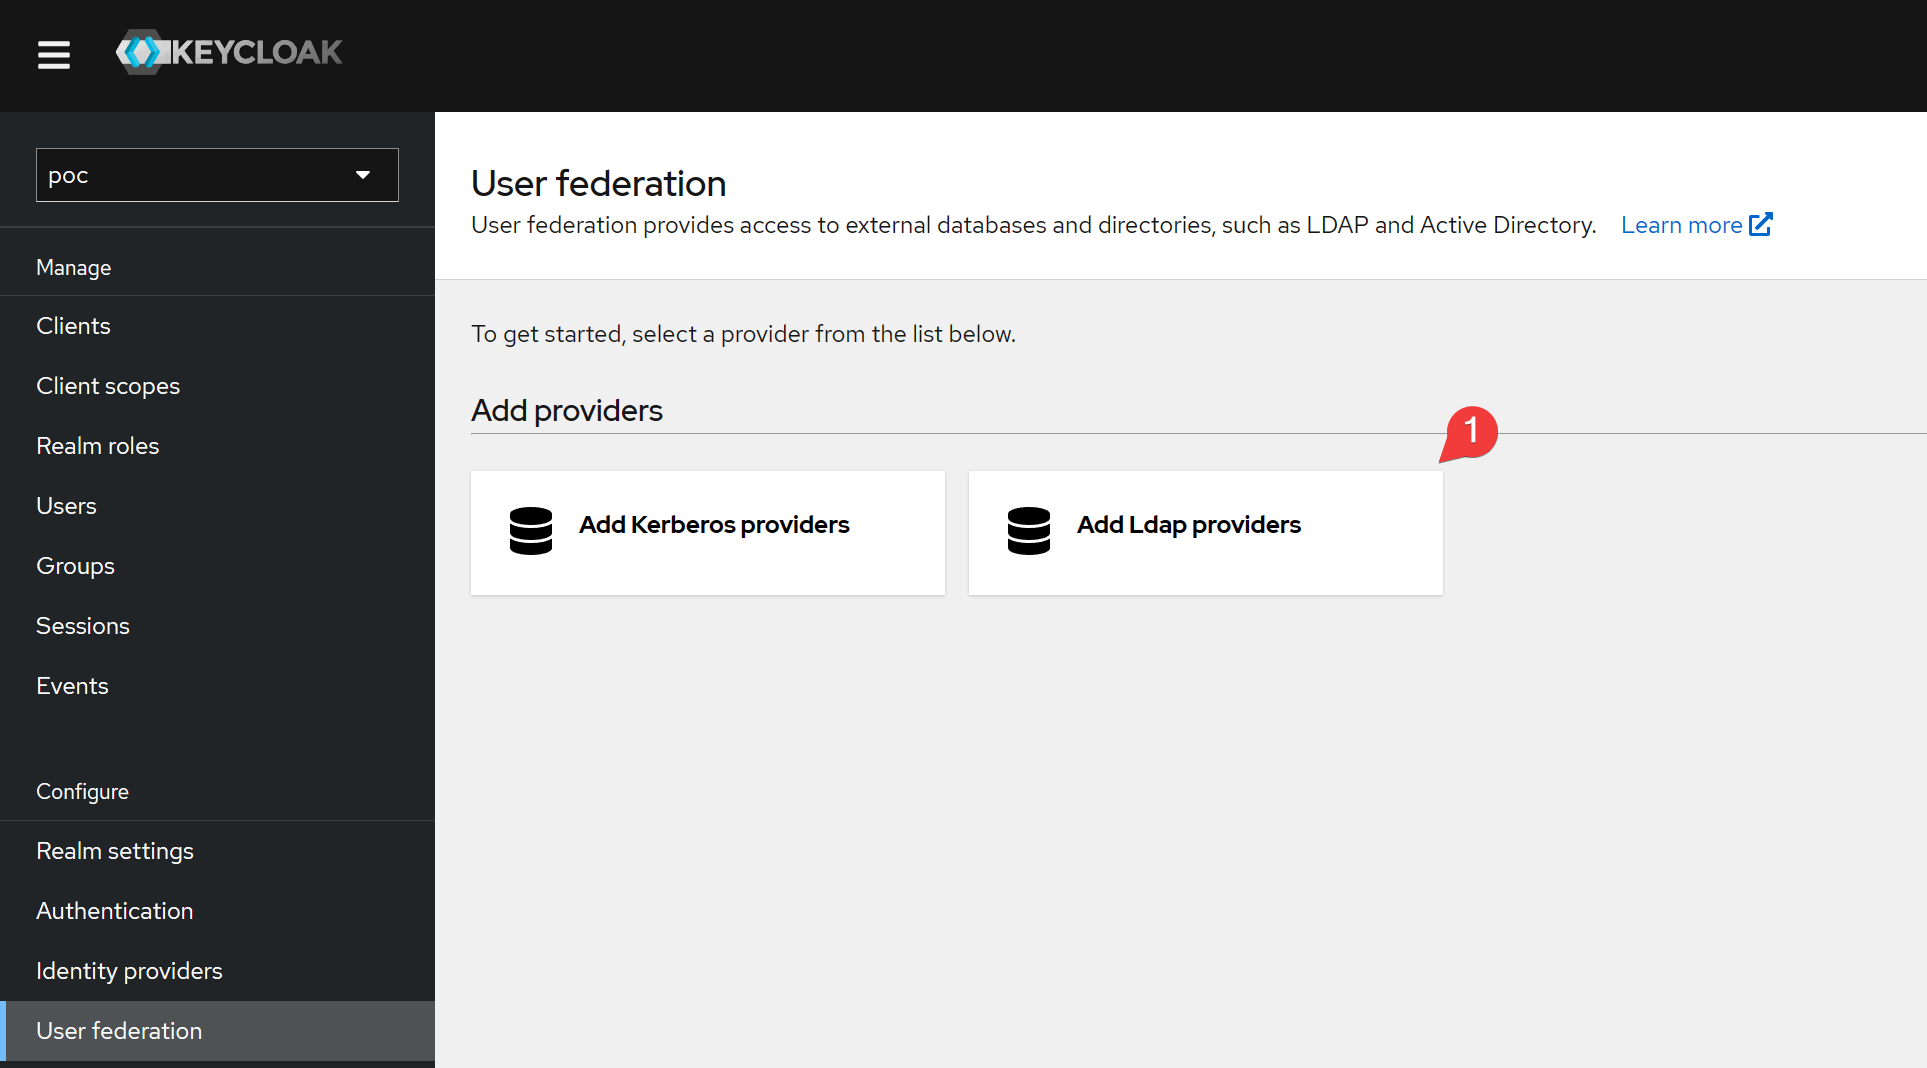
Click Add Ldap providers.
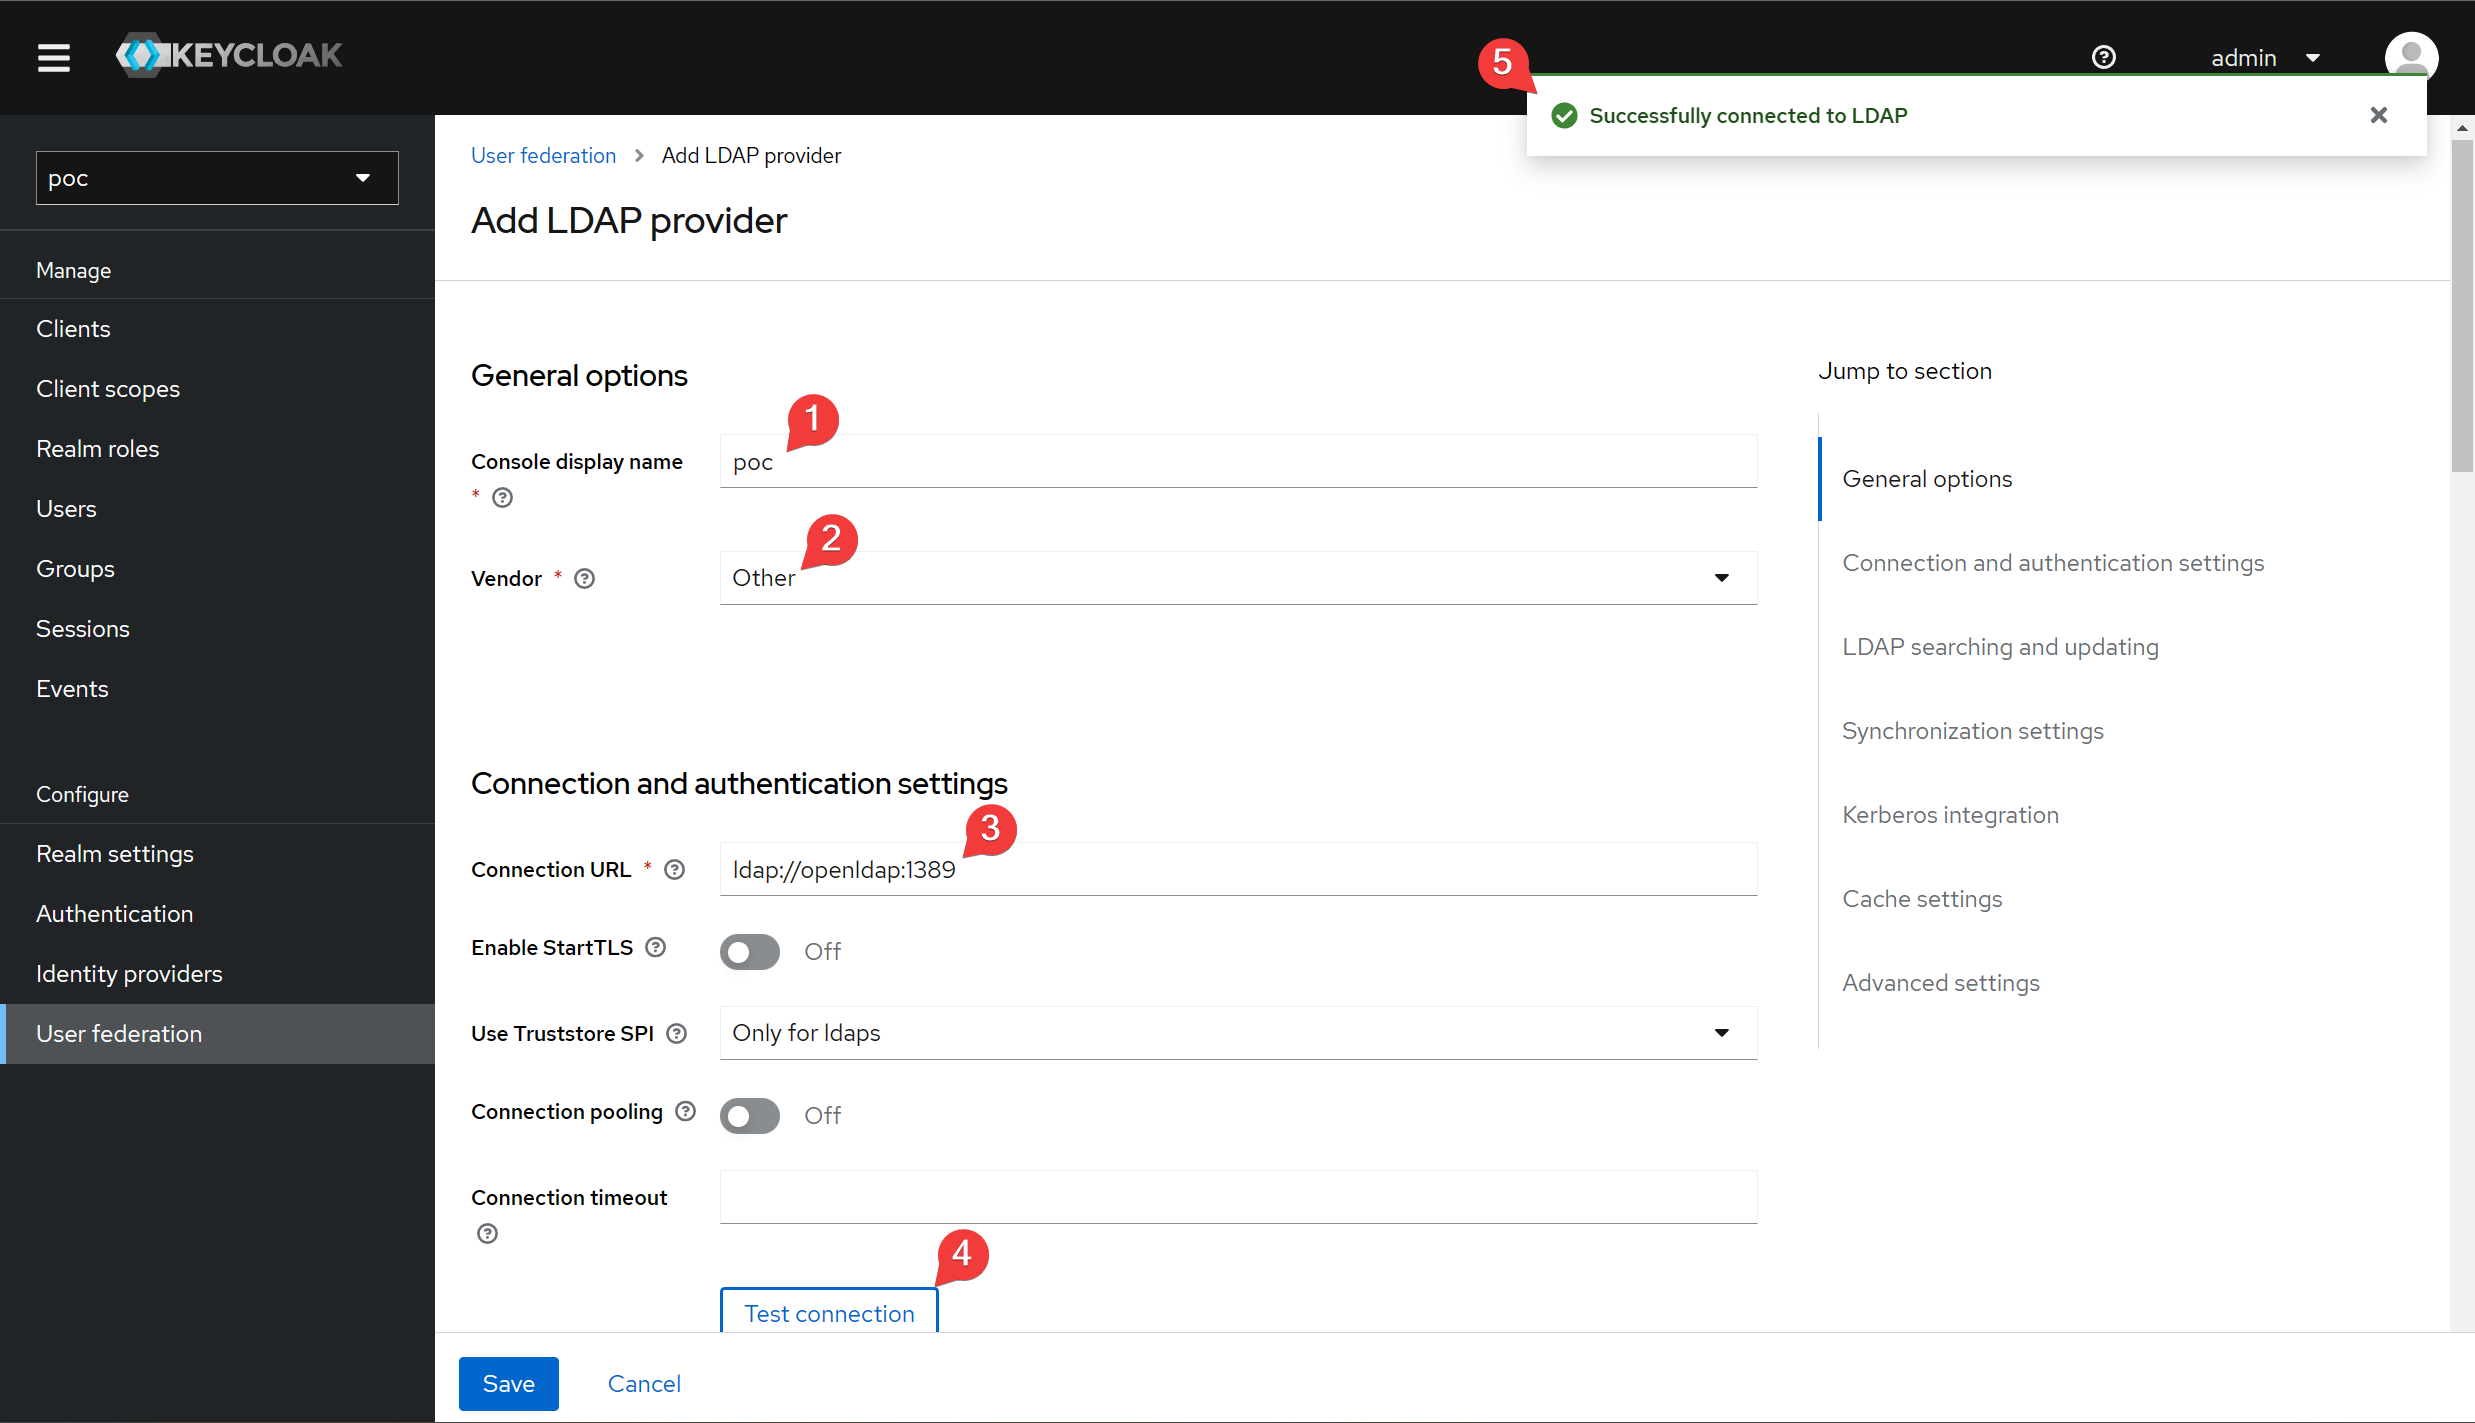
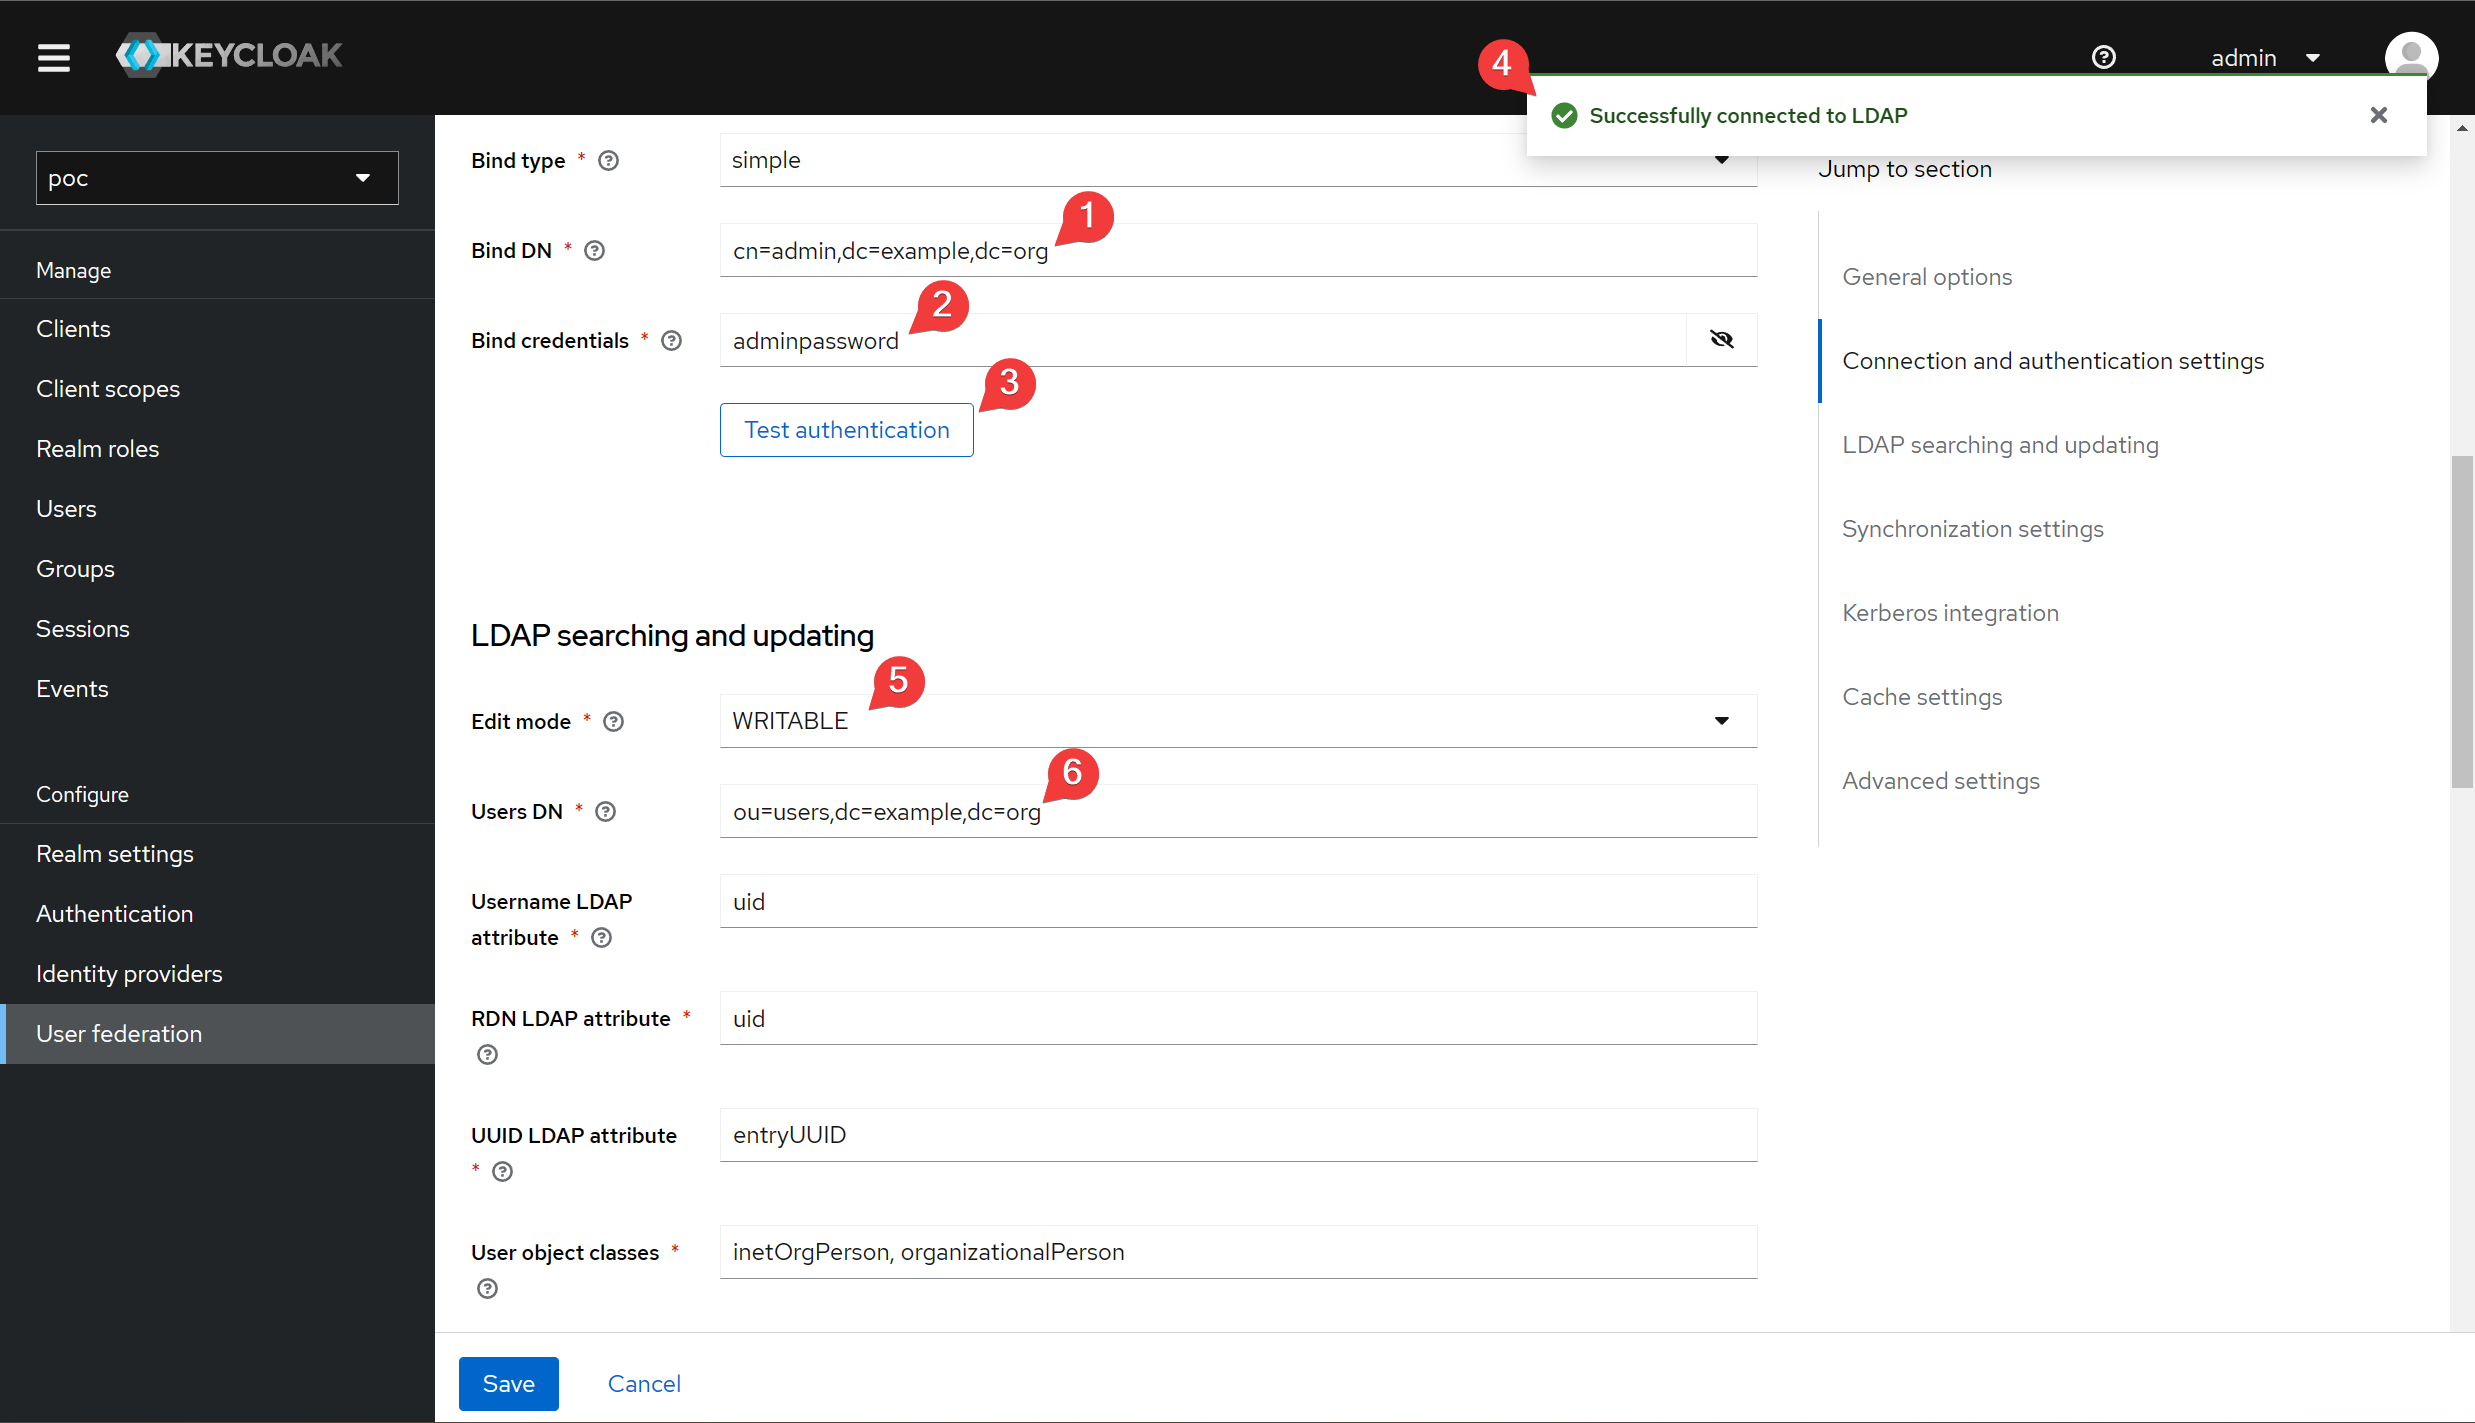
Fill out the form according to the image below.
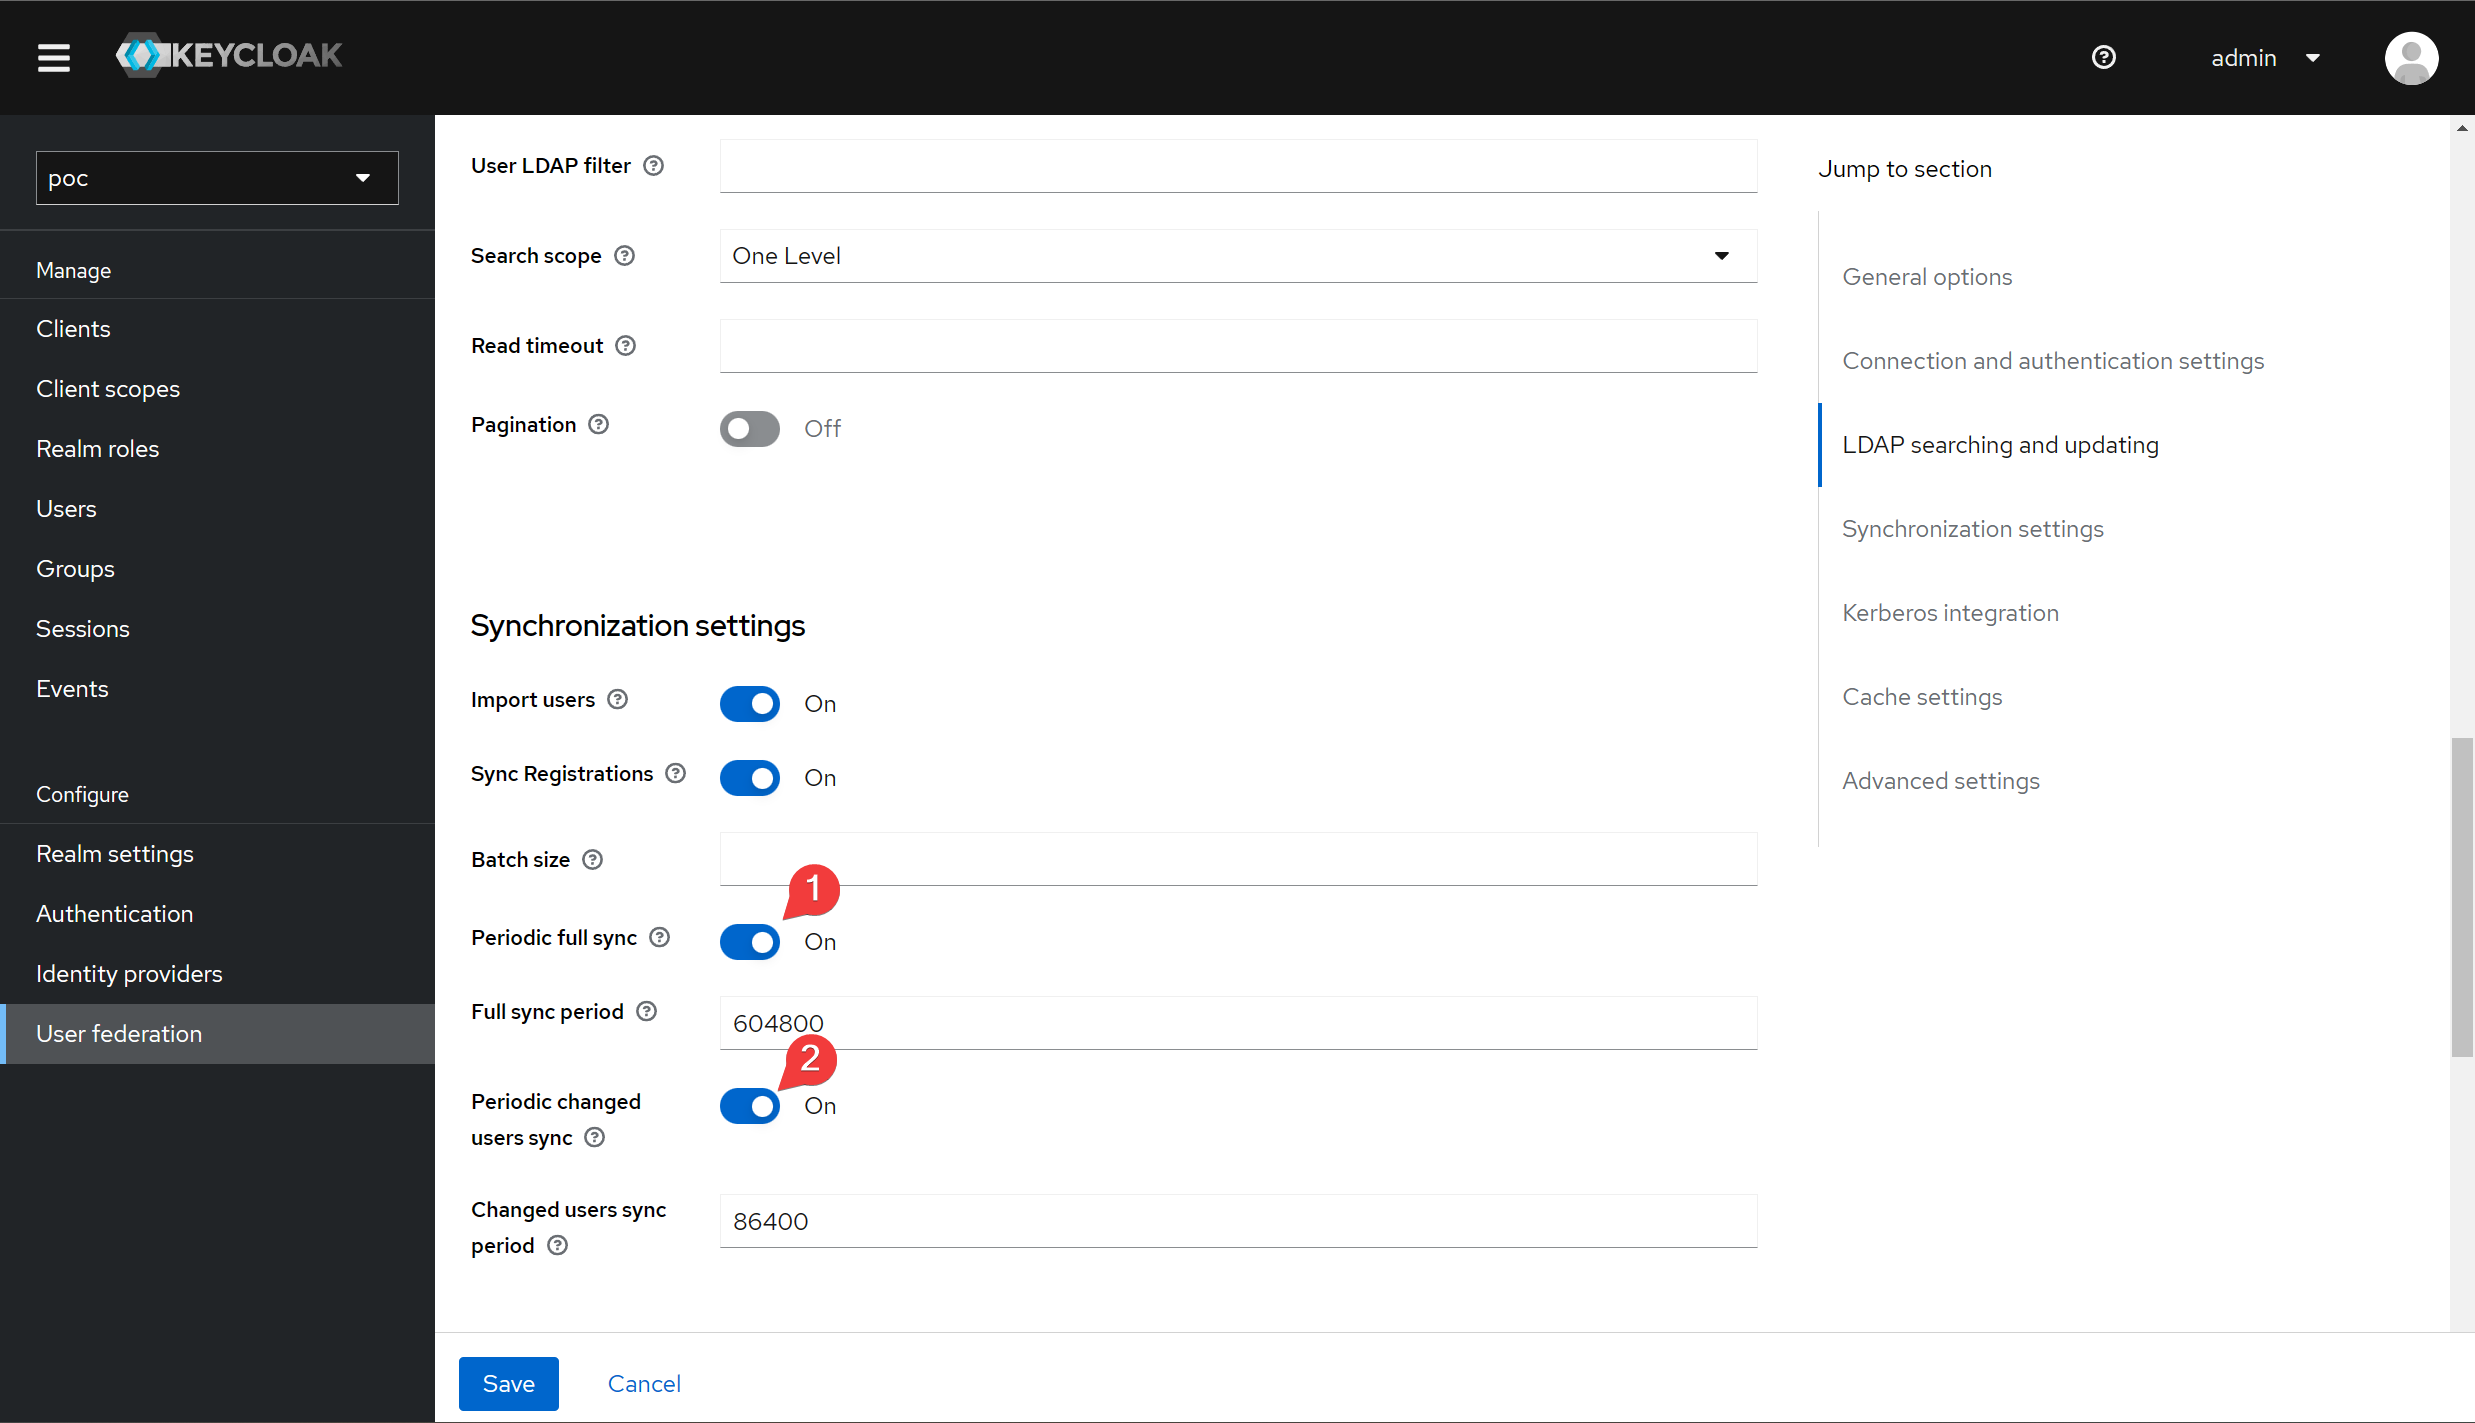
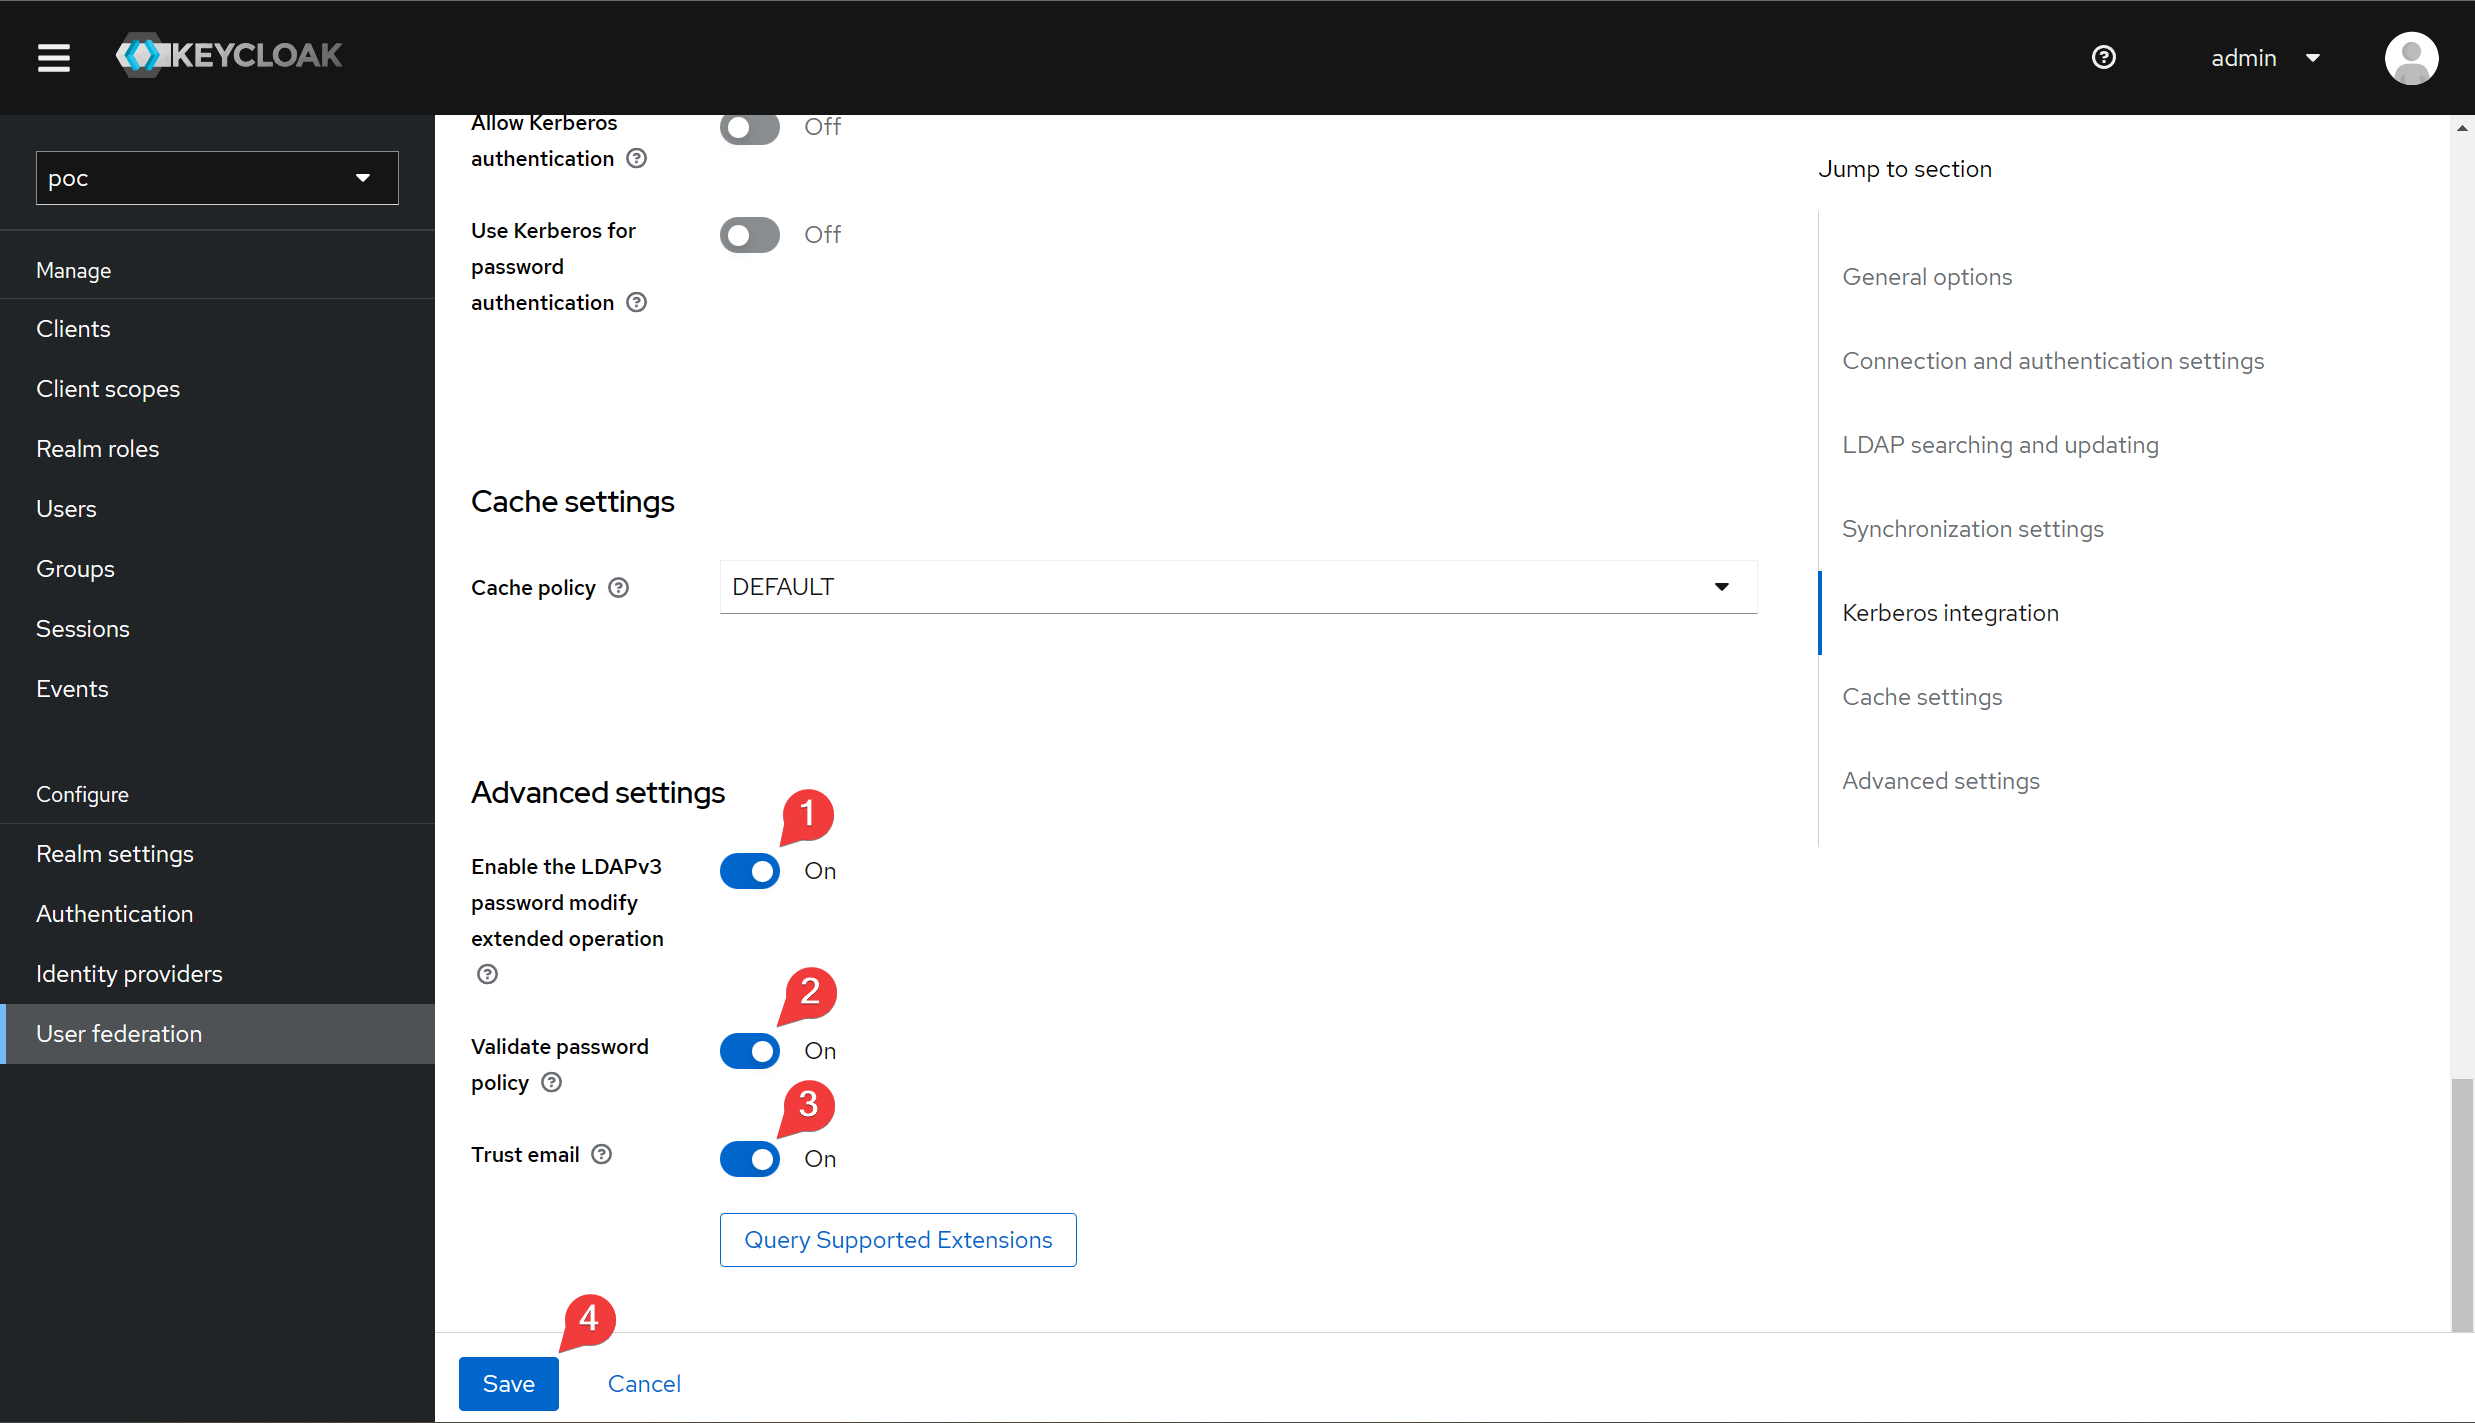
Next, we can query the user to confirm that the integration was successful.
Check users
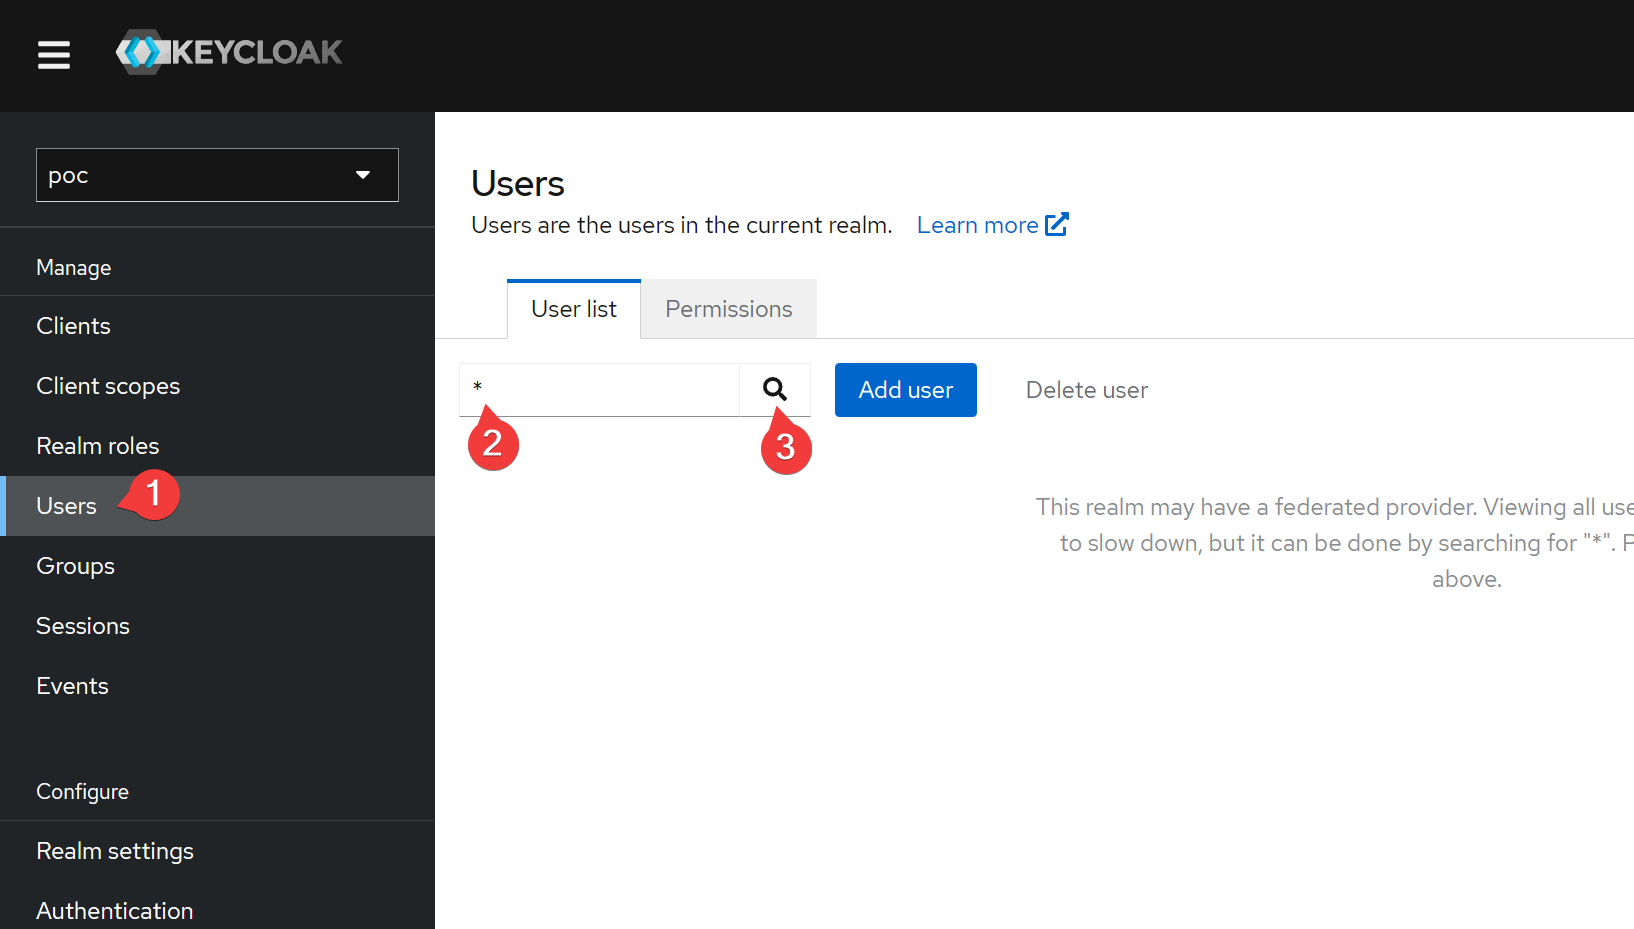
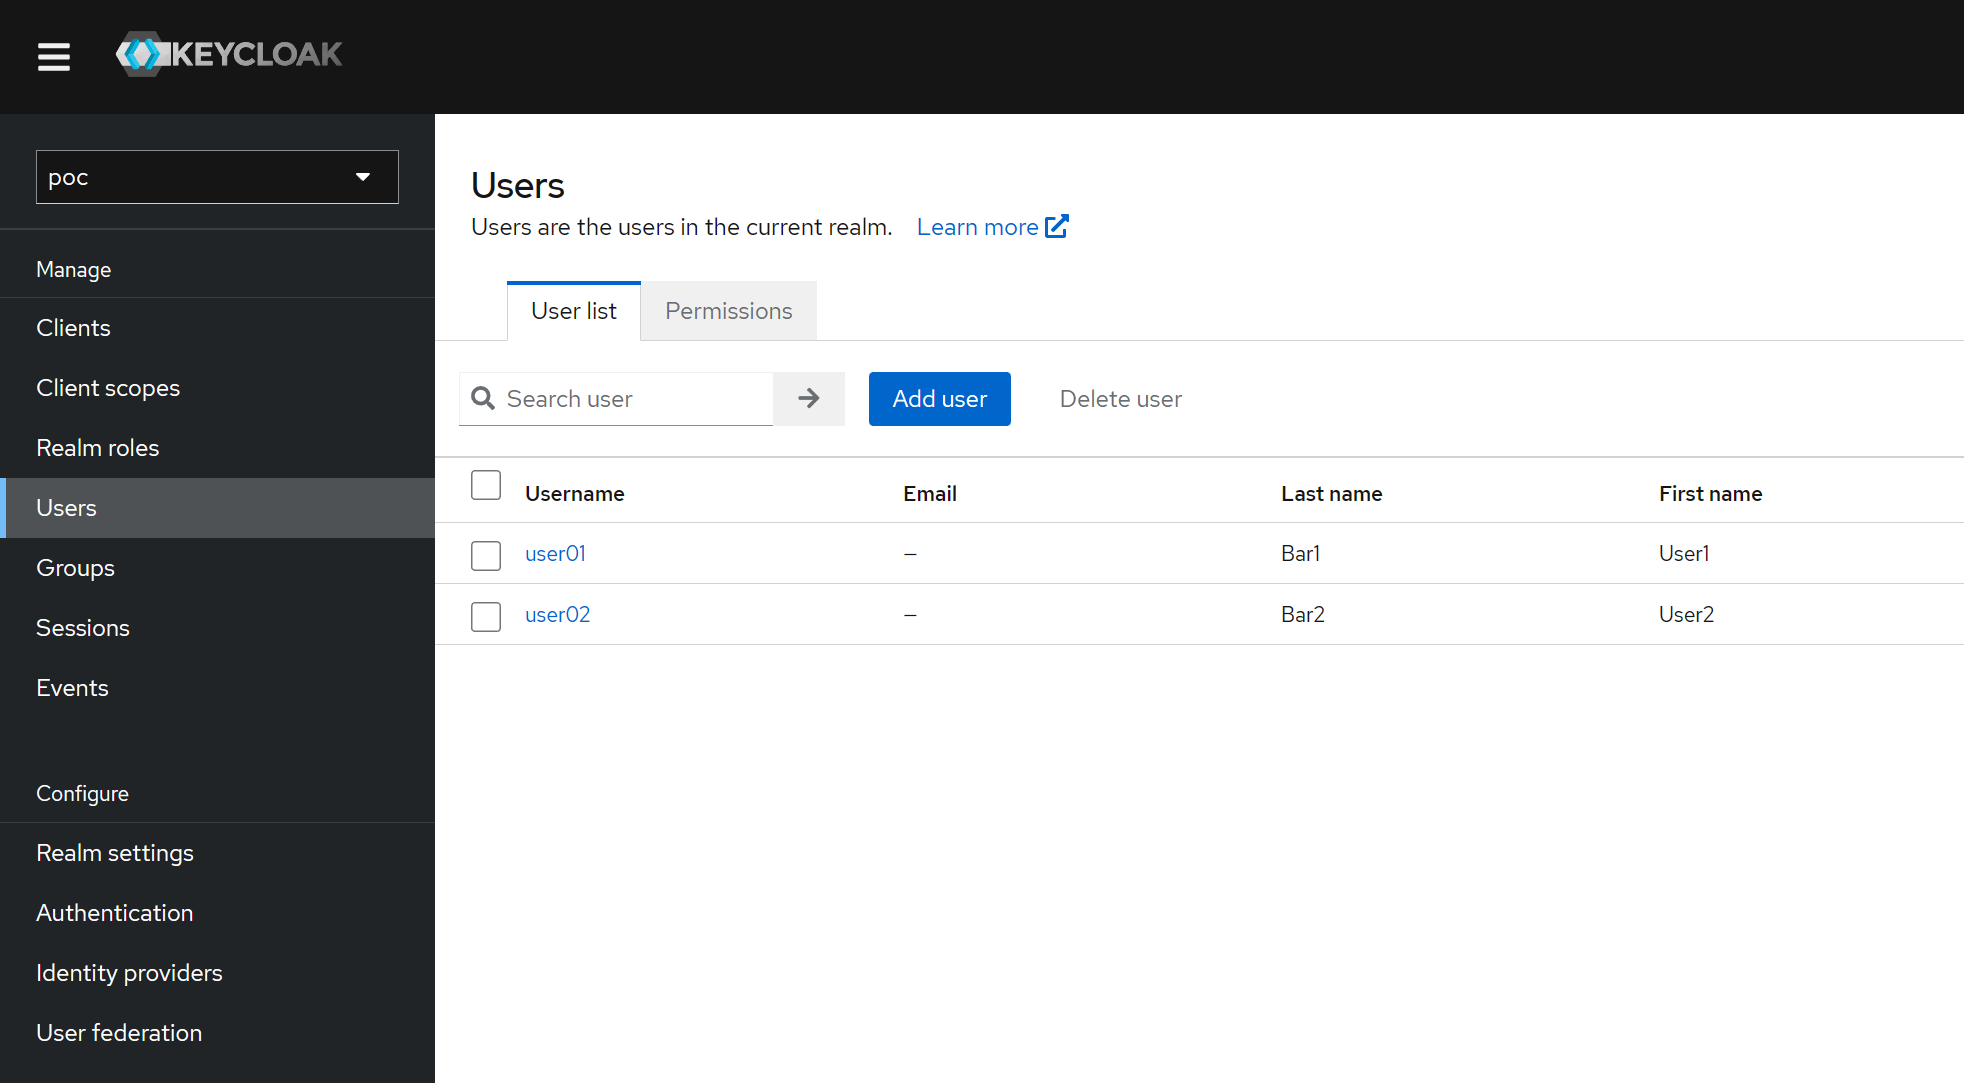
Go to the user list page and search * to get all users from user federation.
Create OAuth2 client
Go to the Clients page and click Create client.
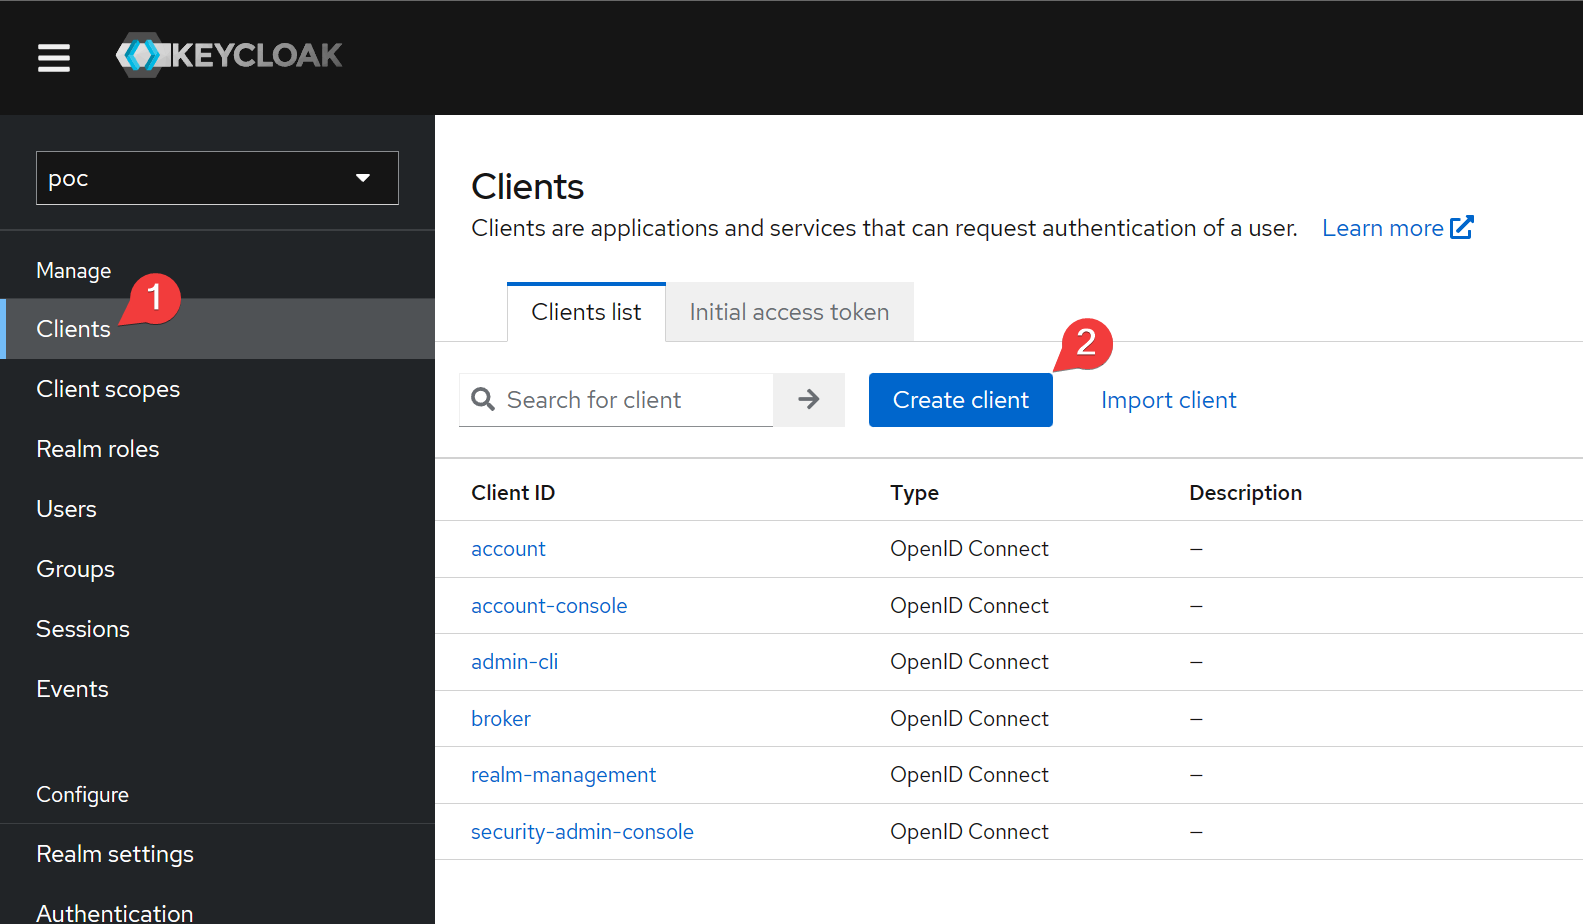
Set the client id.
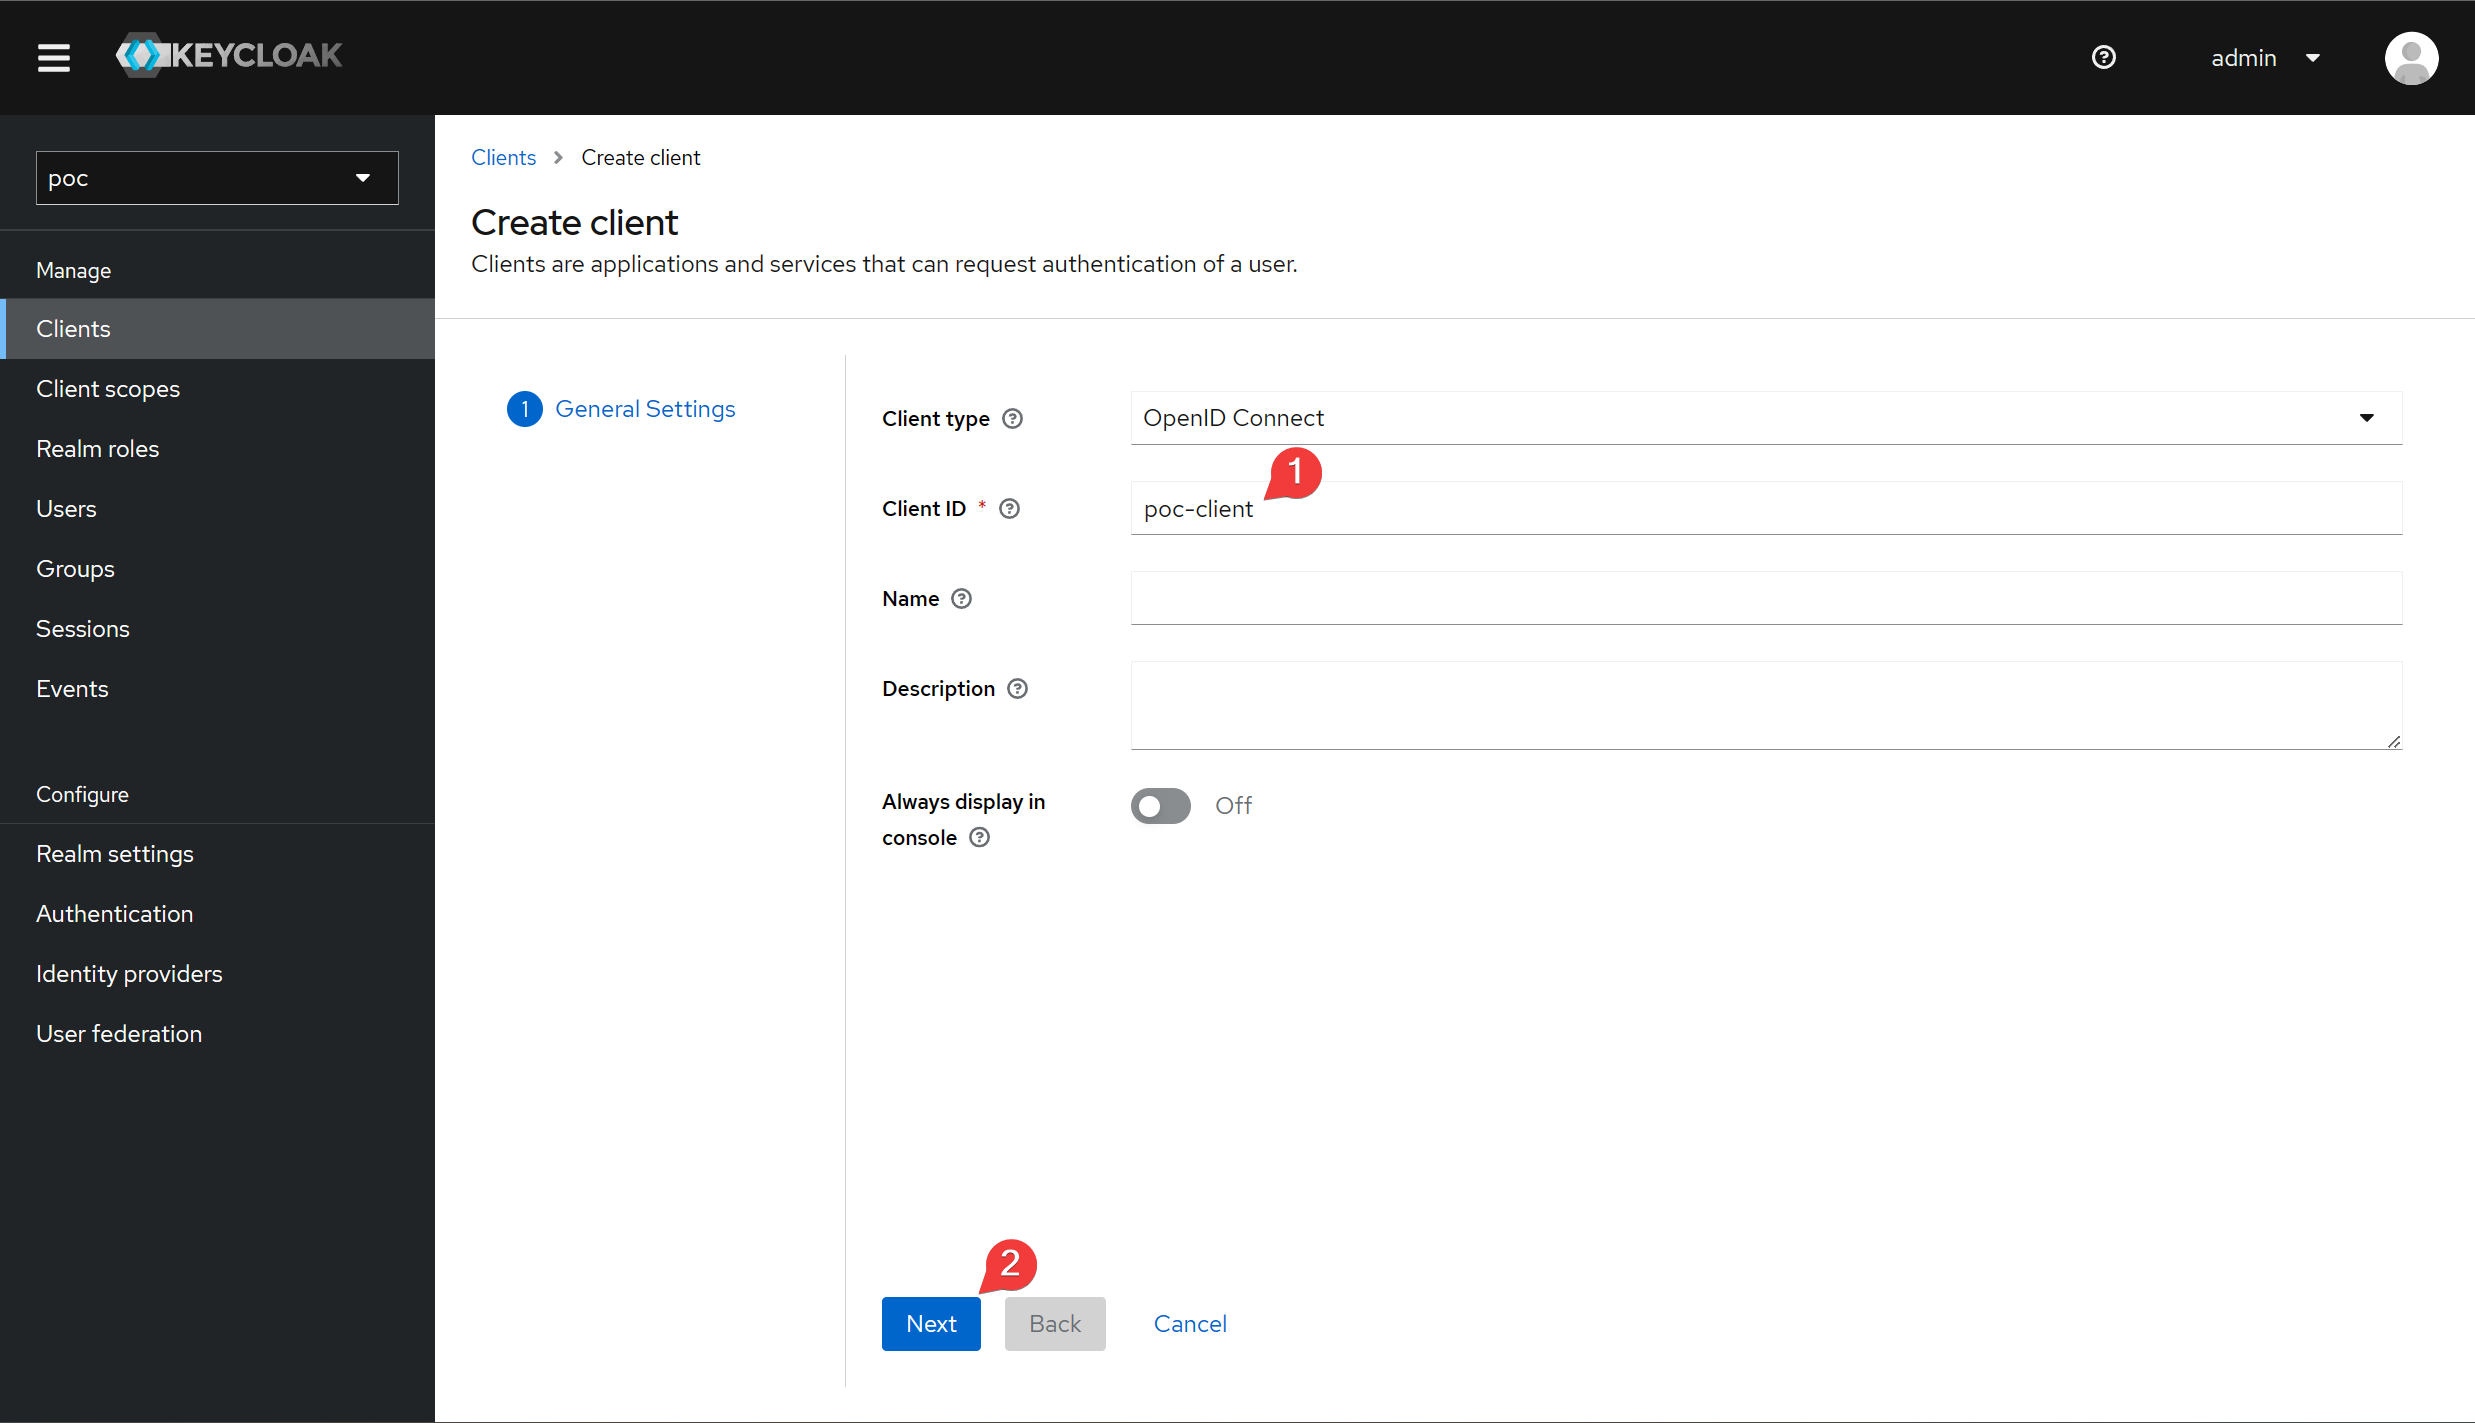
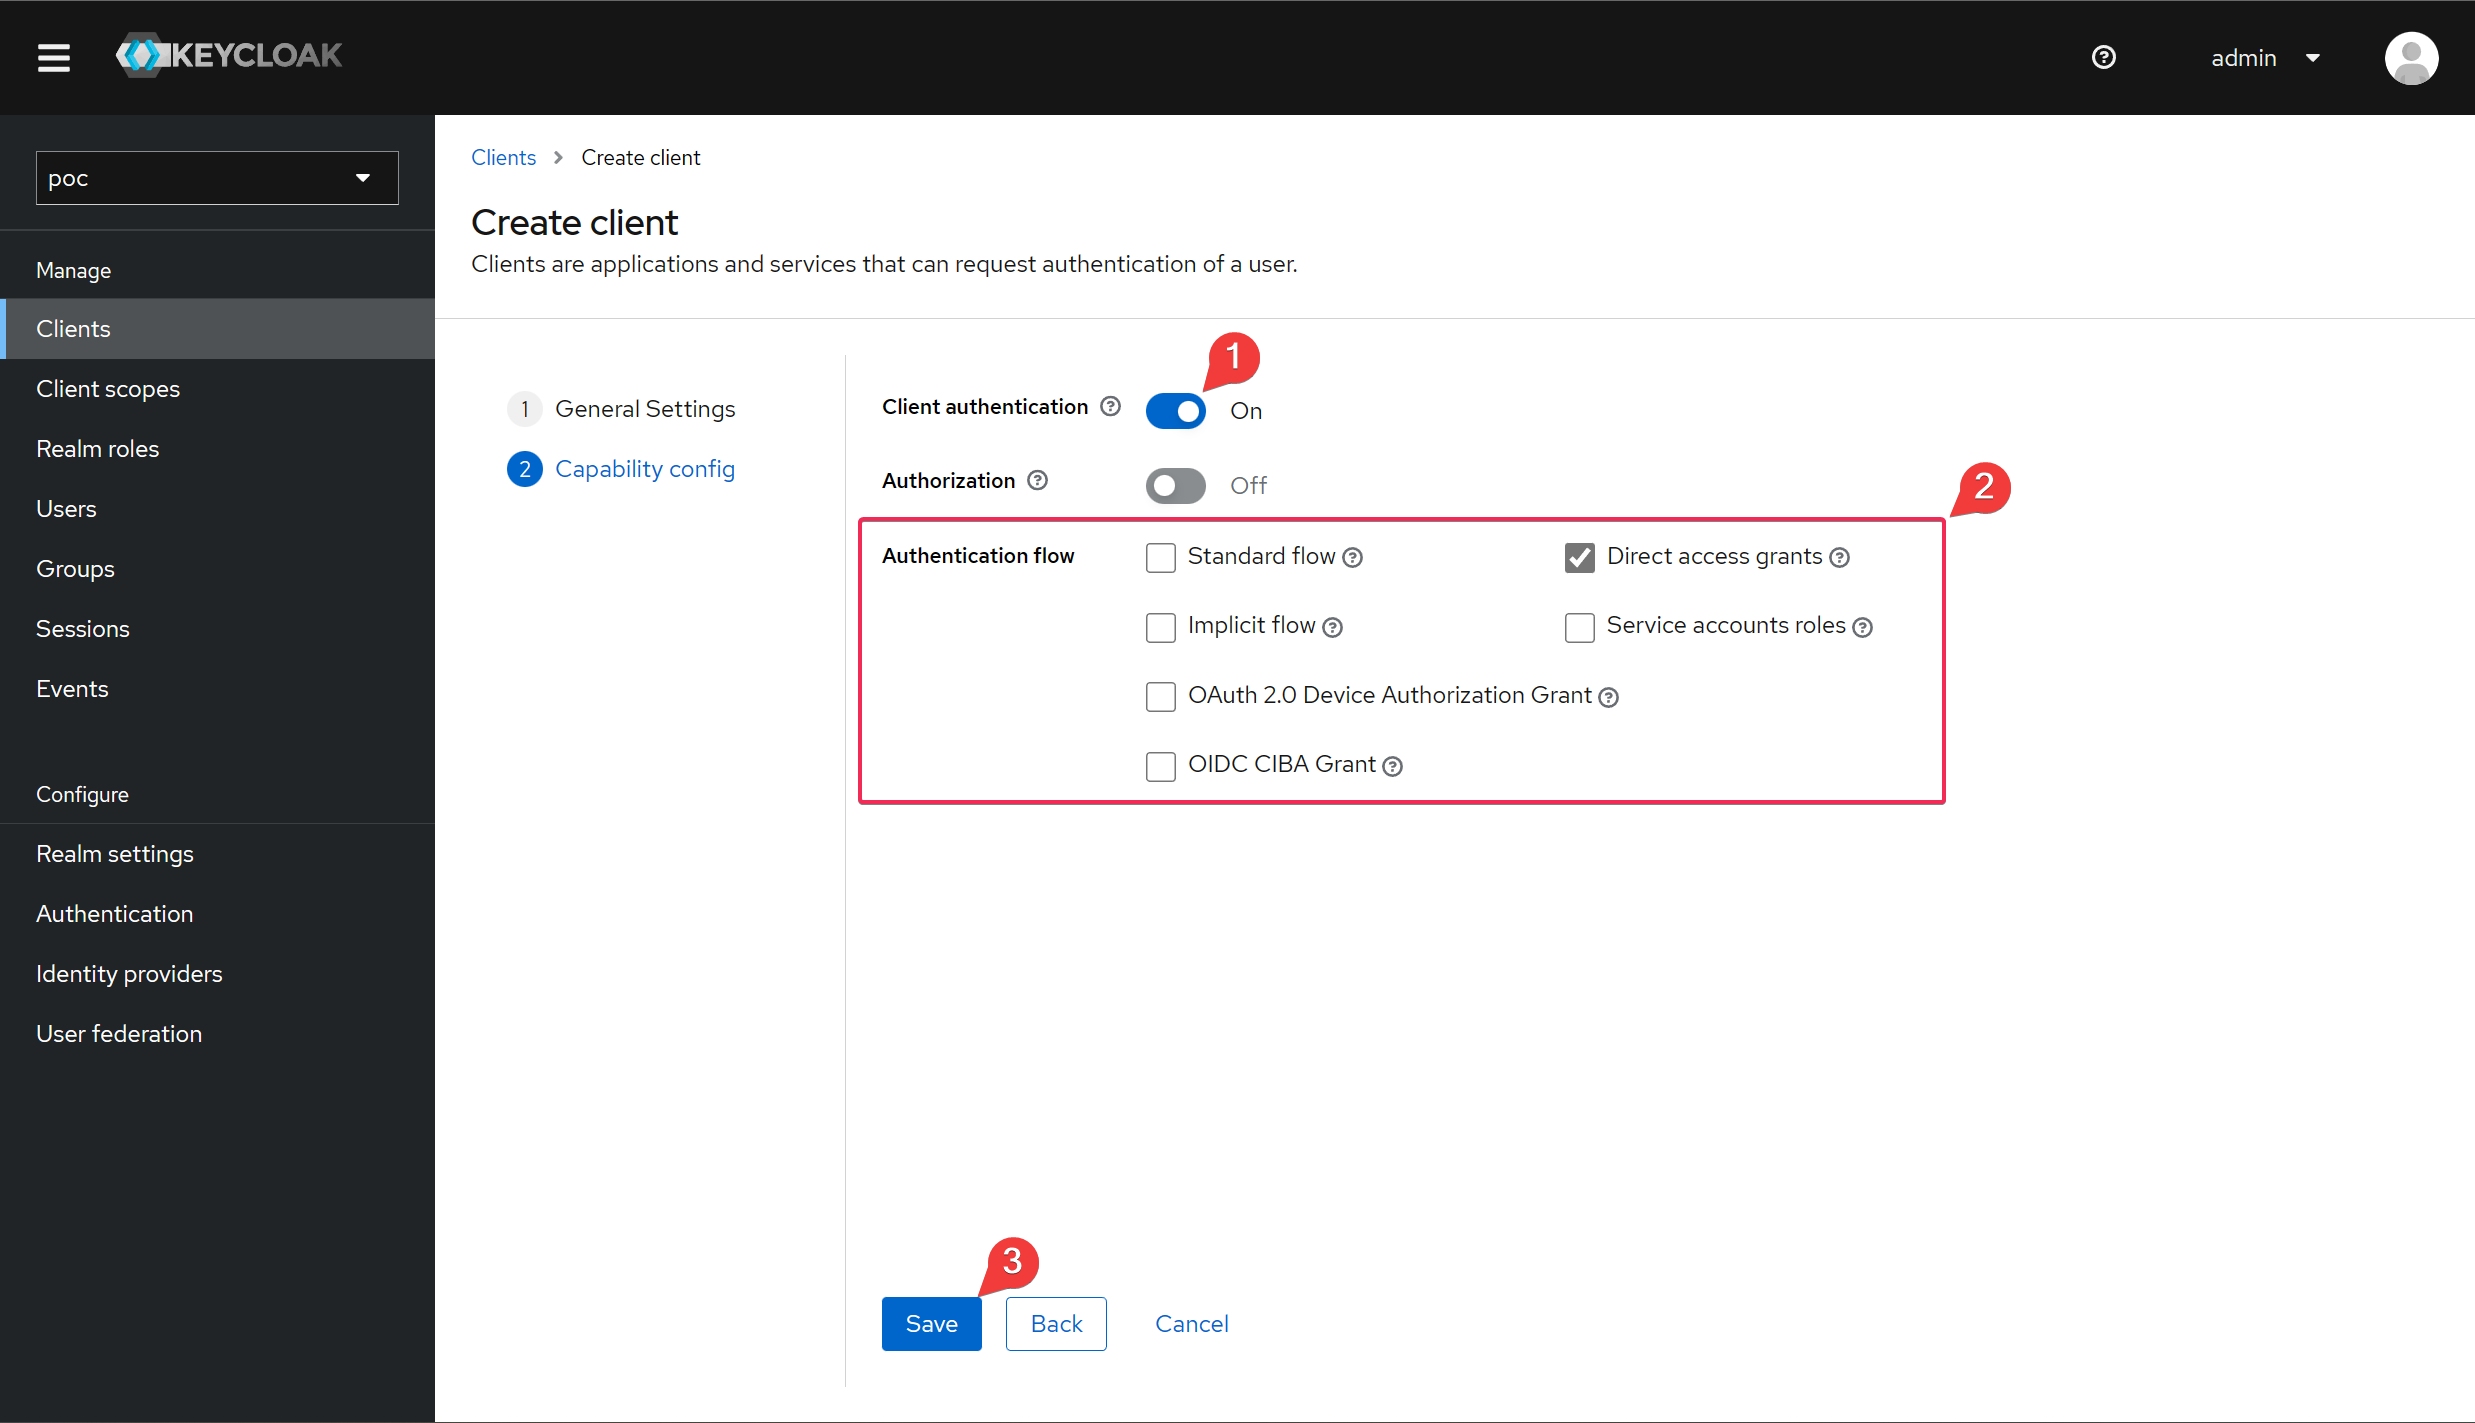
Enables client authentication to ensure that the client is a private application. Next, adjust the authentication flow to keep only the Direct access grant, which represents the Resources Owner Password grant type.
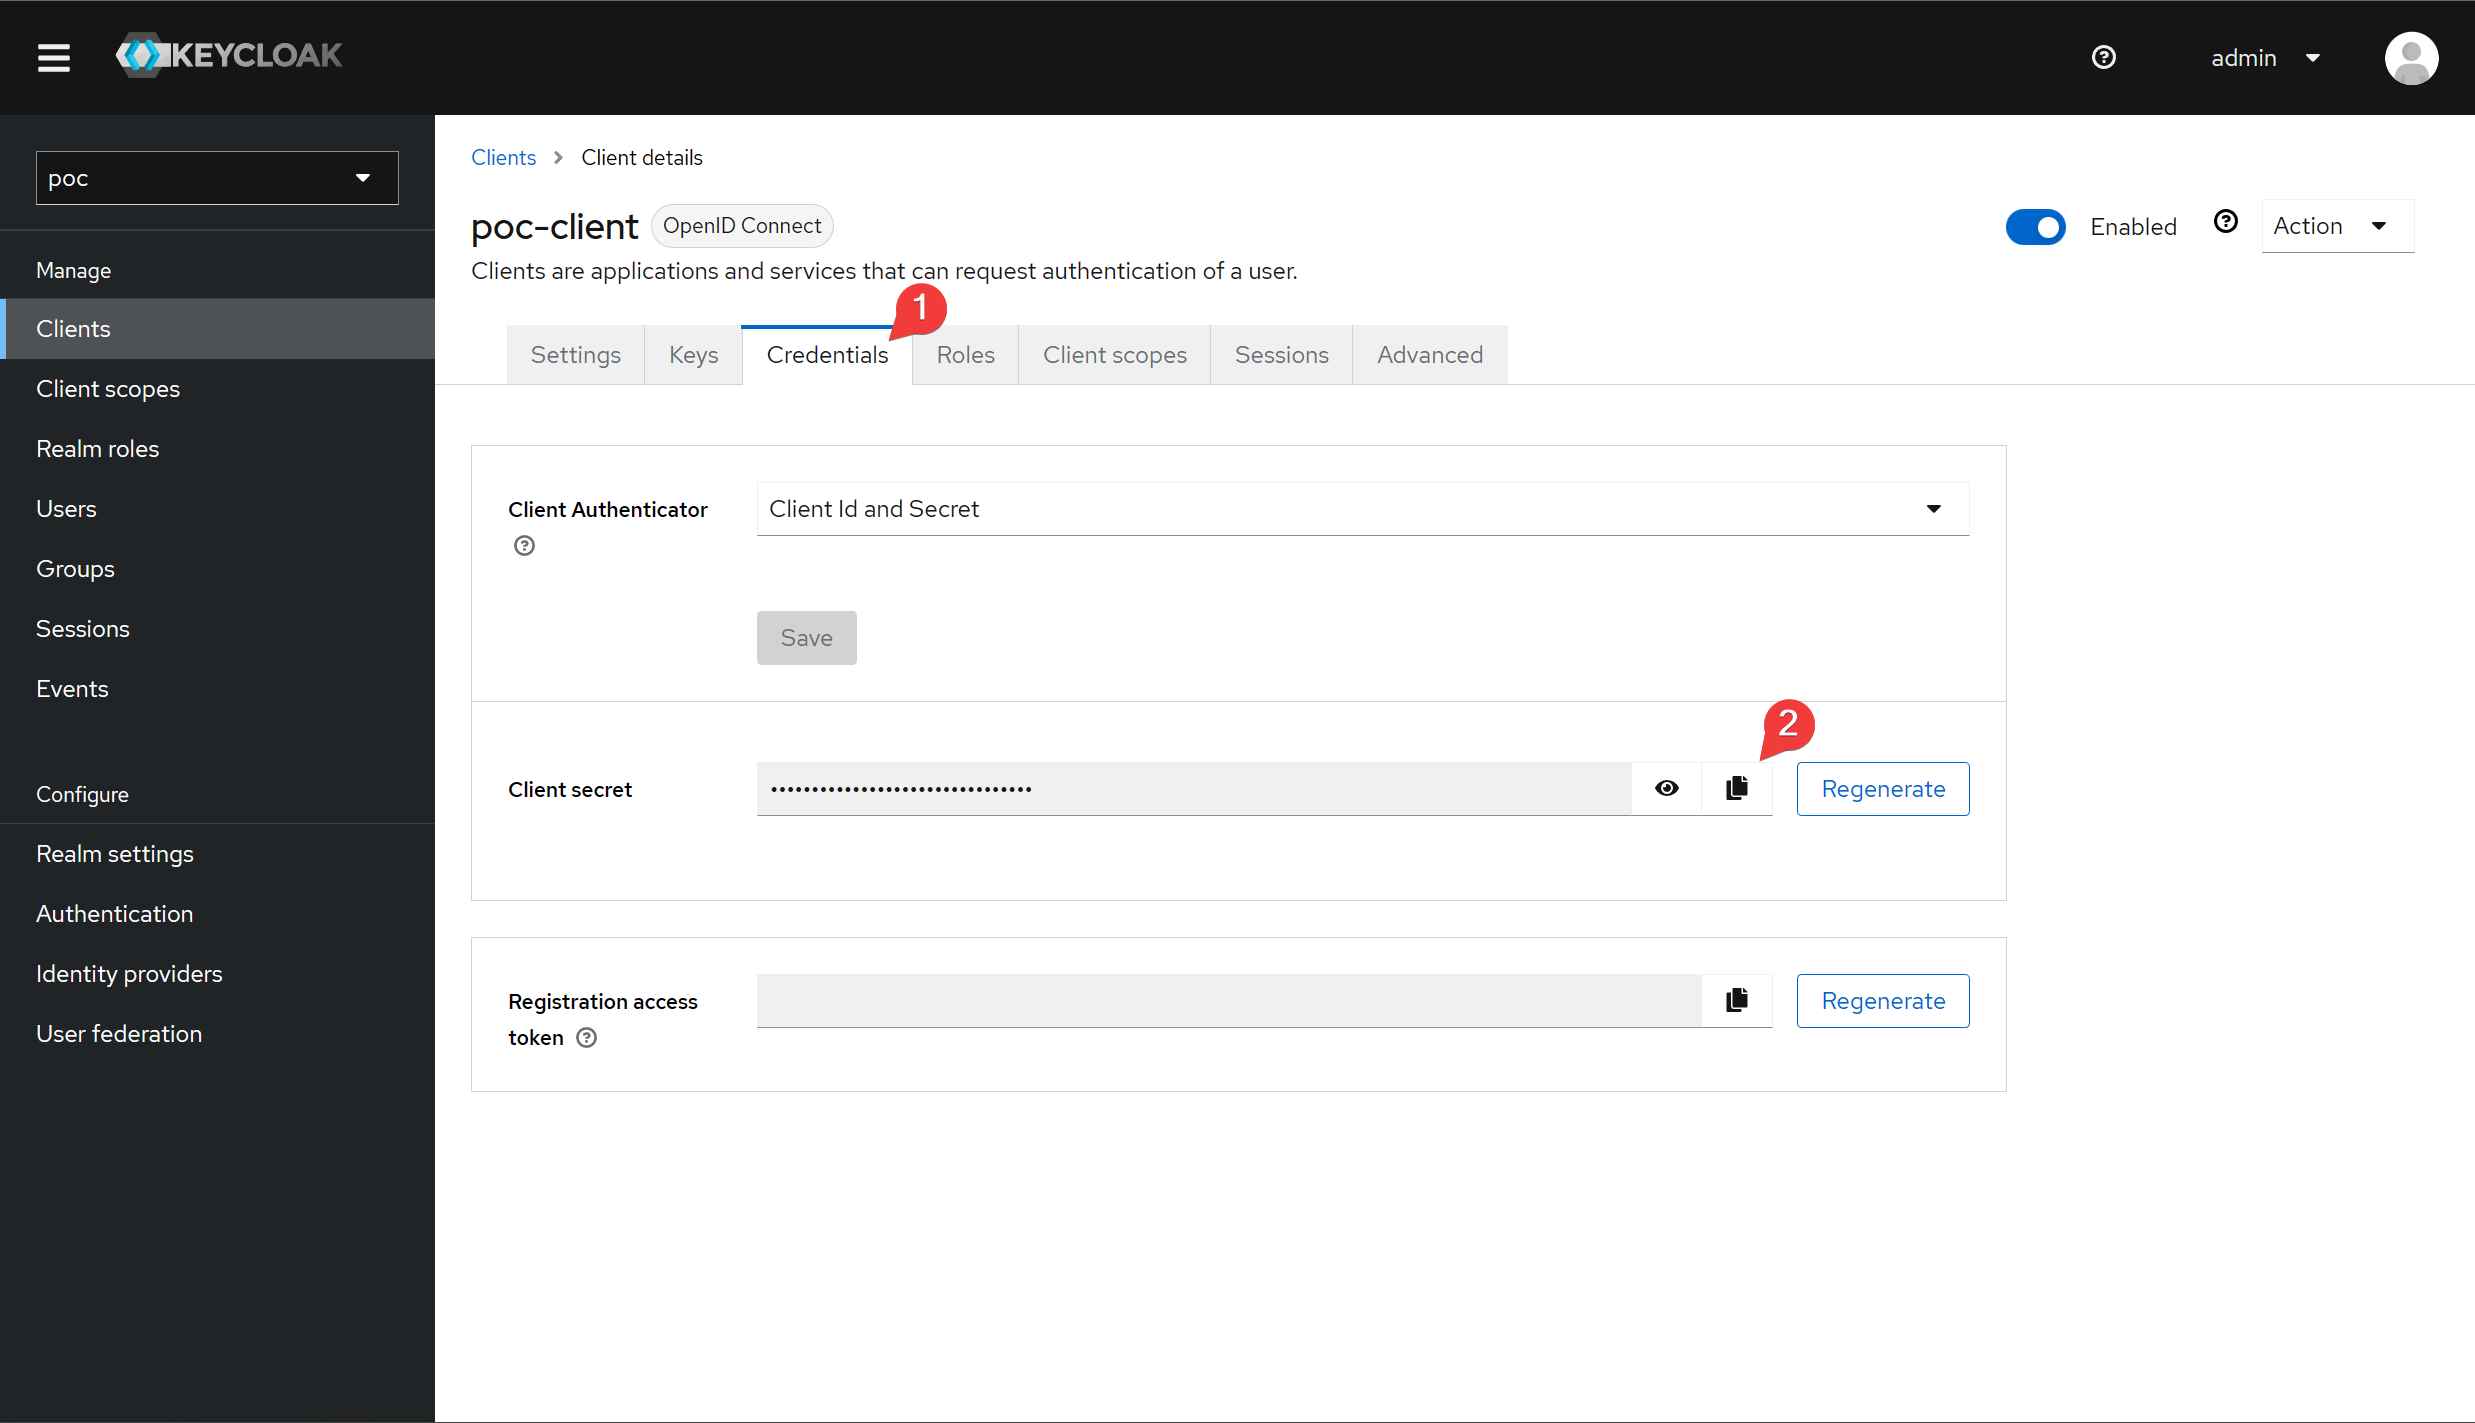
After submitting, go to the client's Credentials tab to get its client secret.
Configure the OpenID Connect plugin
Create a plugin template with the openid-connect plugin enabled with the following configuration as described in API7 EE Introduction.
{
  "bearer_only": true,
  "client_id": "poc-client",
  "client_secret": "<client secret>",
  "discovery": "http://<host or ip>:8080/realms/poc/.well-known/openid-configuration",
  "access_token_in_authorization_header": true,
  "set_access_token_header": false,
  "set_id_token_header": false
}
If we don't want the backend to get the entire UserInfo directly, we can use some programmability to parse and fetch some data and write them to the request header.
The following is an example of an implementation using the serverless plugin, which should not be used in production.
{
  "disable": false,
  "functions": [
    "return function(conf, ctx) local core = require('apisix.core'); local userinfo = core.request.headers()['X-Userinfo']; userinfo = ngx.decode_base64(userinfo); userinfo = core.json.decode(userinfo); core.request.set_header(ctx, 'X-OpenID-Userid', userinfo.sub); core.request.set_header(ctx, 'X-OpenID-Username', userinfo.username); core.request.set_header(ctx, 'X-OpenID-Scope', userinfo.scope); core.request.set_header(ctx, 'X-OpenID-Client', userinfo.client_id); if conf.remove_userinfo_header then; core.request.set_header(ctx, 'X-Userinfo', nil); end; if conf.remove_authorization_header then; core.request.set_header(ctx, 'Authorization', nil); end; end"
  ],
  "phase": "access",
  "remove_authorization_header": true,
  "remove_userinfo_header": true
}
return function(conf, ctx)
    local core = require('apisix.core');
    local userinfo = core.request.headers()['X-Userinfo'];
    userinfo = ngx.decode_base64(userinfo);
    userinfo = core.json.decode(userinfo);
    core.request.set_header(ctx, 'X-OpenID-Userid', userinfo.sub);
    core.request.set_header(ctx, 'X-OpenID-Username', userinfo.username);
    core.request.set_header(ctx, 'X-OpenID-Scope', userinfo.scope);
    core.request.set_header(ctx, 'X-OpenID-Client', userinfo.client_id);
    if conf.remove_userinfo_header then
        core.request.set_header(ctx, 'X-Userinfo', nil)
    end
    if conf.remove_authorization_header then
        core.request.set_header(ctx, 'Authorization', nil)
    end
end
Test
Get access token
curl 'http://<host or ip>:8080/realms/poc/protocol/openid-connect/token' \
-H 'Authorization: Basic <base64 encoded "client_id:client_secret">' \
-H 'Content-Type: application/x-www-form-urlencoded' \
--data-urlencode 'grant_type=password' \
--data-urlencode 'scope=openid profile offline_access' \
--data-urlencode 'username=user01' \
--data-urlencode 'password=password1'
{
    "access_token": "<access_token>",
    "expires_in": 2592000,
    "refresh_expires_in": 0,
    "refresh_token": "<refresh_token>",
    "token_type": "Bearer",
    "id_token": "<id_token>",
    "not-before-policy": 0,
    "session_state": "4dd98db0-2328-4666-8f59-adb2d8b21008",
    "scope": "openid offline_access profile email"
}
Access the API
curl 'http://<host or ip>:80/anything' --header 'Host: example.com' --oauth2-bearer "<access_token>"
{
  "args": {},
  "data": "",
  "files": {},
  "form": {},
  "headers": {
    "Accept": "*/*",
    "Authorization": "Bearer eyJhbGciOiJSUzI1NiIsInR5cCIgOiAiSldUIiwia2lkIiA6ICJabGZXNWtHY25IWUV5TG5XMEpFcEd6bU00Vi1ZTEdBYzVFaXU1Y2lxbmpVIn0.eyJleHAiOjE2ODE2Mzc2NzEsImlhdCI6MTY3OTA0NTY3MSwianRpIjoiY2E5NmY4ZDctMTA4NS00YmZkLTlkZGUtZjdjZTllZWM0Mjc5IiwiaXNzIjoiaHR0cDovLzE0Ni4xOTAuODAuNjU6ODA4MC9yZWFsbXMvcG9jIiwiYXVkIjoiYWNjb3VudCIsInN1YiI6IjFhMDgyZTBkLWNkNGYtNDQ2YS05MzZhLWQ4YjE2MzgwMzczMiIsInR5cCI6IkJlYXJlciIsImF6cCI6InBvYy1jbGllbnQiLCJzZXNzaW9uX3N0YXRlIjoiNGRkOThkYjAtMjMyOC00NjY2LThmNTktYWRiMmQ4YjIxMDA4IiwiYWNyIjoiMSIsInJlYWxtX2FjY2VzcyI6eyJyb2xlcyI6WyJkZWZhdWx0LXJvbGVzLXBvYyIsIm9mZmxpbmVfYWNjZXNzIiwidW1hX2F1dGhvcml6YXRpb24iXX0sInJlc291cmNlX2FjY2VzcyI6eyJhY2NvdW50Ijp7InJvbGVzIjpbIm1hbmFnZS1hY2NvdW50IiwibWFuYWdlLWFjY291bnQtbGlua3MiLCJ2aWV3LXByb2ZpbGUiXX19LCJzY29wZSI6Im9wZW5pZCBvZmZsaW5lX2FjY2VzcyBwcm9maWxlIGVtYWlsIiwic2lkIjoiNGRkOThkYjAtMjMyOC00NjY2LThmNTktYWRiMmQ4YjIxMDA4IiwiZW1haWxfdmVyaWZpZWQiOnRydWUsIm5hbWUiOiJVc2VyMSBCYXIxIiwicHJlZmVycmVkX3VzZXJuYW1lIjoidXNlcjAxIiwiZ2l2ZW5fbmFtZSI6IlVzZXIxIiwiZmFtaWx5X25hbWUiOiJCYXIxIn0.hs7-VA6WVYYDZNZqvV86iKhMnhvrOsmZo9X5TODnAtwof4biVFdFUcwybg1uPECyxJ9SIfbLqJqj0zJ_l8WxKESxD1fzWaL1cBDtcUUXhyVvX43yTO8nZq_WjUmDBwdxYc2ZqflP5r9O4_mVBrVslHgbRLqeOcsFMymKYPOiKw65lO1bxwhH2LwJ2MosjVRVlQ2vV6hroimNX4WGAqSRKvYXfFhDlj6Q0Izfru2uCgBetg5xVkGTY_gpItP9TRqW3_crmkEauHQQwHwtab3kevb6kT2UXsQEwF7-sn60KgqnhW35RLl5-WkXstyfWFMaNsvkA4oKykNnea_y_HBe-w",
    "Host": "example.com",
    "User-Agent": "curl/7.81.0",
    "X-Amzn-Trace-Id": "Root=1-64143817-77e0c7c372b6b9e70d74d162",
    "X-Forwarded-Host": "example.com",
    "X-Userinfo": "eyJlbWFpbF92ZXJpZmllZCI6dHJ1ZSwicmVhbG1fYWNjZXNzIjp7InJvbGVzIjpbImRlZmF1bHQtcm9sZXMtcG9jIiwib2ZmbGluZV9hY2Nlc3MiLCJ1bWFfYXV0aG9yaXphdGlvbiJdfSwidHlwIjoiQmVhcmVyIiwic3ViIjoiMWEwODJlMGQtY2Q0Zi00NDZhLTkzNmEtZDhiMTYzODAzNzMyIiwiZmFtaWx5X25hbWUiOiJCYXIxIiwiYWNyIjoiMSIsInNpZCI6IjRkZDk4ZGIwLTIzMjgtNDY2Ni04ZjU5LWFkYjJkOGIyMTAwOCIsInNjb3BlIjoib3BlbmlkIG9mZmxpbmVfYWNjZXNzIHByb2ZpbGUgZW1haWwiLCJhenAiOiJwb2MtY2xpZW50IiwiYWN0aXZlIjp0cnVlLCJyZXNvdXJjZV9hY2Nlc3MiOnsiYWNjb3VudCI6eyJyb2xlcyI6WyJtYW5hZ2UtYWNjb3VudCIsIm1hbmFnZS1hY2NvdW50LWxpbmtzIiwidmlldy1wcm9maWxlIl19fSwibmFtZSI6IlVzZXIxIEJhcjEiLCJwcmVmZXJyZWRfdXNlcm5hbWUiOiJ1c2VyMDEiLCJpYXQiOjE2NzkwNDU2NzEsImF1ZCI6ImFjY291bnQiLCJpc3MiOiJodHRwOlwvXC8xNDYuMTkwLjgwLjY1OjgwODBcL3JlYWxtc1wvcG9jIiwiY2xpZW50X2lkIjoicG9jLWNsaWVudCIsImp0aSI6ImNhOTZmOGQ3LTEwODUtNGJmZC05ZGRlLWY3Y2U5ZWVjNDI3OSIsInNlc3Npb25fc3RhdGUiOiI0ZGQ5OGRiMC0yMzI4LTQ2NjYtOGY1OS1hZGIyZDhiMjEwMDgiLCJnaXZlbl9uYW1lIjoiVXNlcjEiLCJ1c2VybmFtZSI6InVzZXIwMSIsImV4cCI6MTY4MTYzNzY3MX0="
  },
  "json": null,
  "method": "GET",
  "origin": "113.118.187.217, 146.190.80.65",
  "url": "https://example.com/anything"
}
You can see that according to the configuration, the Access Token sent by the user is verified and the UserInfo is also sent upstream.
Access the API with Lua code snippet
curl 'http://<host or ip>:80/anything' --header 'Host: example.com' --oauth2-bearer "<access_token>"
{
  "args": {},
  "data": "",
  "files": {},
  "form": {},
  "headers": {
    "Accept": "*/*",
    "Host": "example.com",
    "User-Agent": "curl/7.81.0",
    "X-Amzn-Trace-Id": "Root=1-64143976-4d40eb4f7a2dda8108042d30",
    "X-Forwarded-Host": "example.com",
    "X-Openid-Client": "poc-client",
    "X-Openid-Scope": "openid offline_access profile email",
    "X-Openid-Userid": "1a082e0d-cd4f-446a-936a-d8b163803732",
    "X-Openid-Username": "user01"
  },
  "json": null,
  "method": "GET",
  "origin": "113.118.187.217, 146.190.80.65",
  "url": "https://example.com/anything"
}
You can see that some of the UserInfo fields have been extracted and written to the request header, while the Authorization header and X-Userinfo have been removed.