LDAP
Set up API Gateway with LDAP
Setting up Apache APISIX or API7 Enterprise with LDAP authentication is relatively straightforward. It only requires adding some simple LDAP parameters to the API Gateway's configurations. This allows you to authenticate users quickly and securely.
In this post, we will use API7 Enterprise as an API Gateway and the Simple Bind Authentication method of LDAP. This way, LDAP clients only need to provide the correct username and password.
Connect to VM
In this post, I’m using the Virtual Machine (2 Cores, 4 GB Memory, Ubuntu 20) with IP 43.154.201.123.
$ ssh ubuntu@43.154.201.123
Install API7 Enterprise
API7 Enterprise is the On-Premises, Enterprise-grade API management platform based on Apache APISIX.
- Download API7 Enterprise from here
- Follow the instructions to start API7 Enterprise
$ docker pull api7/api7-ee:2.13.2304

$ docker run -d --name api7-ee -p 80:80 -p 443:443 -p 9000:9000 api7/api7-ee:2.13.2304
- Visit
http://43.154.201.123:9000and upload your License to activate API7 Enterprise
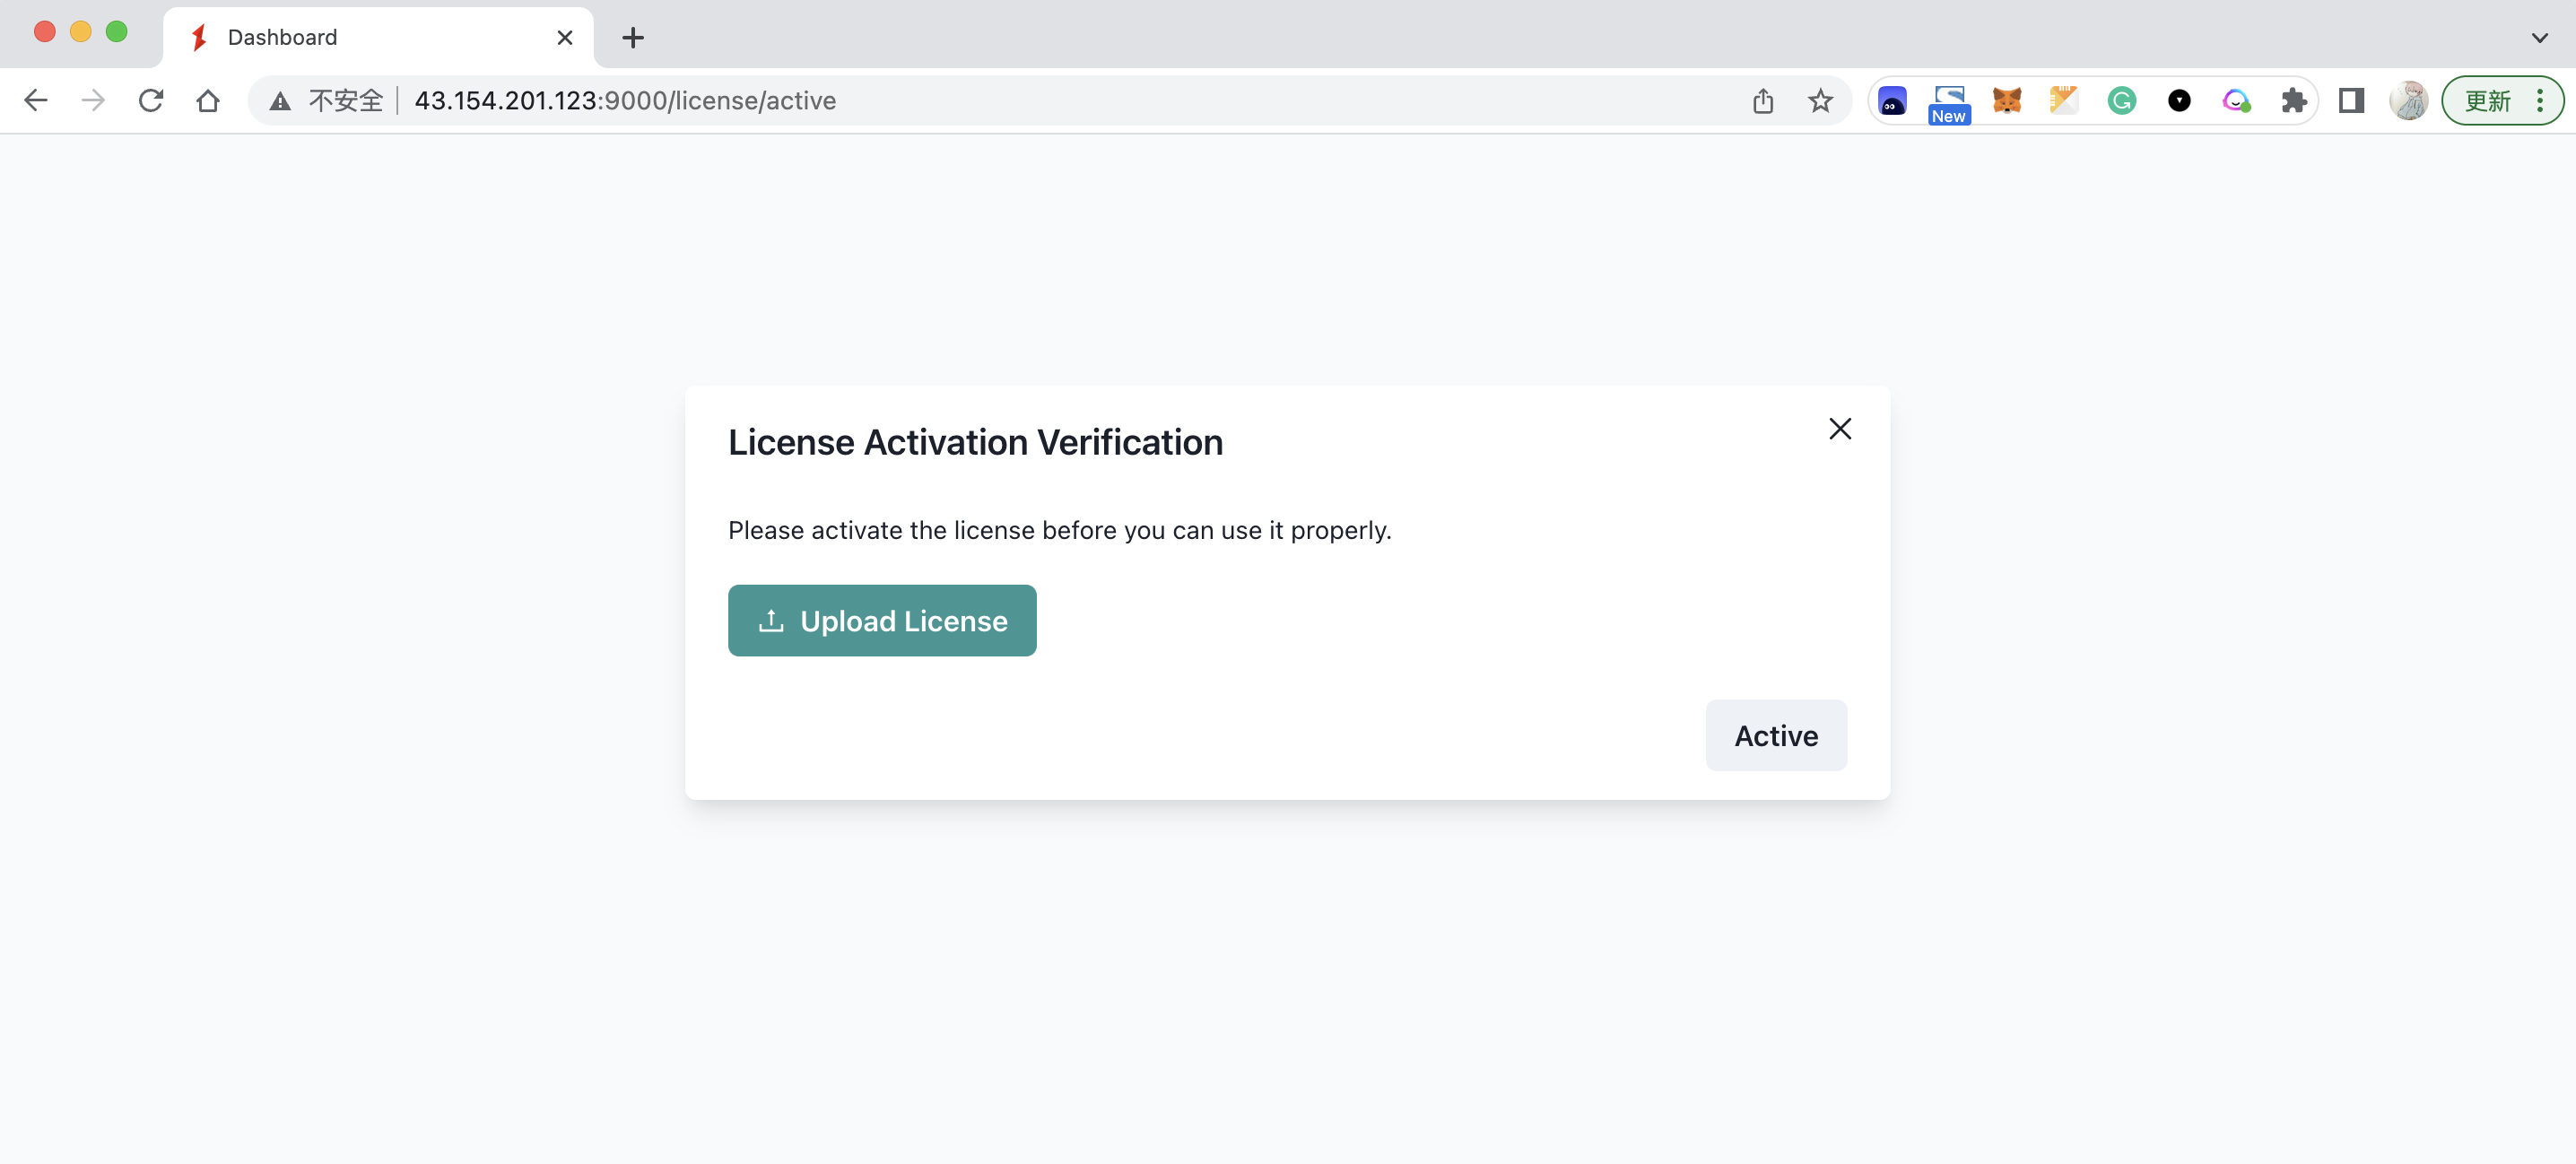
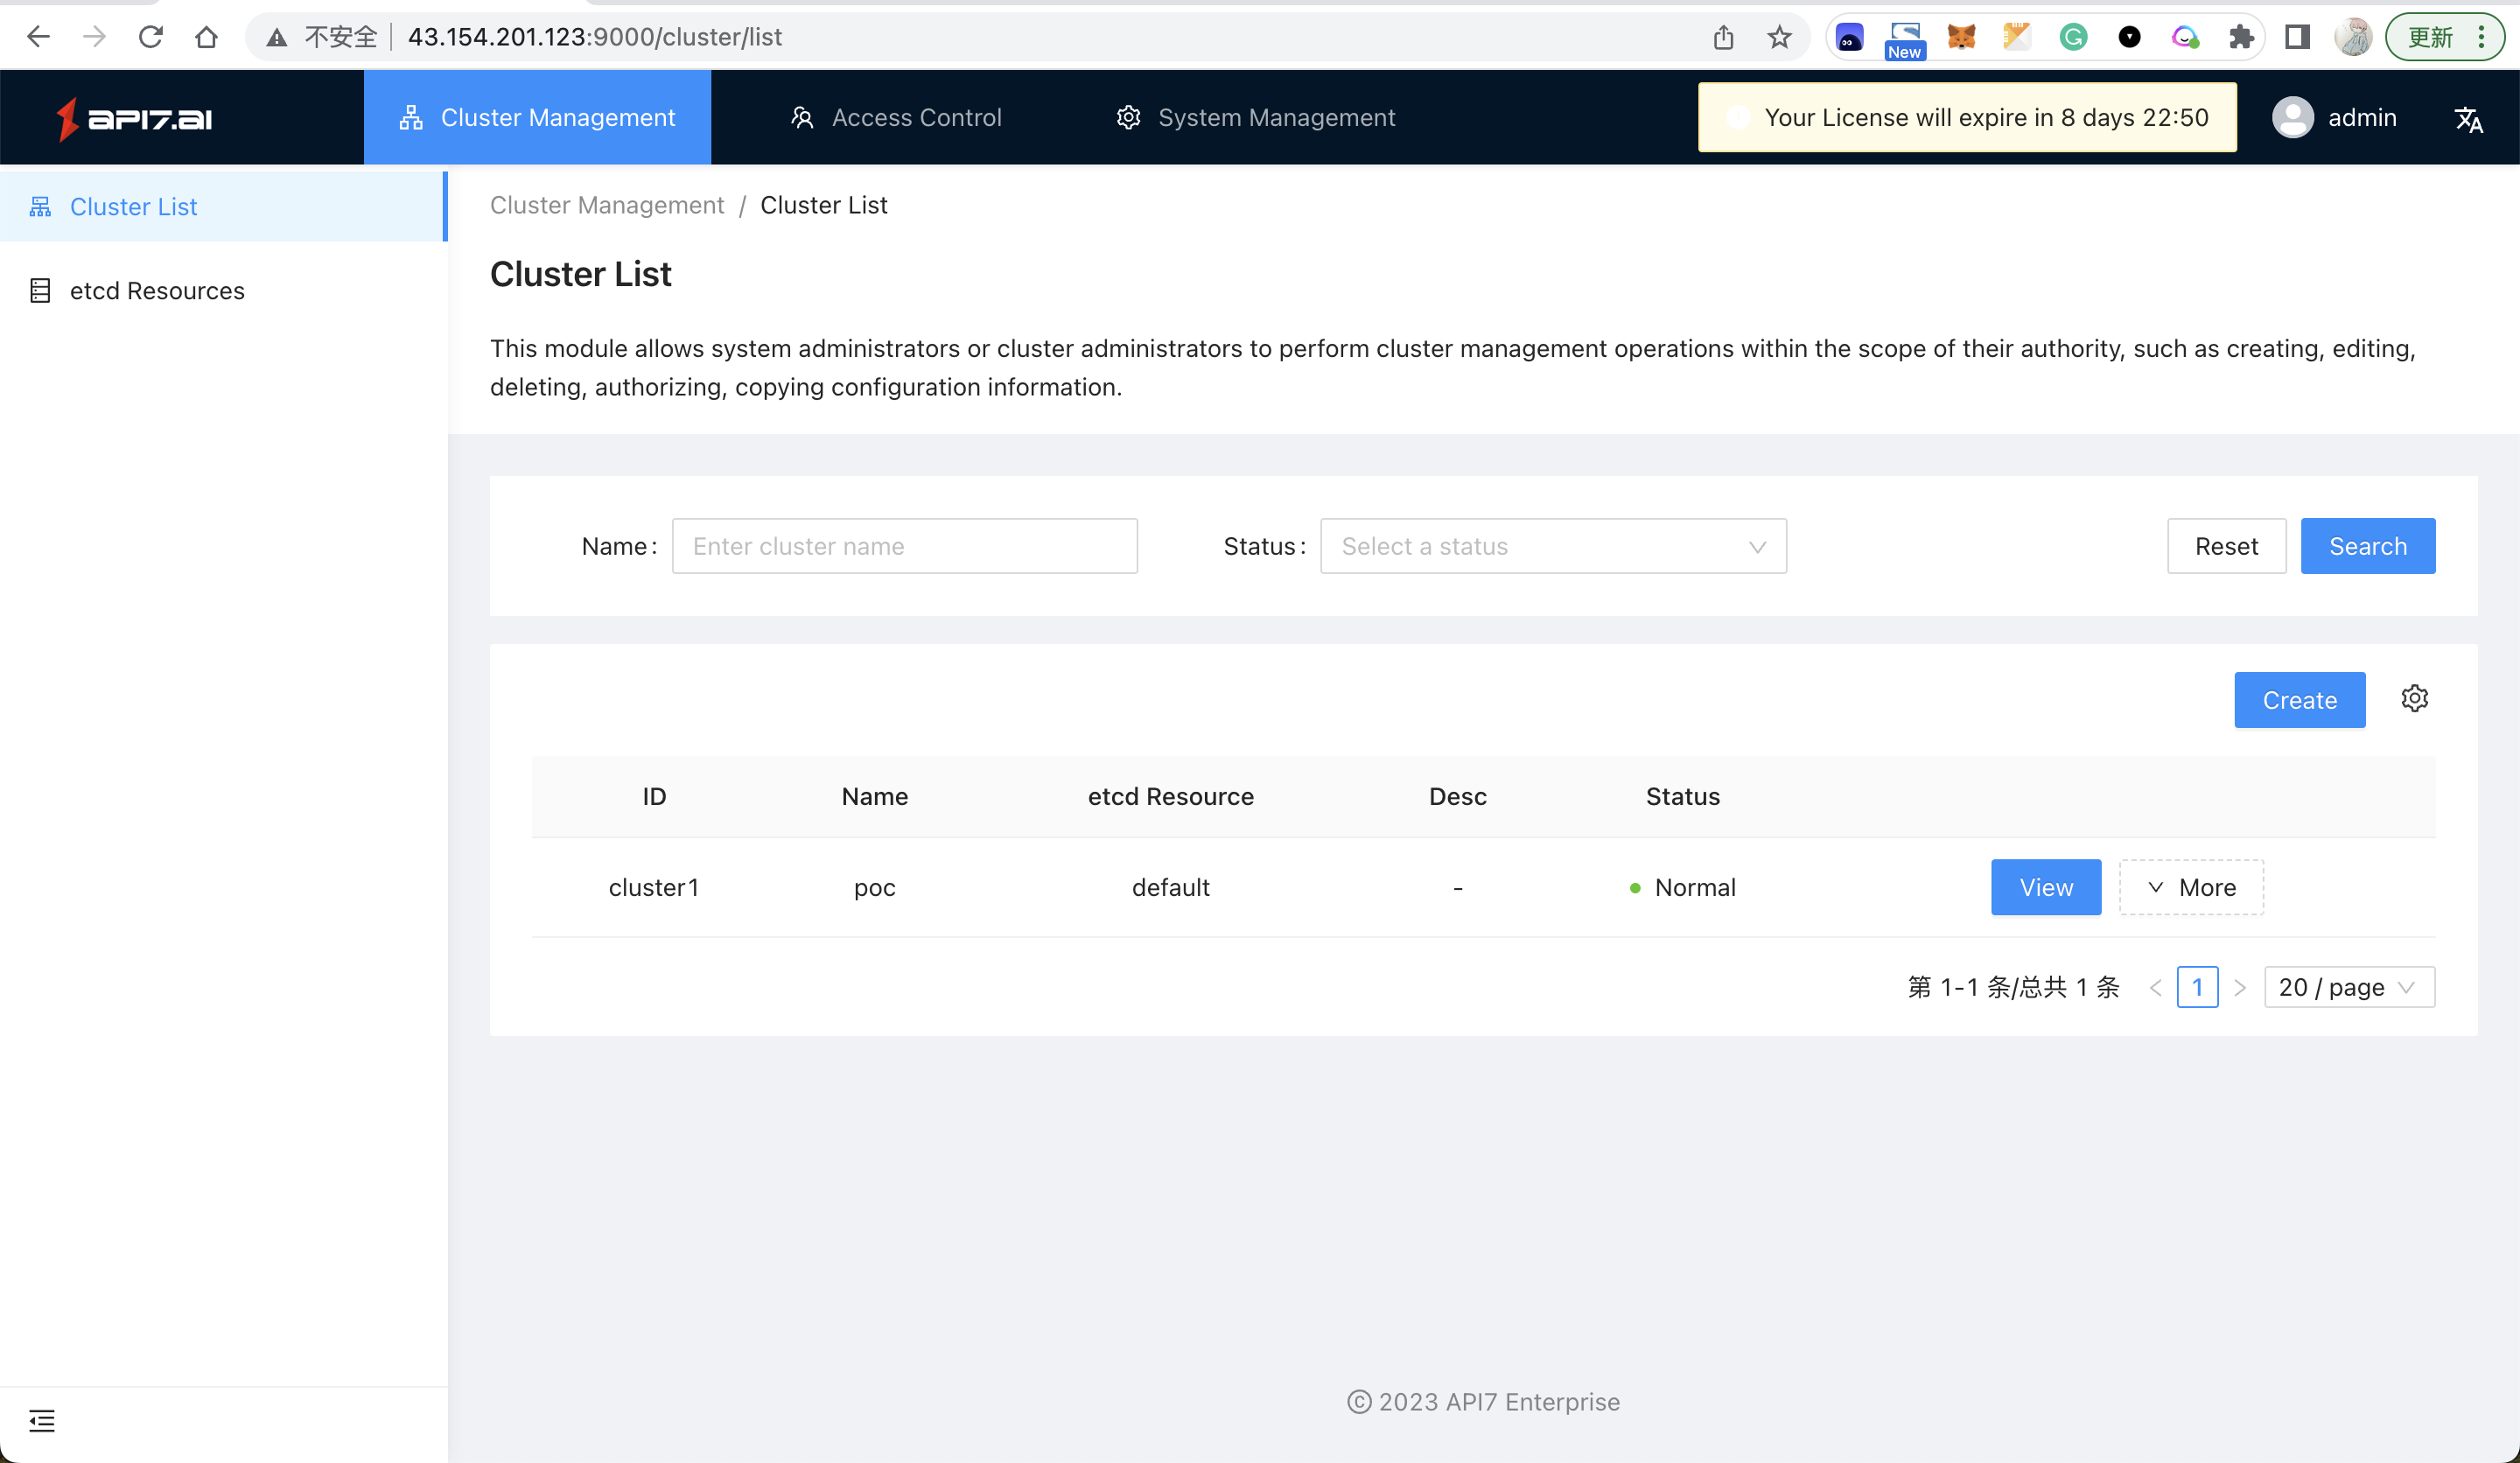
- After activation successfully, you will be redirected to the landing page
Install LDAP Server
OpenLDAP is the leading open-source LDAP Server solution that utilizes LDAP to store and manage a range of data, including user credentials and access control policies.
The following command starts a LDAP server, and creates two default users (user01 and user02).
$ docker run -d --name openldap \
  -p 1389:1389 \
  -e LDAP_ROOT=dc=example,dc=org \
  -e LDAP_USER_DC=users \
  -e LDAP_ADMIN_USERNAME=admin \
  -e LDAP_ADMIN_PASSWORD=adminpassword \
  -e LDAP_USERS=user01,user02 \
  -e LDAP_PASSWORDS=password1,password2 \
  bitnami/openldap:2.6
NOTE: Check bitnami/openldap for more configurations.
Connect Containers
Because both API7 Enterprise and OpenLDAP are running in different Docker containers, we need to connect them in the same network, then each container can communicate with another.
$ docker network create gateway-network

$ docker network connect gateway-network openldap

$ docker network connect gateway-network api7-ee
To verify the two containers, openldap and api7-ee, are connected, you can run the following command to display details:
$ docker network inspect gateway-network
The expected output should like:
[
    {
        "Name":"gateway-network",
        "Id":"85eb99e8e6fd1f346df8c46cb4a7054c91a7e444fc0f997e3456ed3b8b6f3188",
        "Created":"2023-03-12T13:30:25.019881362+08:00",
        "Containers":{
            "637a557186c956867963430841f18e937ec1080961a33bc46910c80dd42152e0":{
                "Name":"api7-ee",
                "EndpointID":"8a2e850f7699f93730bc451ac726a4369a90c83c215c30f19dcd98f40c8a5044",
                "IPv4Address":"172.20.0.3/16"
            },
            "94ff86314d7fca86cf58a3d2e1d095be6716e4196228c3d4632bb89e2b9fdaa2":{
                "Name":"openldap",
                "EndpointID":"12300f598caa3587fba93989a5bf1bc6e68f5677e869c86f3fe60e63411206d7",
                "IPv4Address":"172.20.0.2/16"
            }
        }
    }
]
Configure API7 Enterprise
- Click View to enter the default
Cluster Dashboard. - Click Workspaces to show all workspaces you have created (Empty yet).
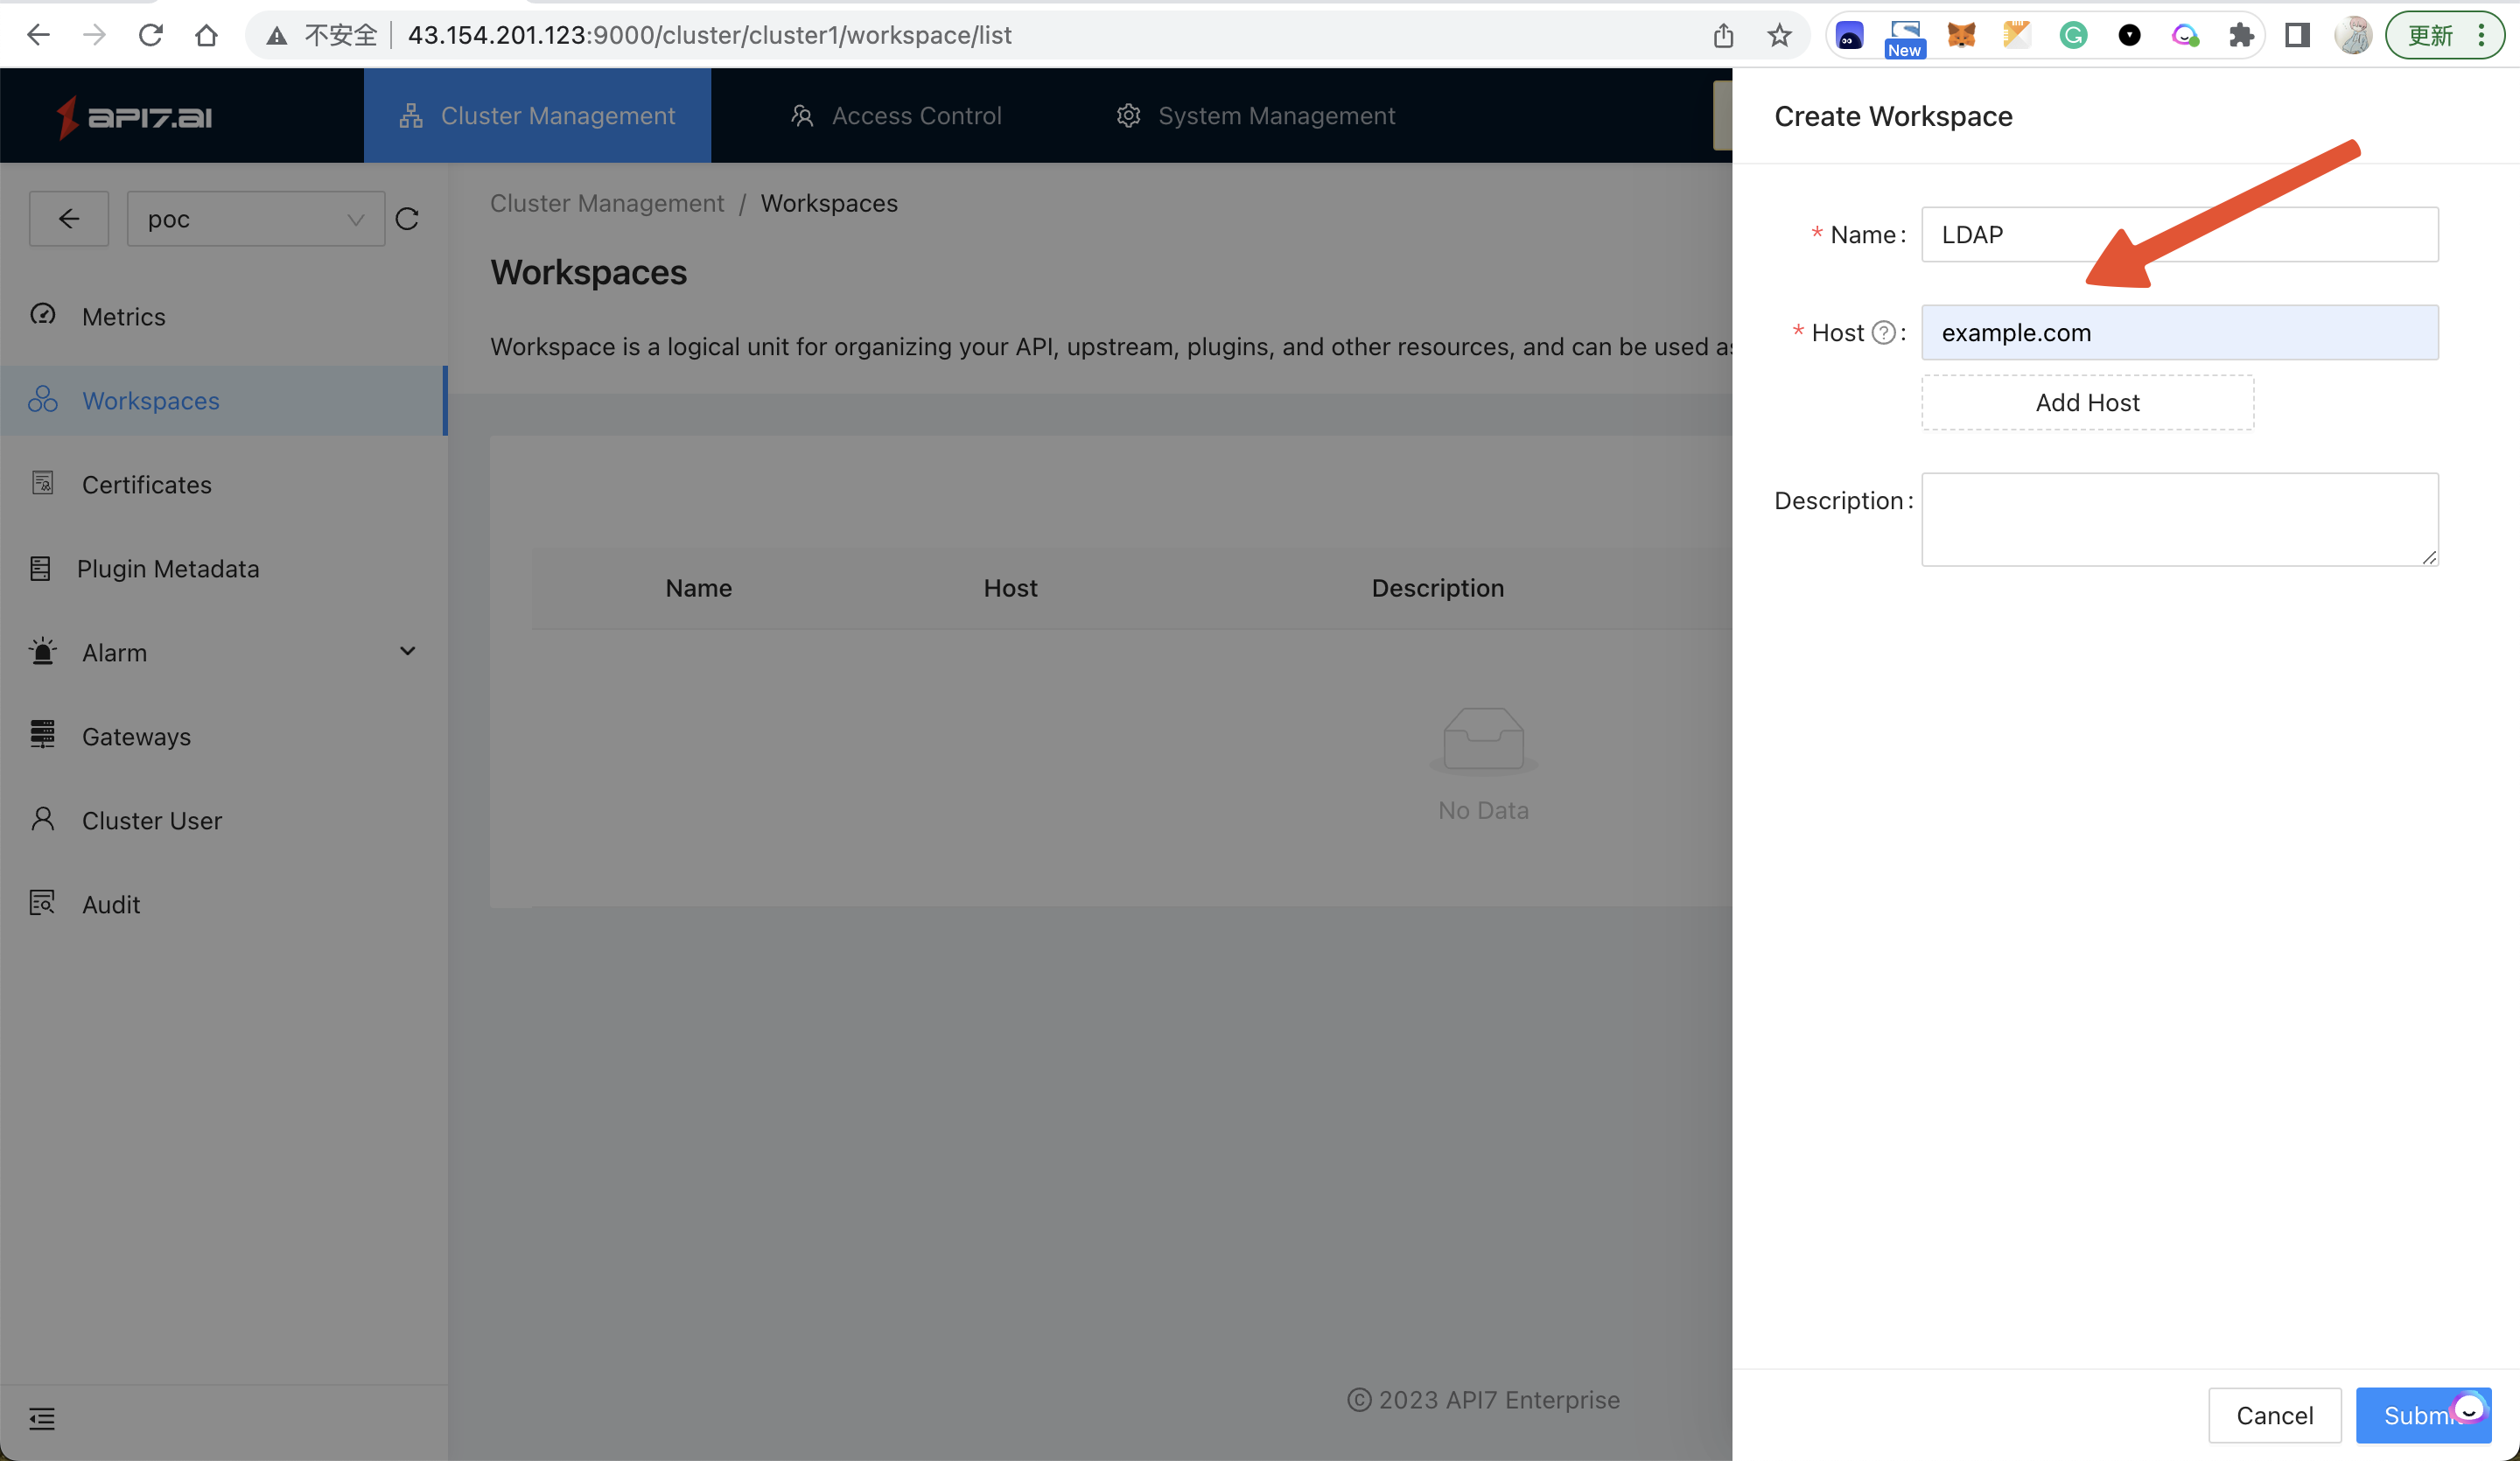
- Click Create to create a new
Workspacewith the following information (check the following screenshot), and click Submit.
- Click View to enter the
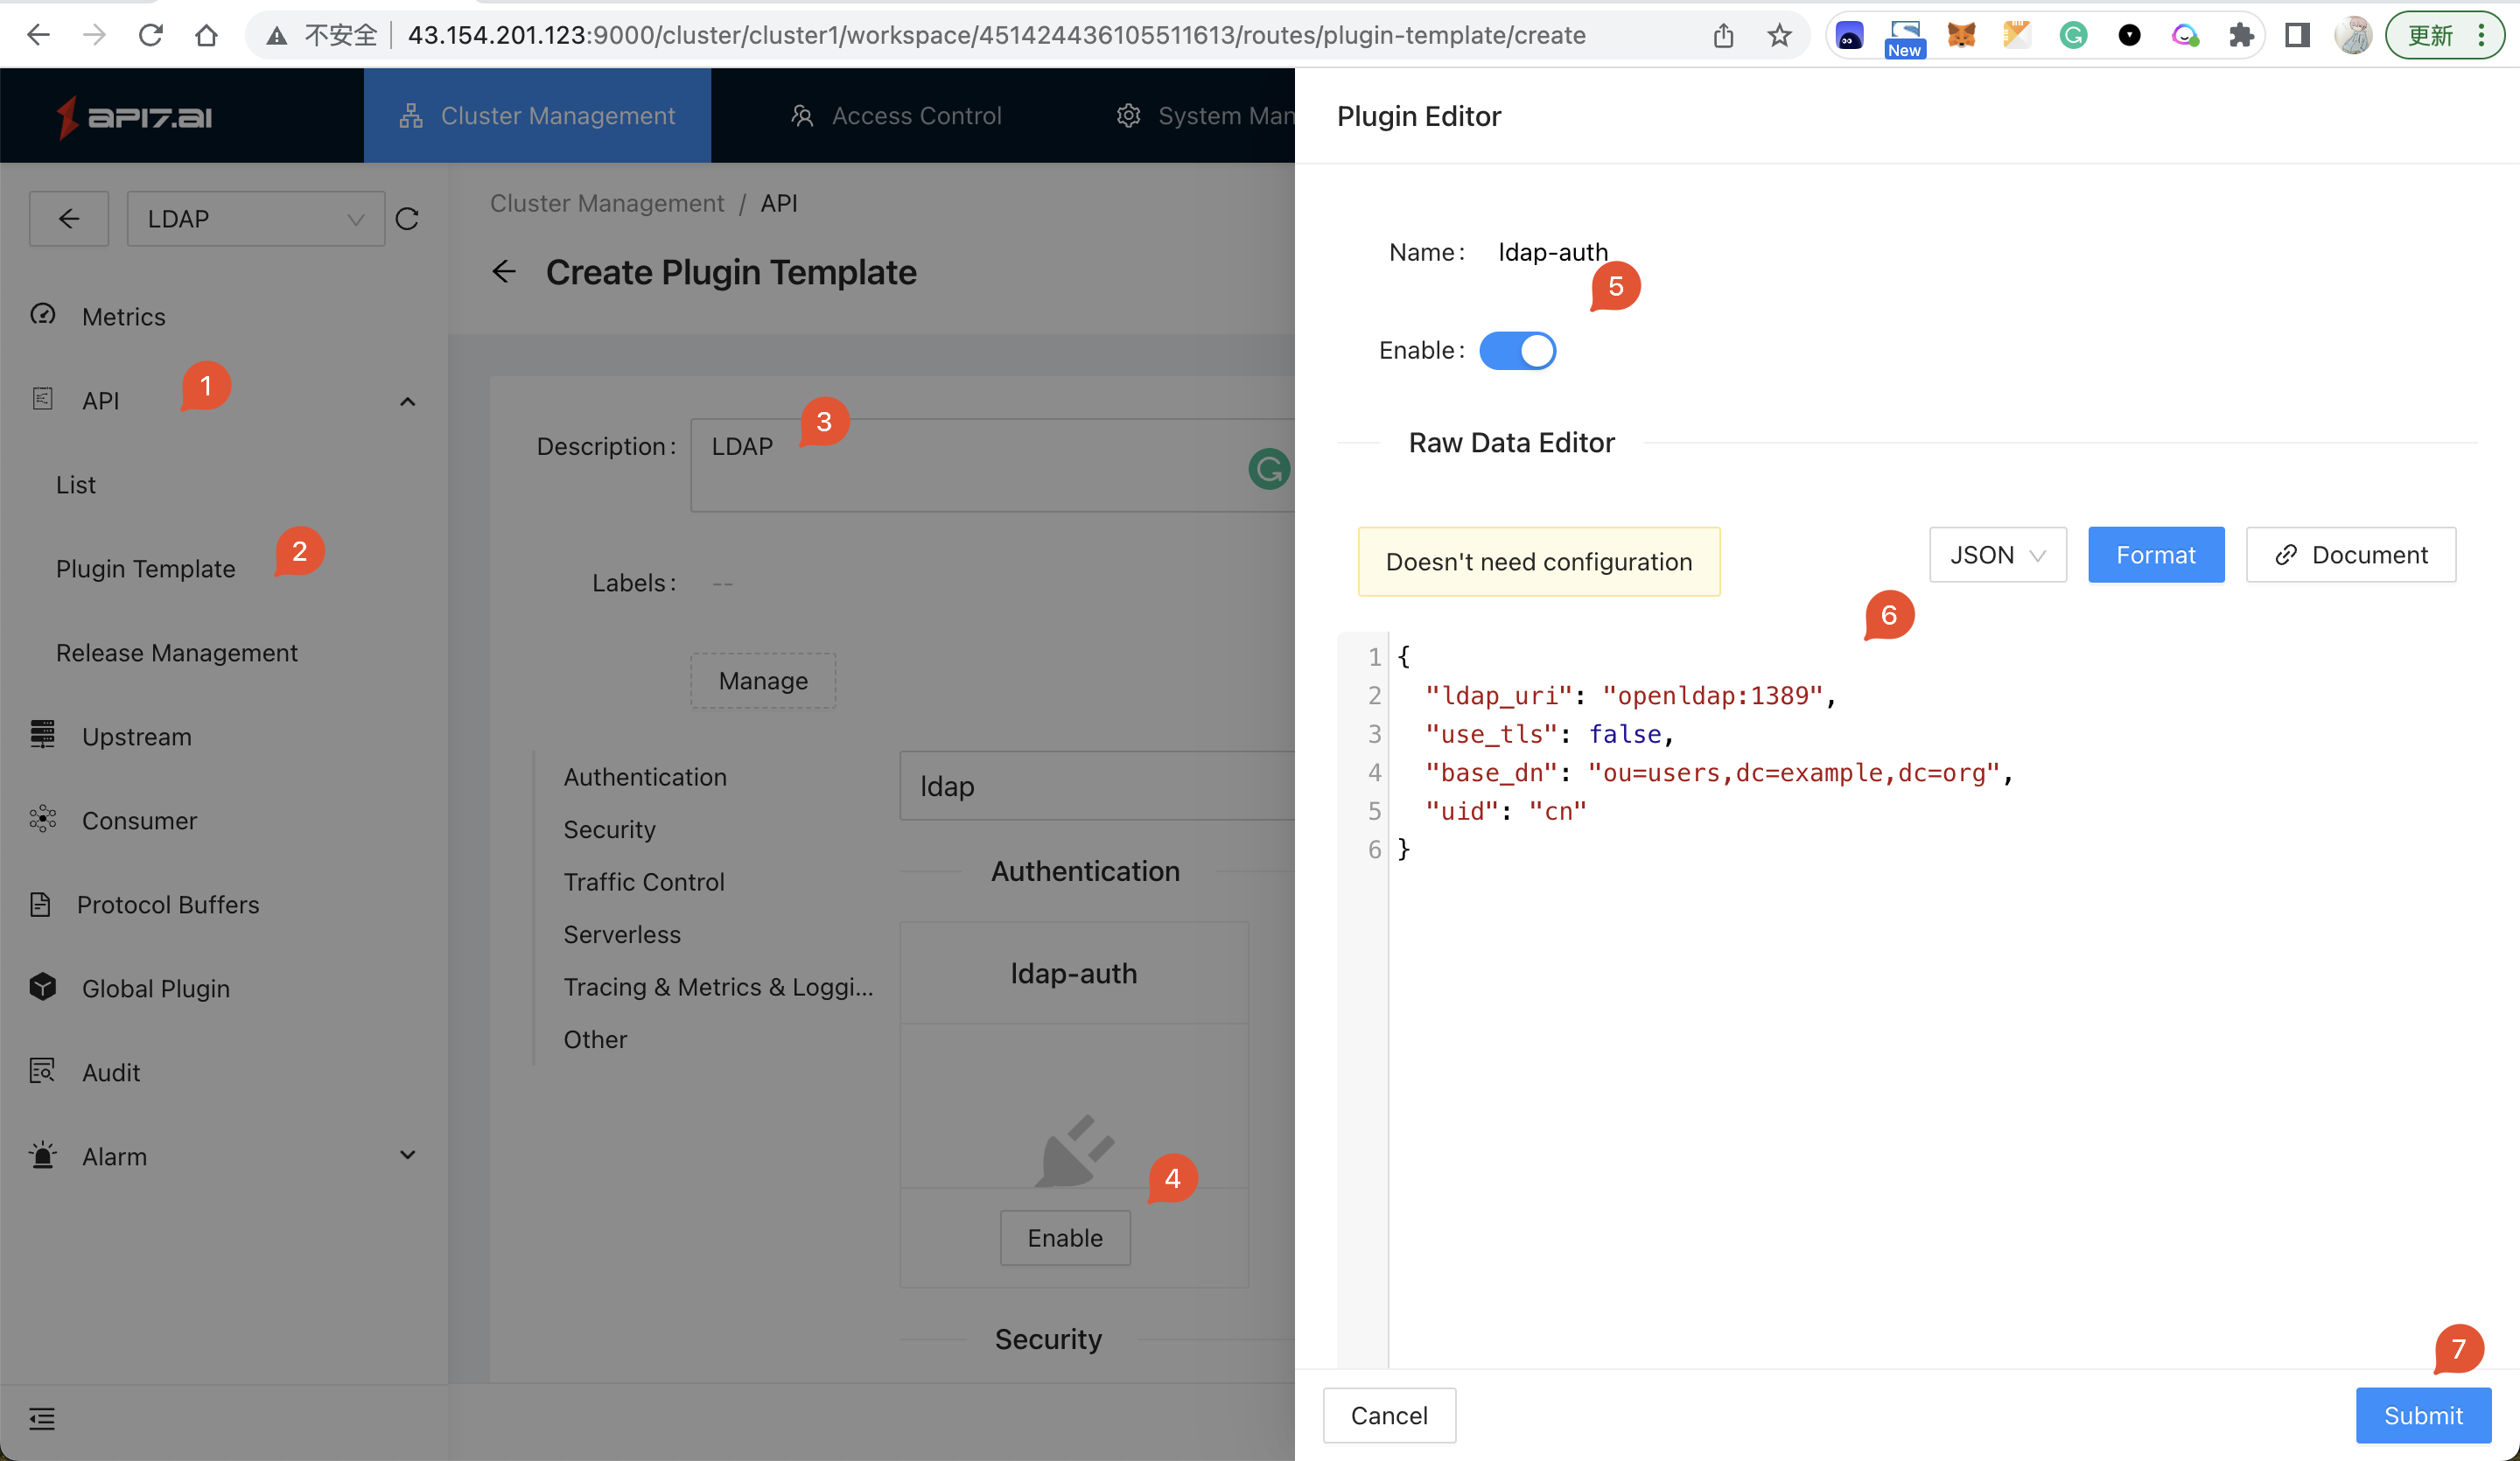
LDAP Workspace. - Click
API -> Plugin Templateand click Create. - Search the
ldap-authplugin, click Enable and enter the configuration:
{
  "ldap_uri": "openldap:1389",
  "use_tls": false,
  "base_dn": "ou=users,dc=example,dc=org",
  "uid": "cn"
}
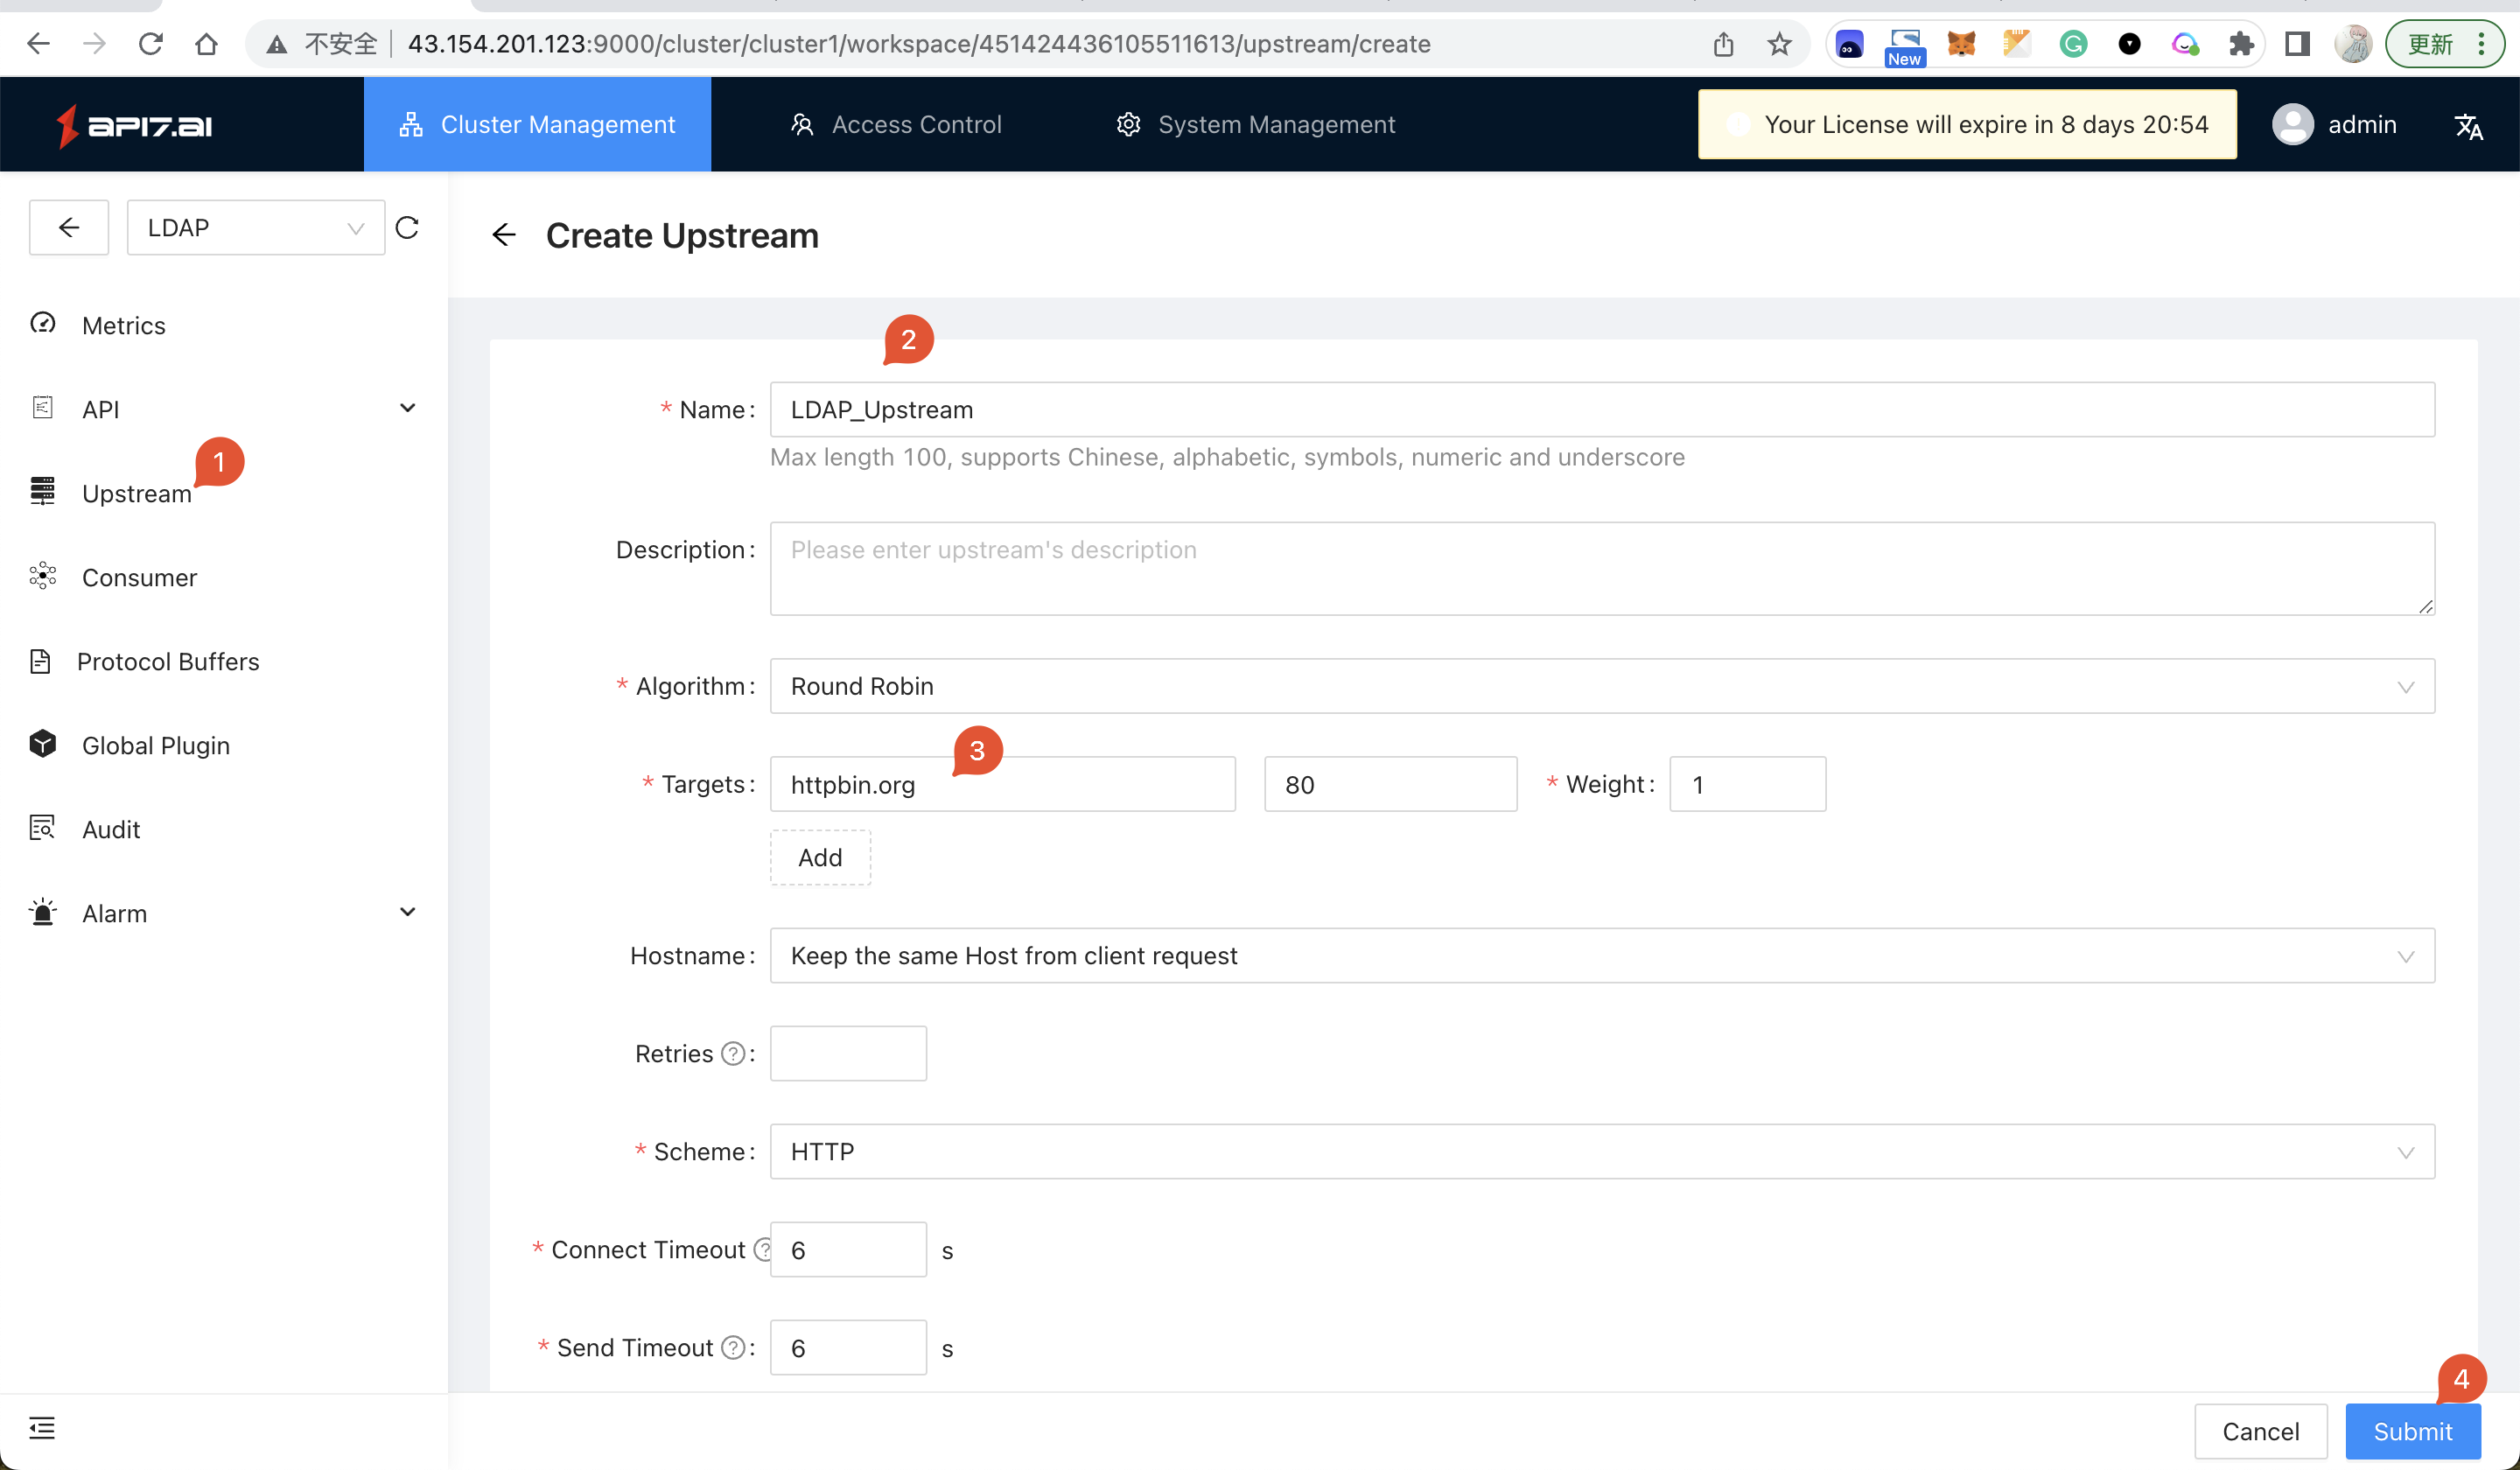
- Click
Upstream -> Creatmto create an Upstream:
- Click
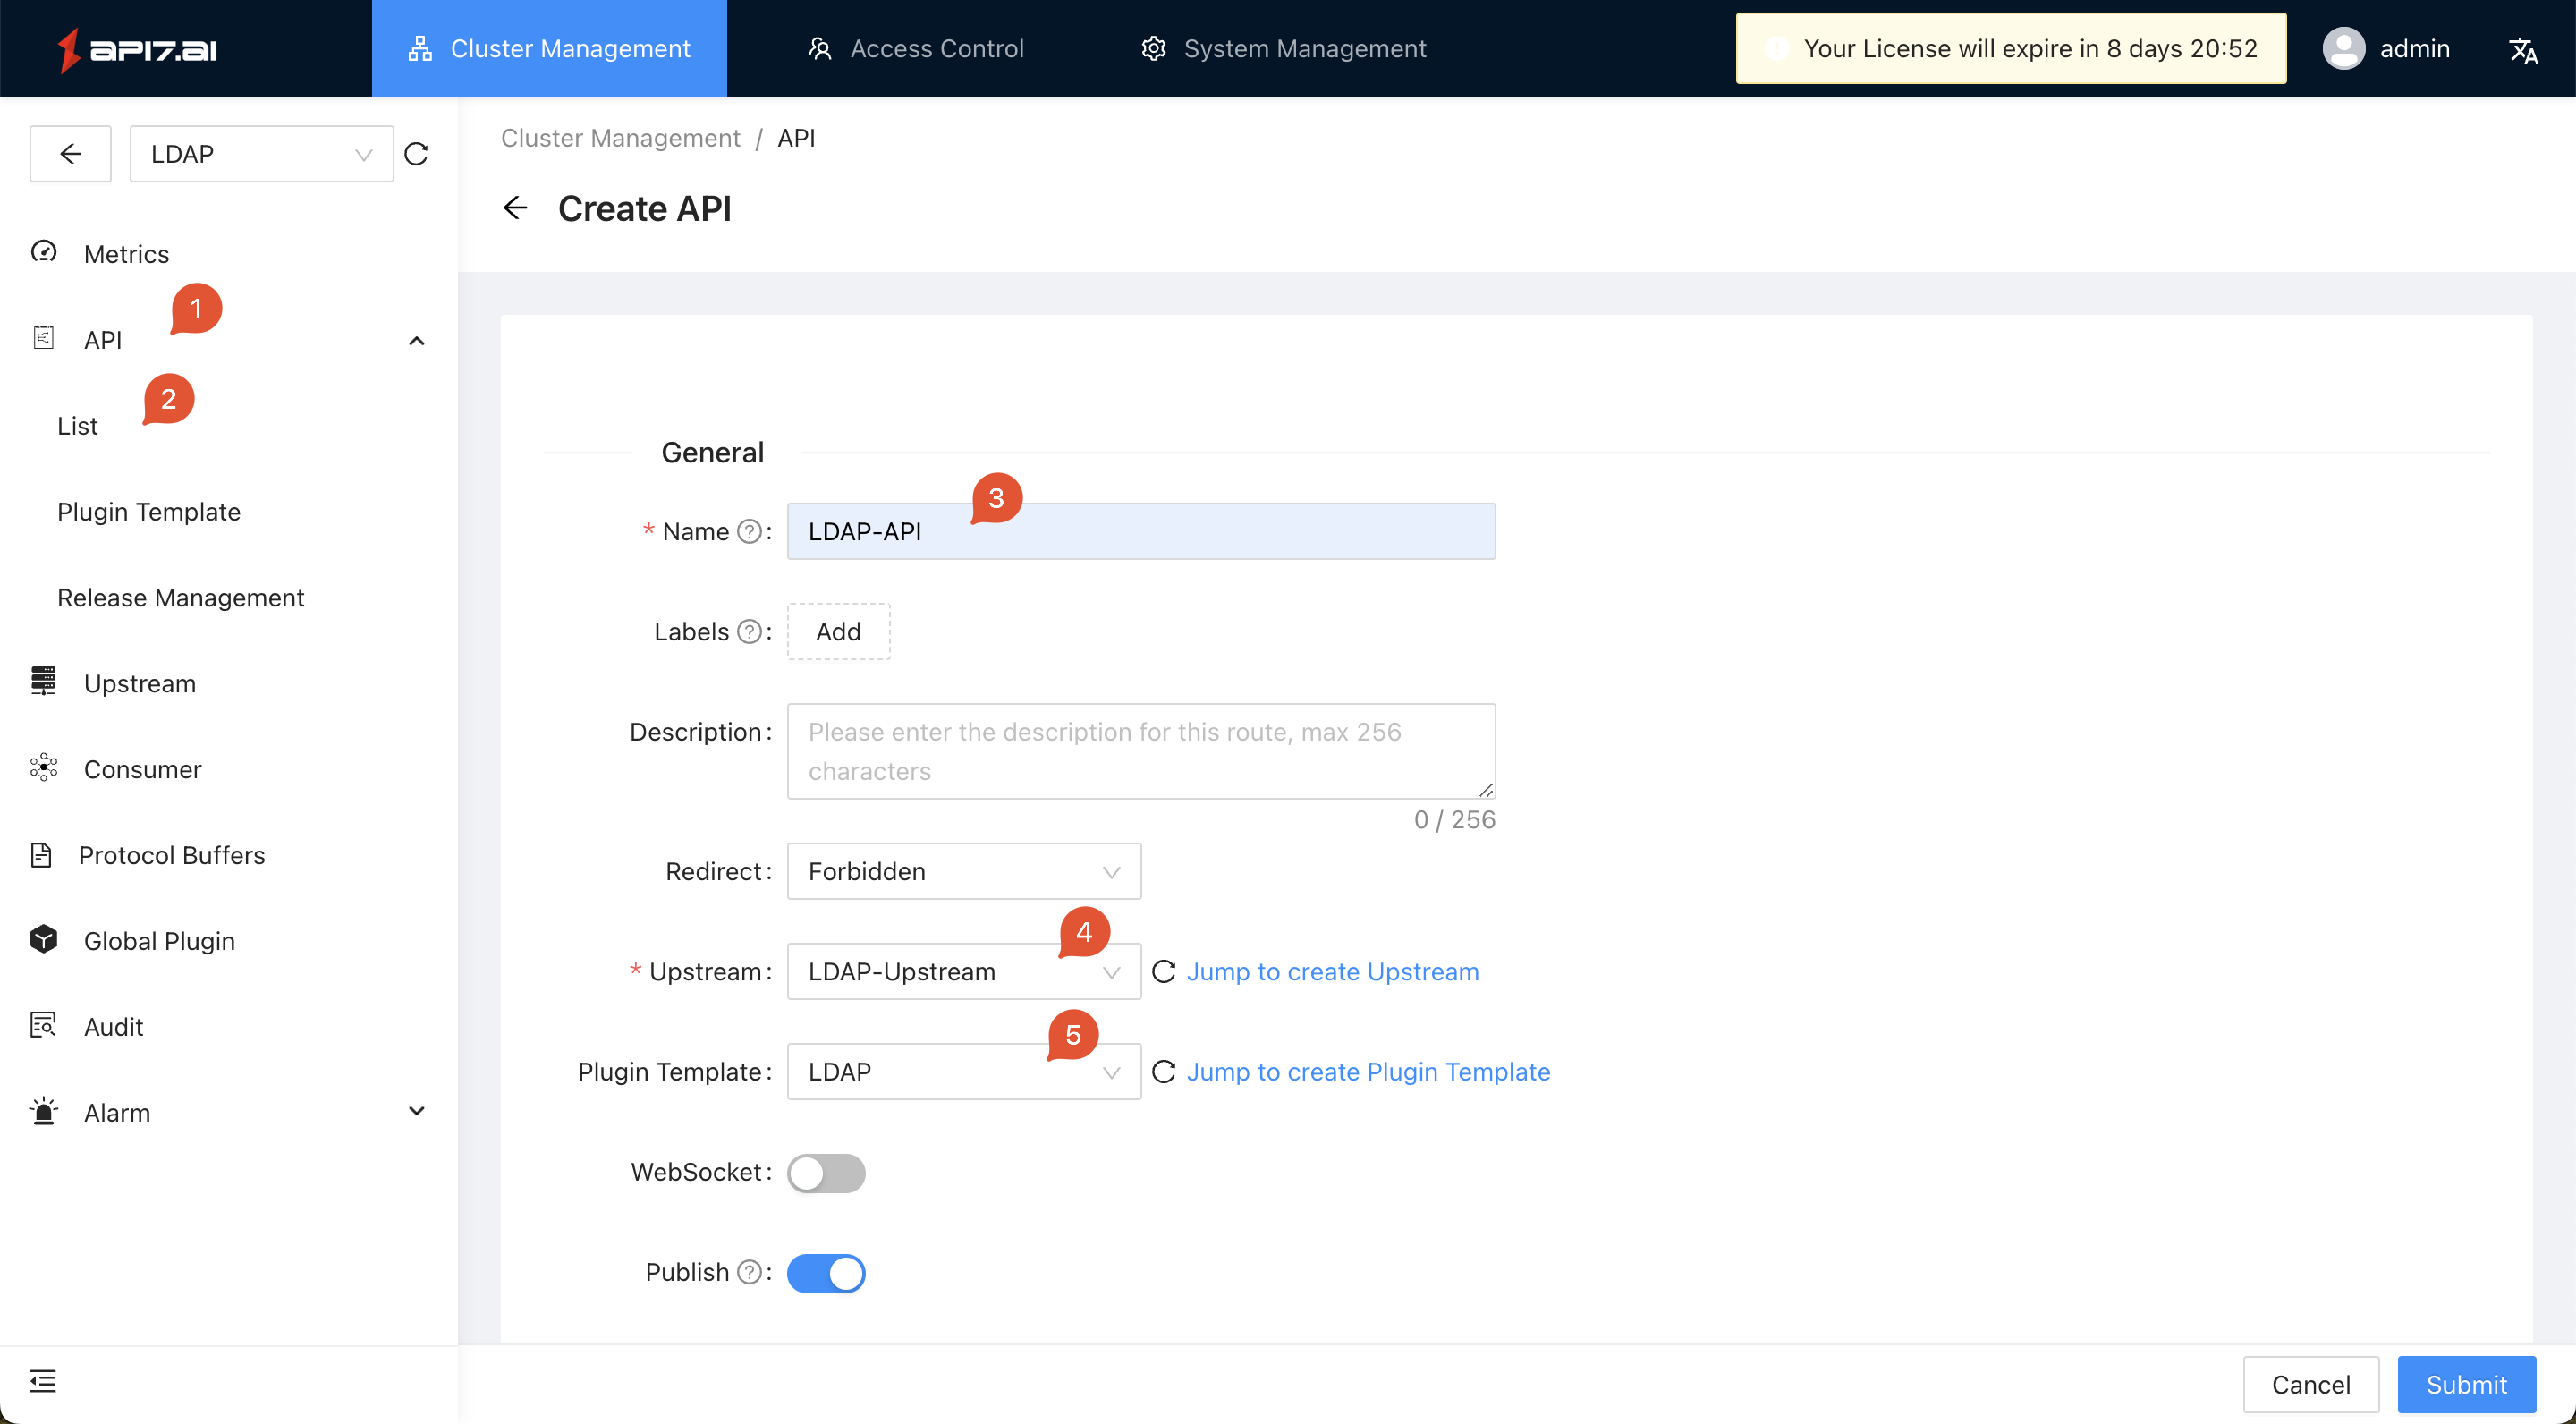
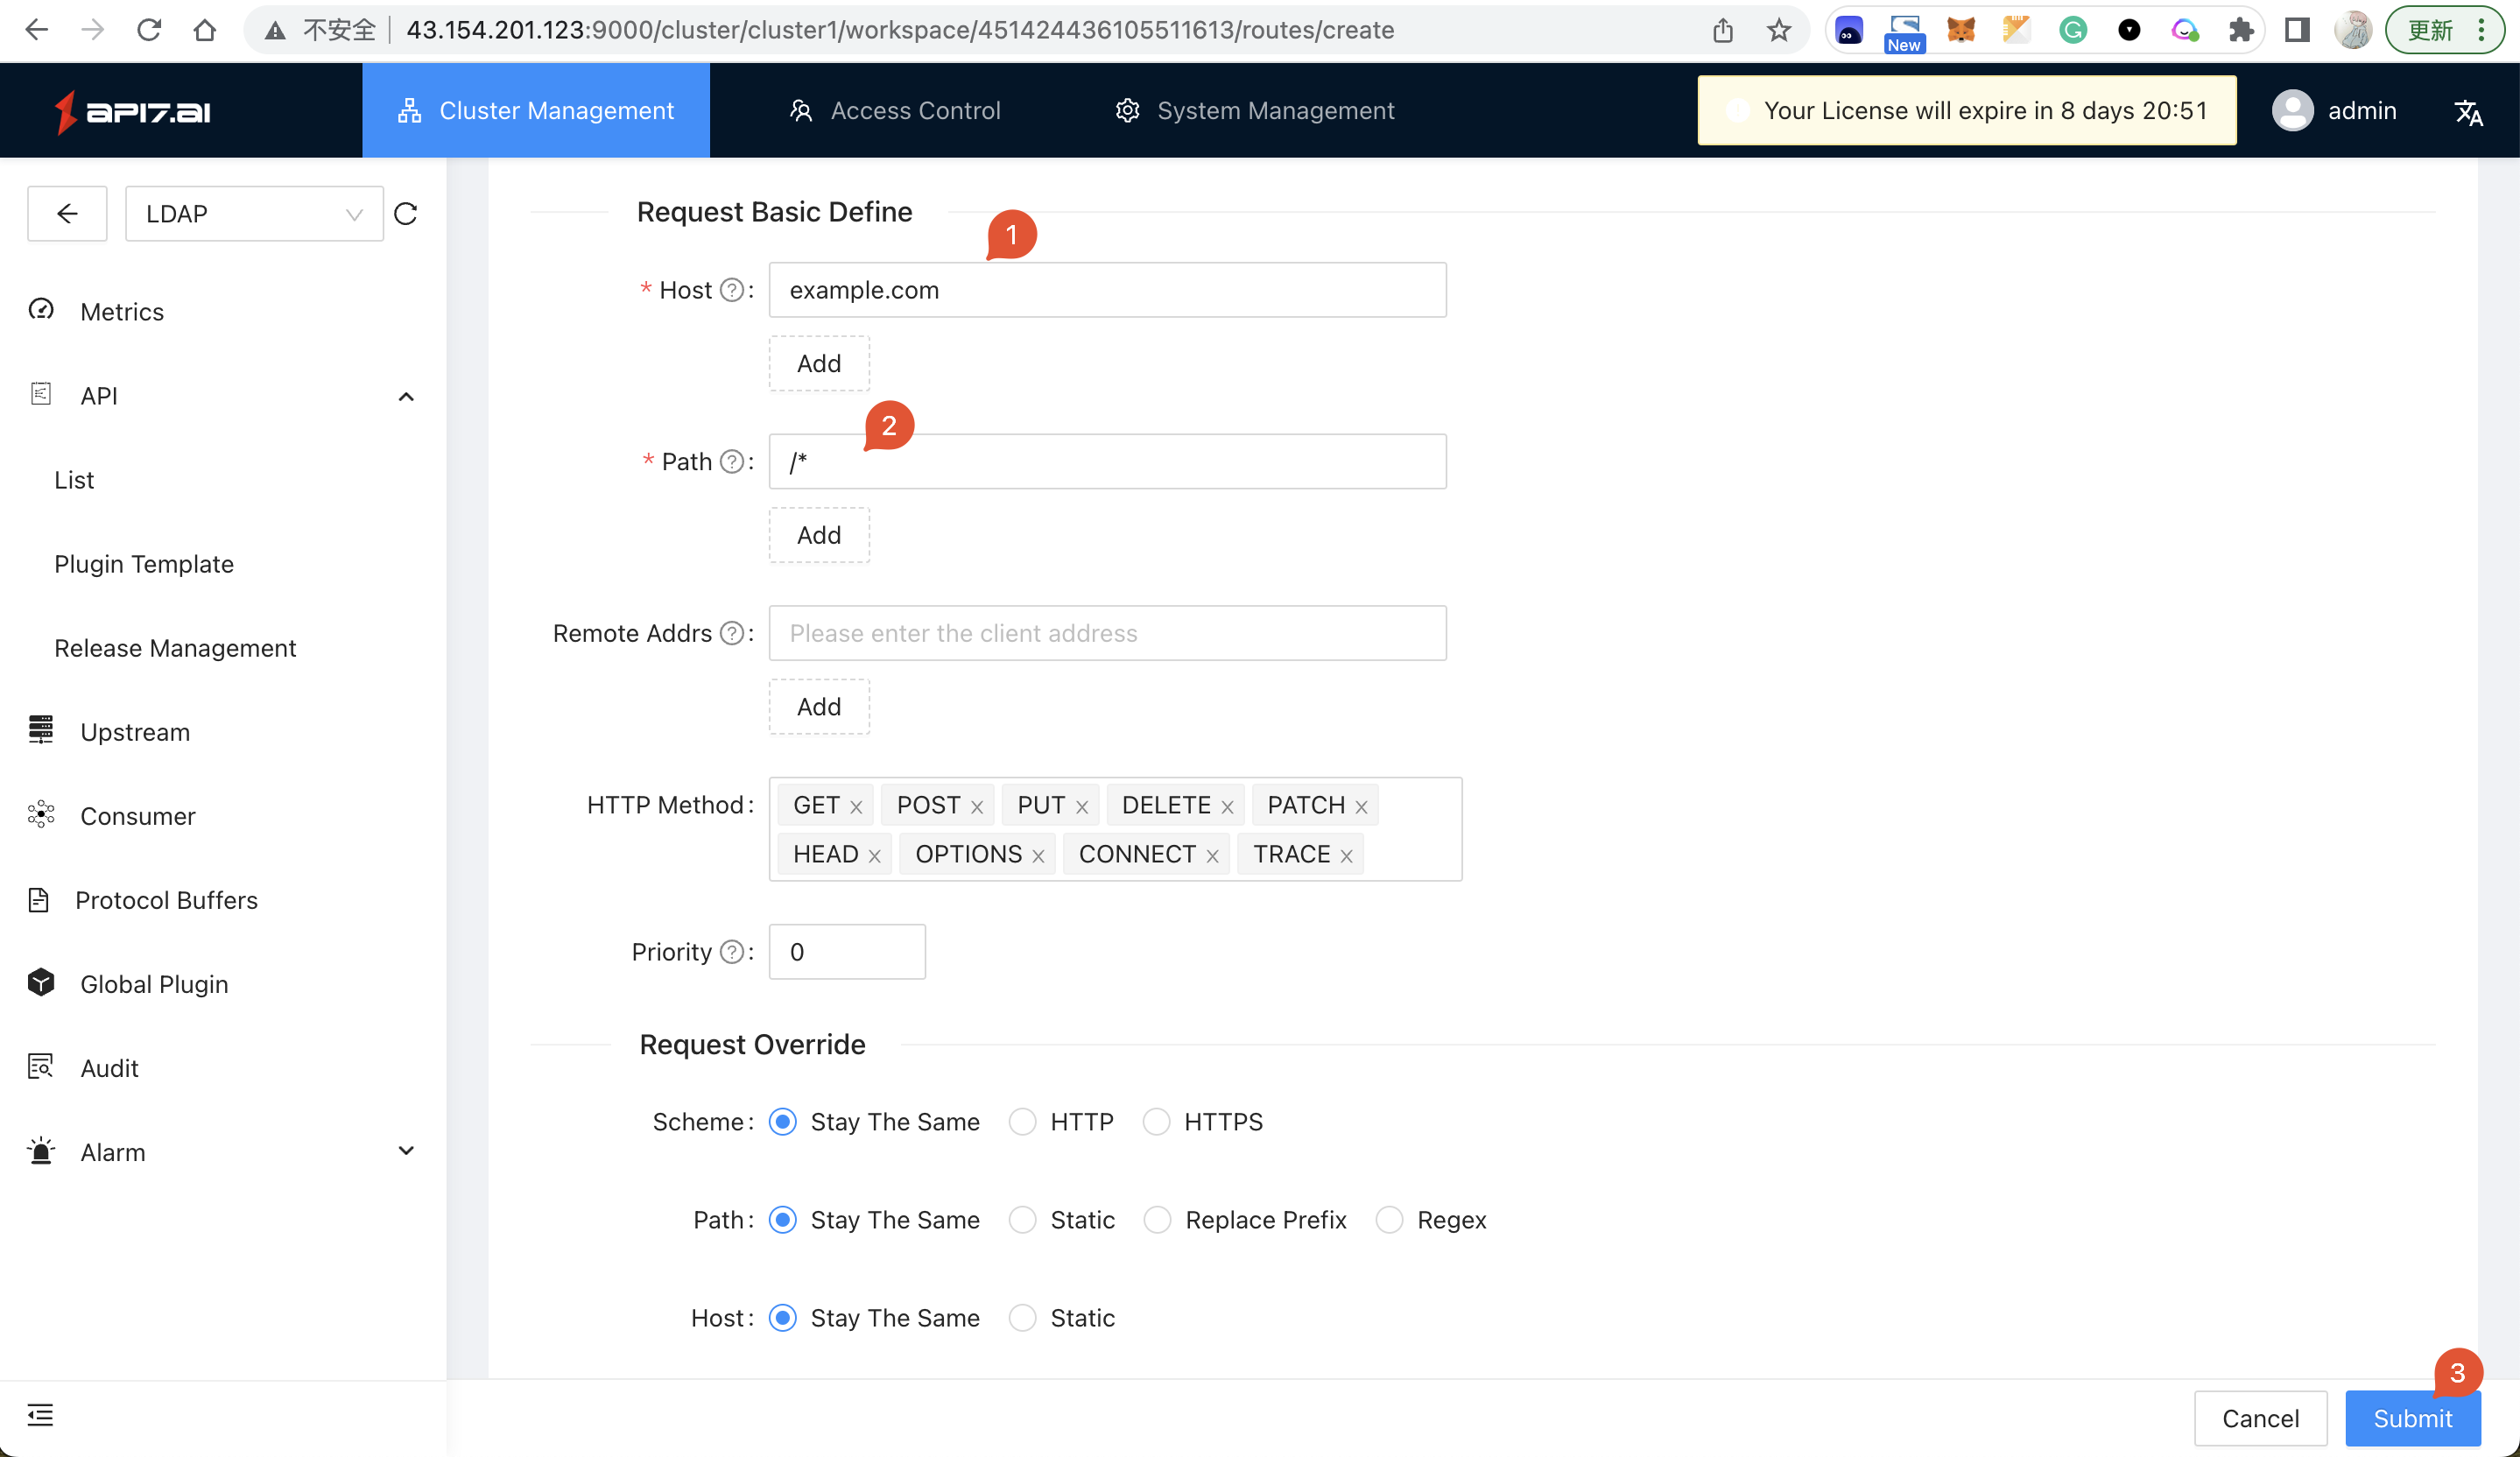
API -> List -> Createto create an API:
- Click
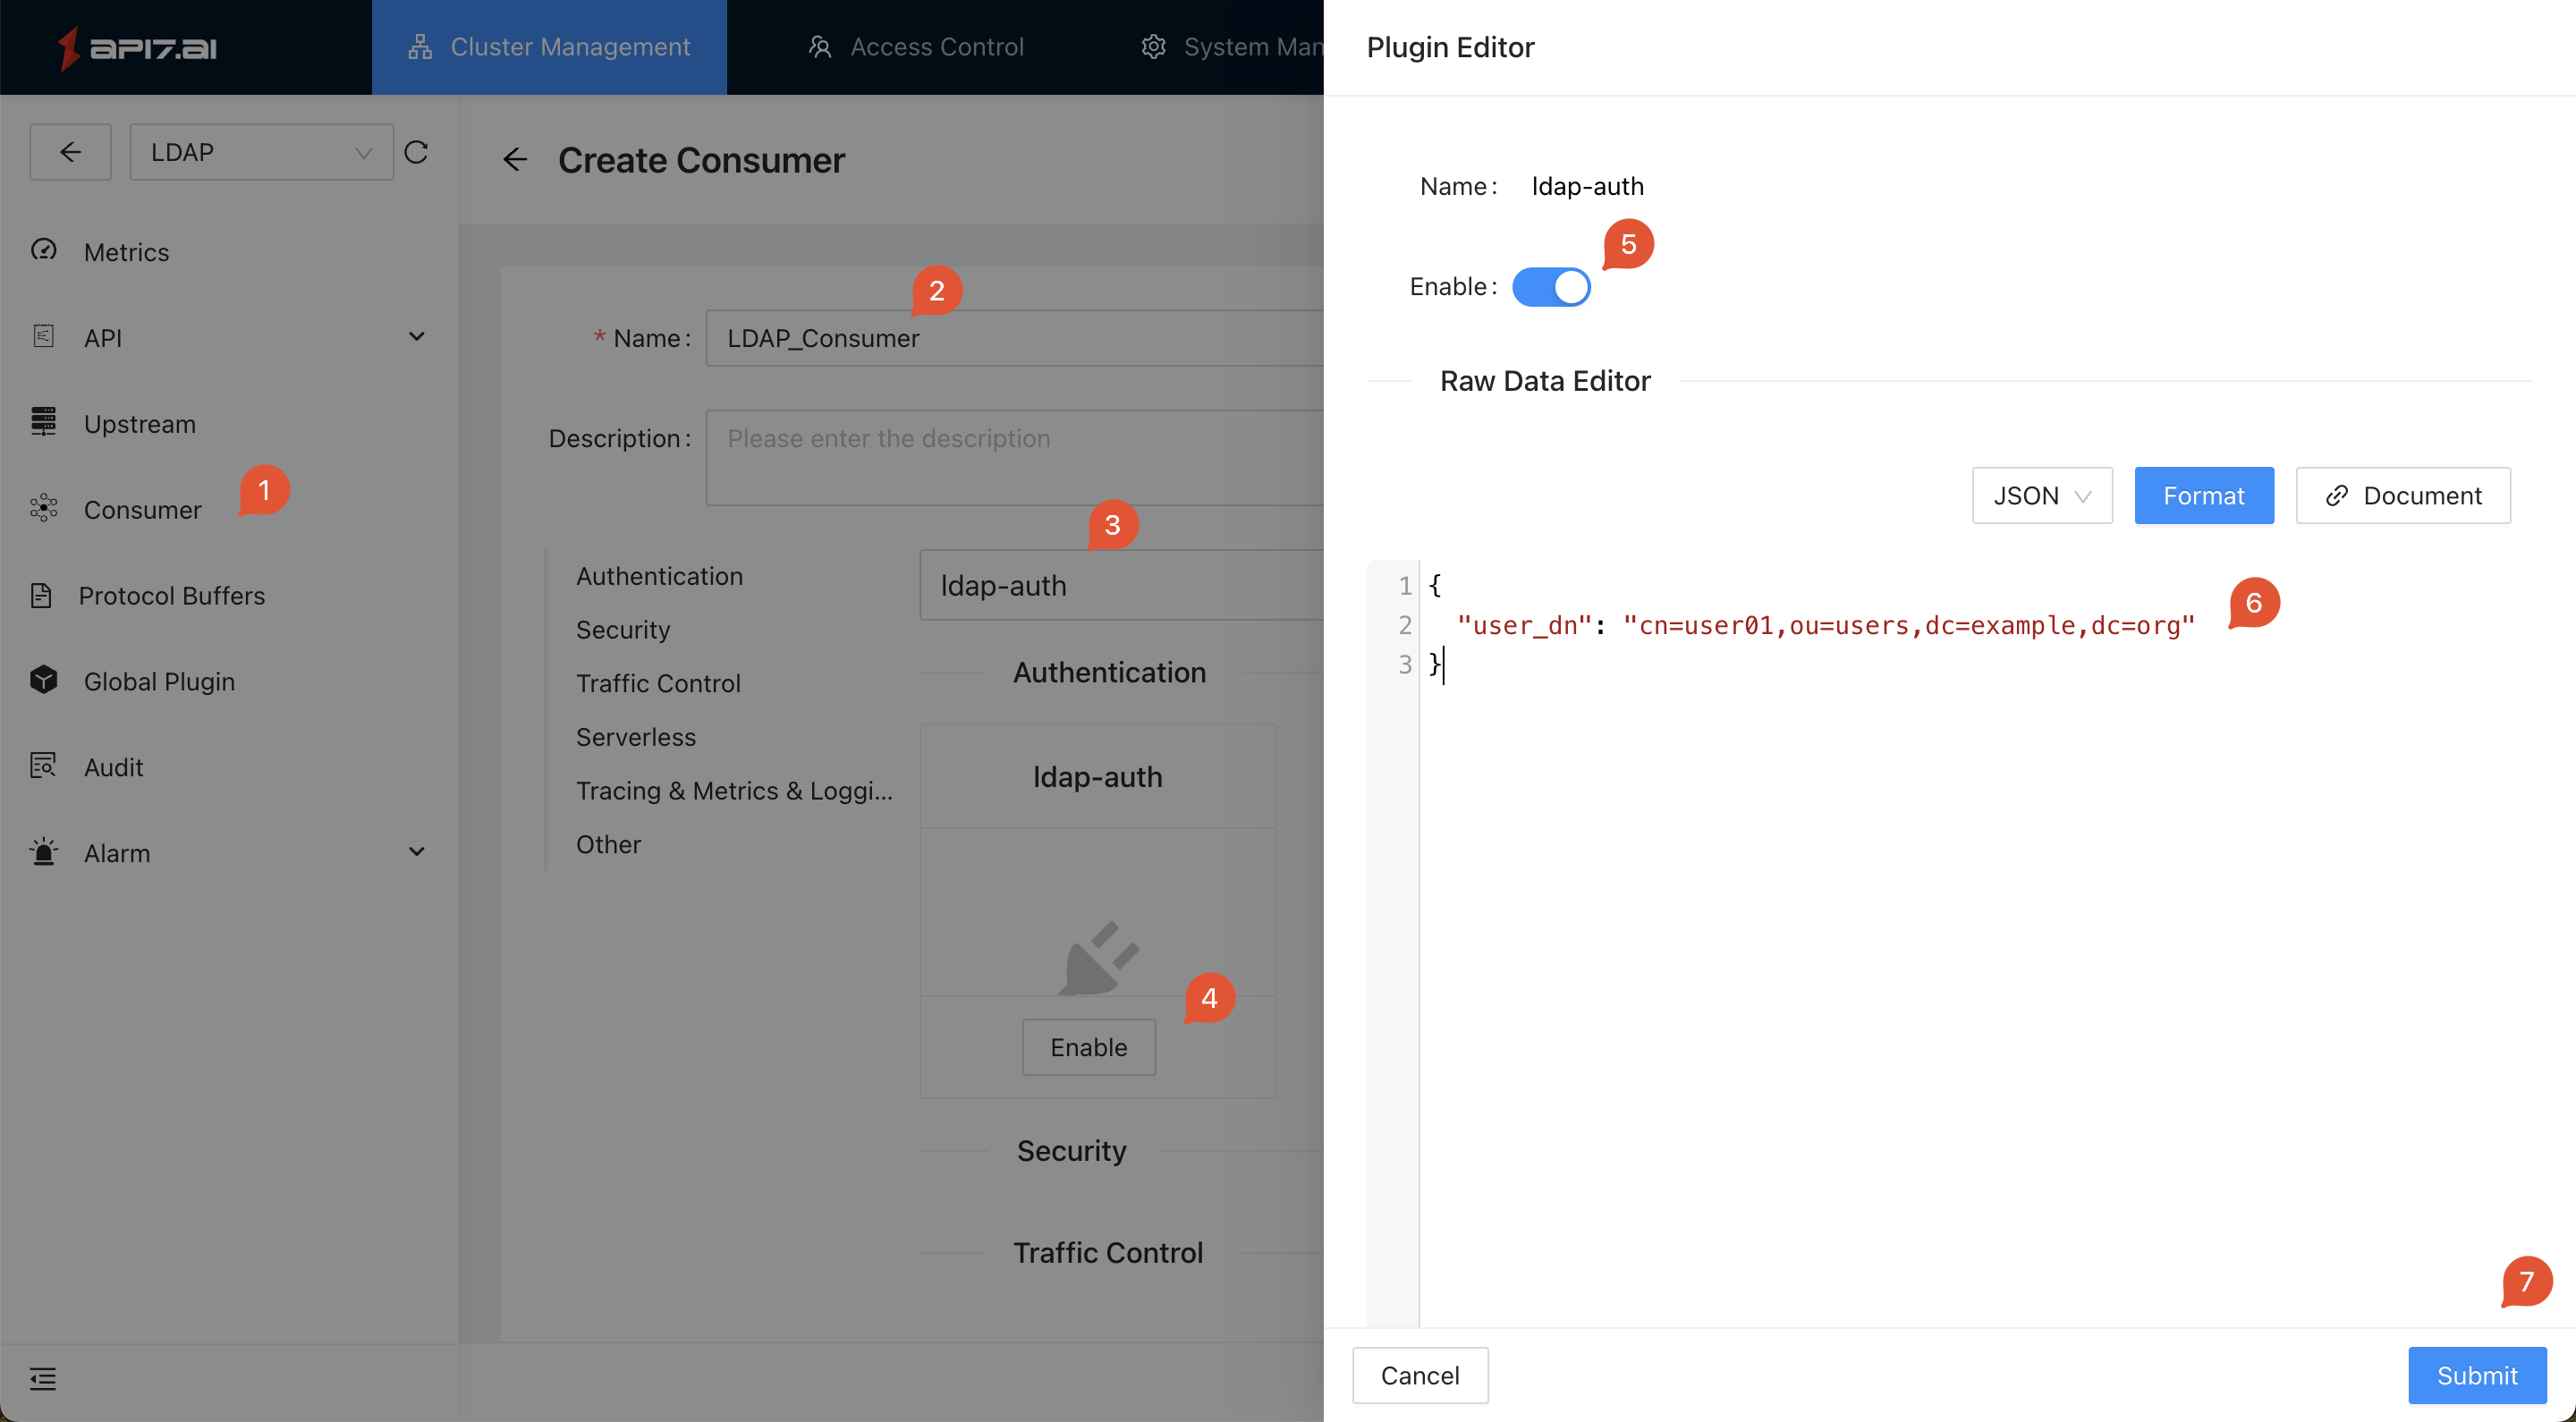
Consumer -> Createto create a new consumer:
The following configuration binds user01 to the consumer LDAP_Consumer, which means only the user01 user can access the APIs.
{
  "user_dn": "cn=user01,ou=users,dc=example,dc=org"
}
Validate
- Send a request without any username or password
$ curl -i 127.0.0.1/ip -H "Host: example.com"

# Response

HTTP/1.1 401 Unauthorized
Date: Sun, 12 Mar 2023 05:56:31 GMT
Content-Type: text/plain; charset=utf-8
Transfer-Encoding: chunked
Connection: keep-alive
WWW-Authenticate: Basic realm='.'
Server: APISIX/2.13.2304

{"message":"Missing authorization in request"}
- Send a request with the wrong username and password
$ curl -i 127.0.0.1/ip -H "Host: example.com" -u user01:wrongpassword

HTTP/1.1 401 Unauthorized
Date: Sun, 12 Mar 2023 06:06:52 GMT
Content-Type: text/plain; charset=utf-8
Transfer-Encoding: chunked
Connection: keep-alive
Server: APISIX/2.13.2304

{"message":"Invalid user authorization"}
- Send a request with the correct username and password, and the username
user01is bound with one consumerLDAP_Consumer
$ curl -i 127.0.0.1/ip -H "Host: example.com" -u user01:password1

HTTP/1.1 200 OK
Content-Type: application/json
Content-Length: 45
Connection: keep-alive
Date: Sun, 12 Mar 2023 06:08:23 GMT
Access-Control-Allow-Origin: *
Access-Control-Allow-Credentials: true
Server: APISIX/2.13.2304

{
  "origin": "172.17.0.1, 43.154.201.123"
}
- Send a request with the correct username and password, but the username
user02is not bound with one consumer
$ curl -i 127.0.0.1/ip -H "Host: example.com" -u user02:password2

HTTP/1.1 401 Unauthorized
Date: Sun, 12 Mar 2023 06:09:54 GMT
Content-Type: text/plain; charset=utf-8
Transfer-Encoding: chunked
Connection: keep-alive
Server: APISIX/2.13.2304

{"message":"Invalid API key in request"}