authz-keycloak
The authz-keycloak plugin integrates with Keycloak to authenticate and authorize users. See Keycloak's Authorization Services Guide for more information about the configuration options available in this plugin.
While the plugin was developed for Keycloak, it could theoretically be used with other OAuth/OIDC and UMA-compliant identity providers.
Examples
The examples below demonstrate how you can configure authz-keycloak for different scenarios.
To follow along, complete the preliminary setups for Keycloak.
Set Up Keycloak
Start Keycloak
- Docker
- Kubernetes
Start a Keycloak instance named apisix-quickstart-keycloak with the administrator name quickstart-admin and password quickstart-admin-pass in development mode:
docker run -d --name "apisix-quickstart-keycloak" \
  -e 'KEYCLOAK_ADMIN=quickstart-admin' \
  -e 'KEYCLOAK_ADMIN_PASSWORD=quickstart-admin-pass' \
  -p 8080:8080 \
  quay.io/keycloak/keycloak:18.0.2 start-dev
Deploy Keycloak to Kubernetes:
apiVersion: apps/v1
kind: Deployment
metadata:
  namespace: aic
  name: keycloak
spec:
  replicas: 1
  selector:
    matchLabels:
      app: keycloak
  template:
    metadata:
      labels:
        app: keycloak
    spec:
      containers:
        - name: keycloak
          image: quay.io/keycloak/keycloak:18.0.2
          args:
            - start-dev
          env:
            - name: KEYCLOAK_ADMIN
              value: quickstart-admin
            - name: KEYCLOAK_ADMIN_PASSWORD
              value: quickstart-admin-pass
          ports:
            - containerPort: 8080
---
apiVersion: v1
kind: Service
metadata:
  namespace: aic
  name: keycloak
spec:
  selector:
    app: keycloak
  ports:
    - port: 8080
      targetPort: 8080
Apply the manifest:
kubectl apply -f keycloak.yaml
If you would like to open the Keycloak console locally, port-forward the Service:
kubectl port-forward -n aic svc/keycloak 8080:8080
Save Keycloak URL
Save the Keycloak URL to an environment variable to be referenced in future configuration:
- Docker
- Kubernetes
KEYCLOAK_URL=http://192.168.42.145:8080 # replace with your Keycloak URL
KEYCLOAK_URL=http://keycloak.aic.svc.cluster.local:8080
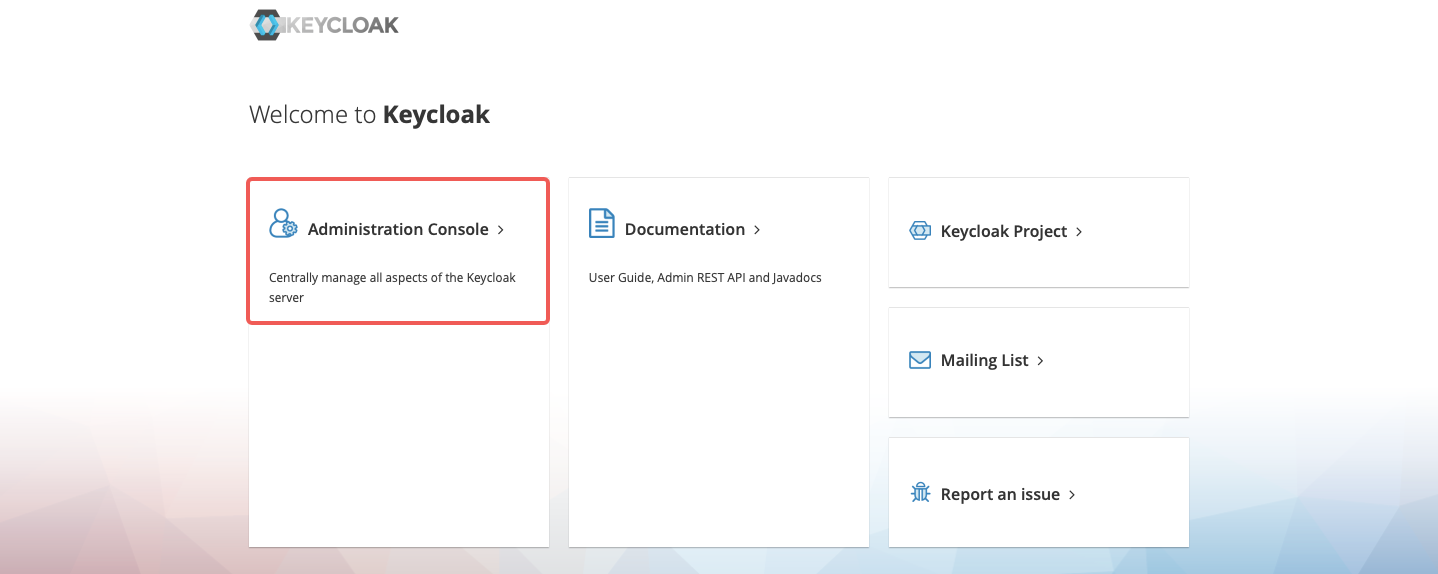
Create a Realm, Client, and Authorization Objects
Navigate to http://localhost:8080 and click Administration Console:
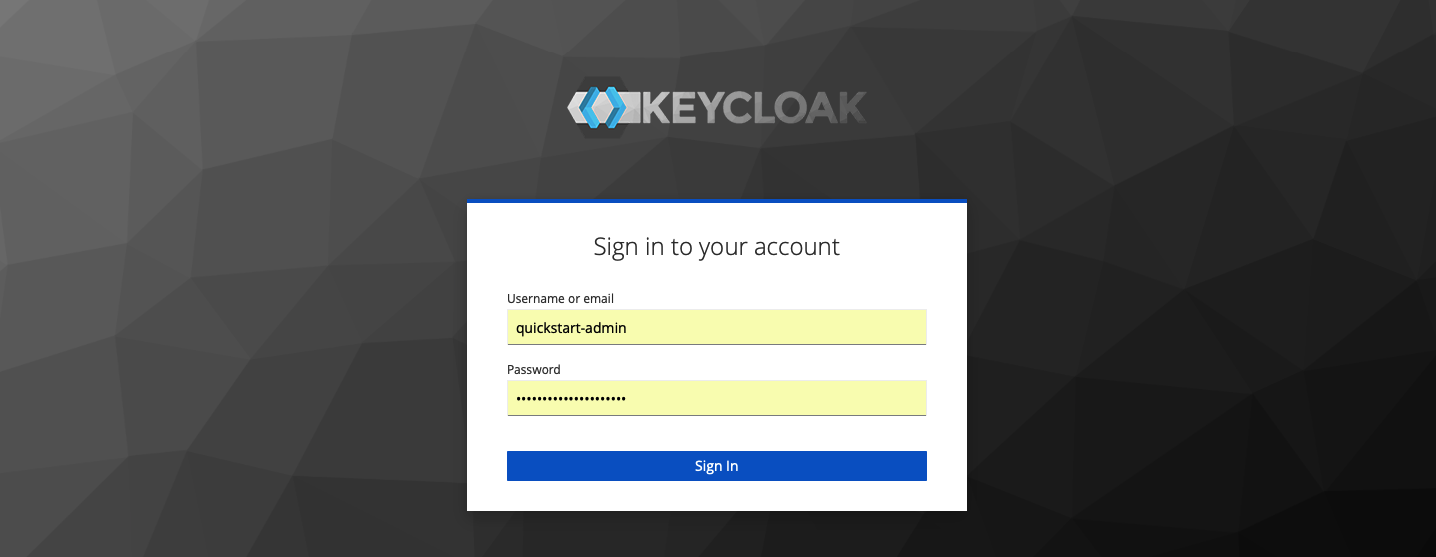
Sign in with the administrator username quickstart-admin and password quickstart-admin-pass:
Create a realm named quickstart-realm:

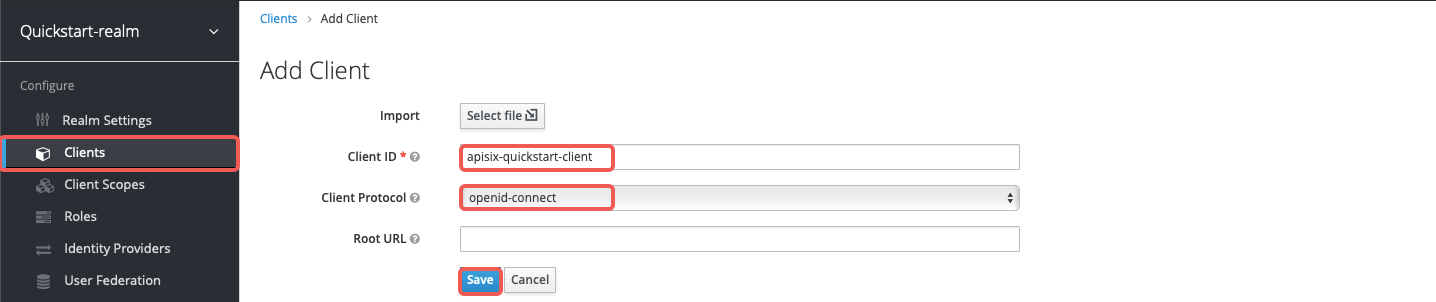
Create a client named apisix-quickstart-client:
On the client settings page, select confidential as the access type:

Enable authorization for the client and save the configuration. This should also enable the client service account and assign the uma_protection role automatically:

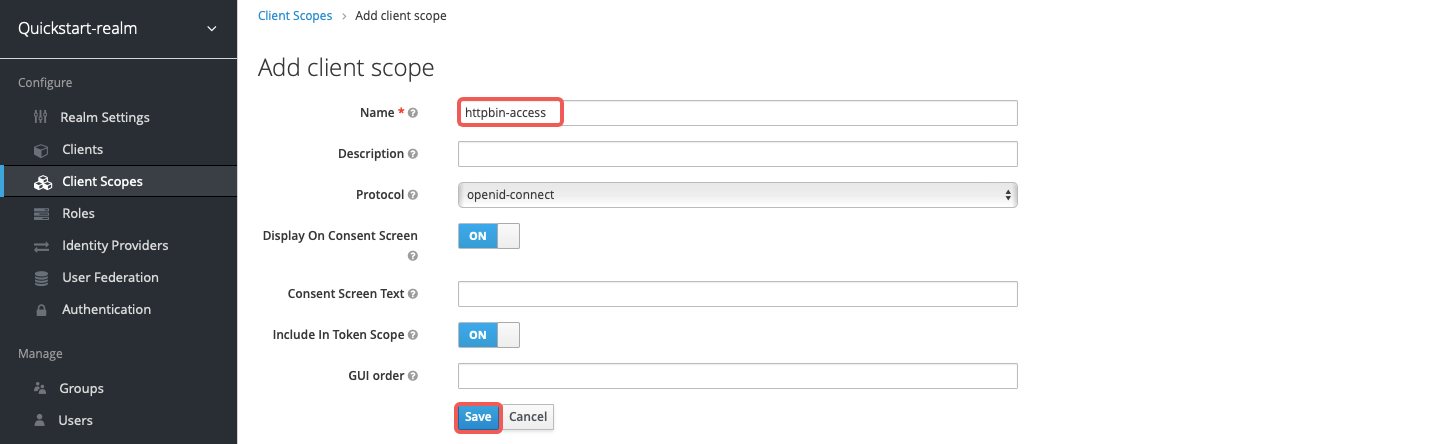
Create a client scope named httpbin-access:
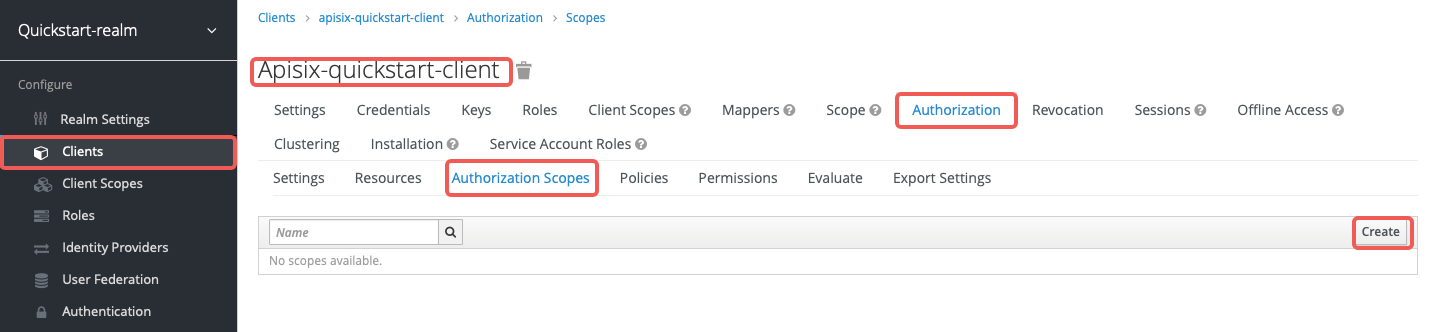
In the client's Authorization section, create the authorization scope access:
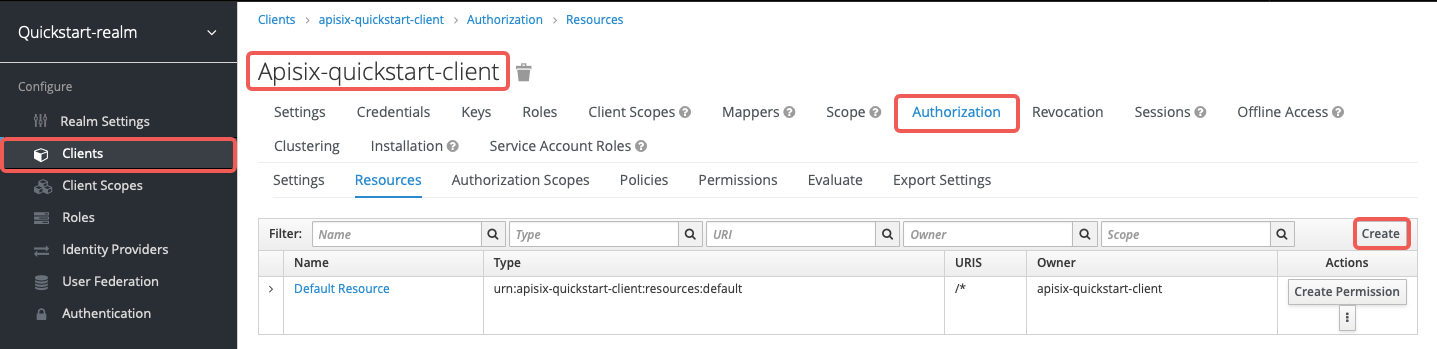
Create the resource httpbin-anything with URI /anything and scope access:
Create the client scope policy access-client-scope-policy that requires httpbin-access:
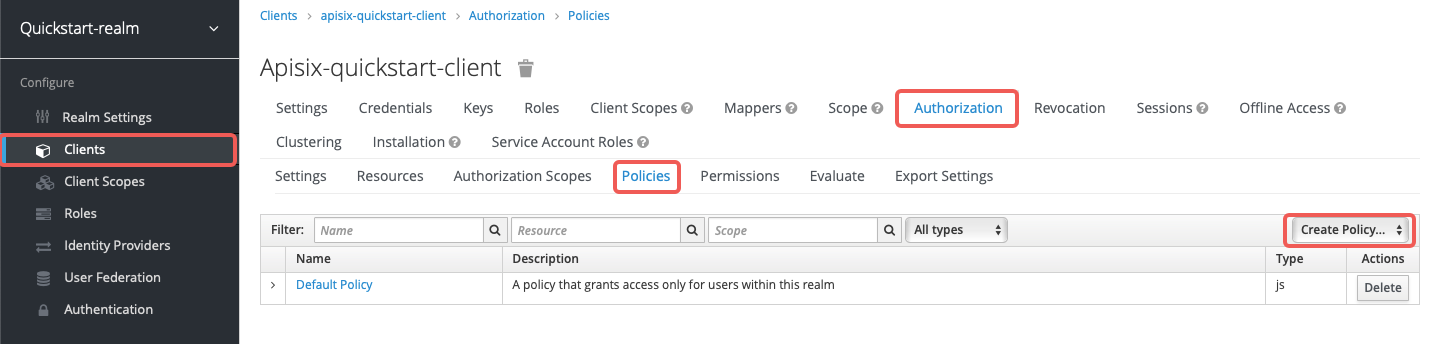
Create the scope-based permission access-scope-perm that uses the access scope and access-client-scope-policy:

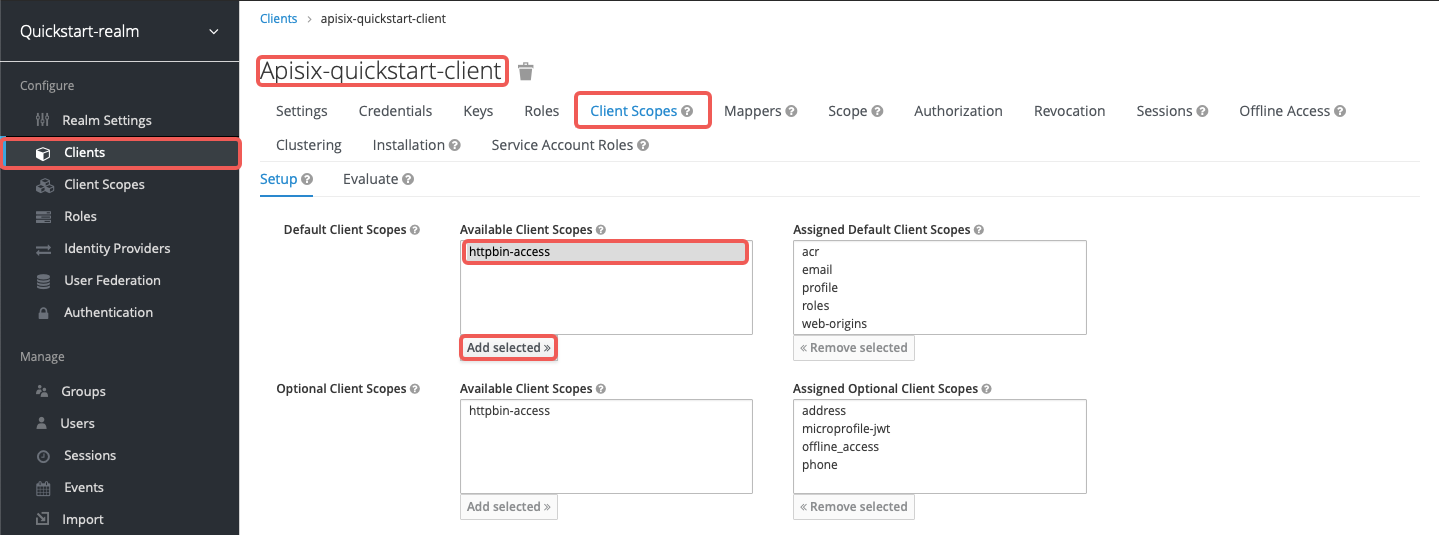
Add httpbin-access to the default client scopes of apisix-quickstart-client:
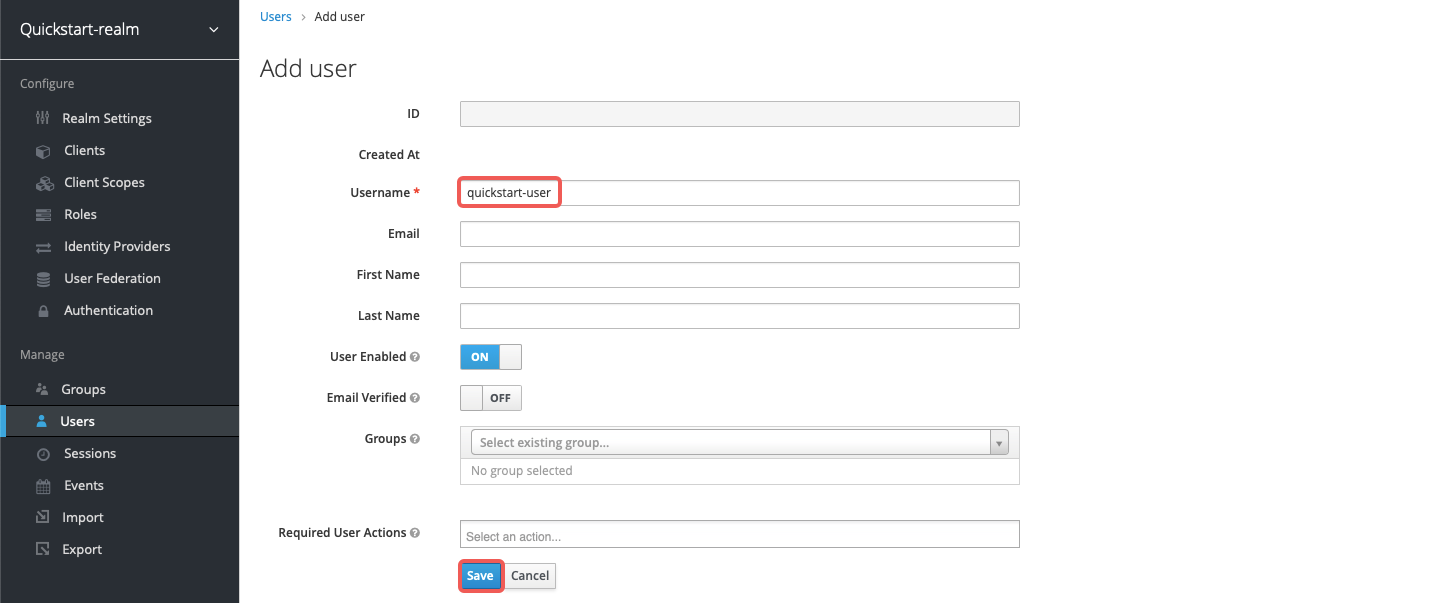
Create a user named quickstart-user:
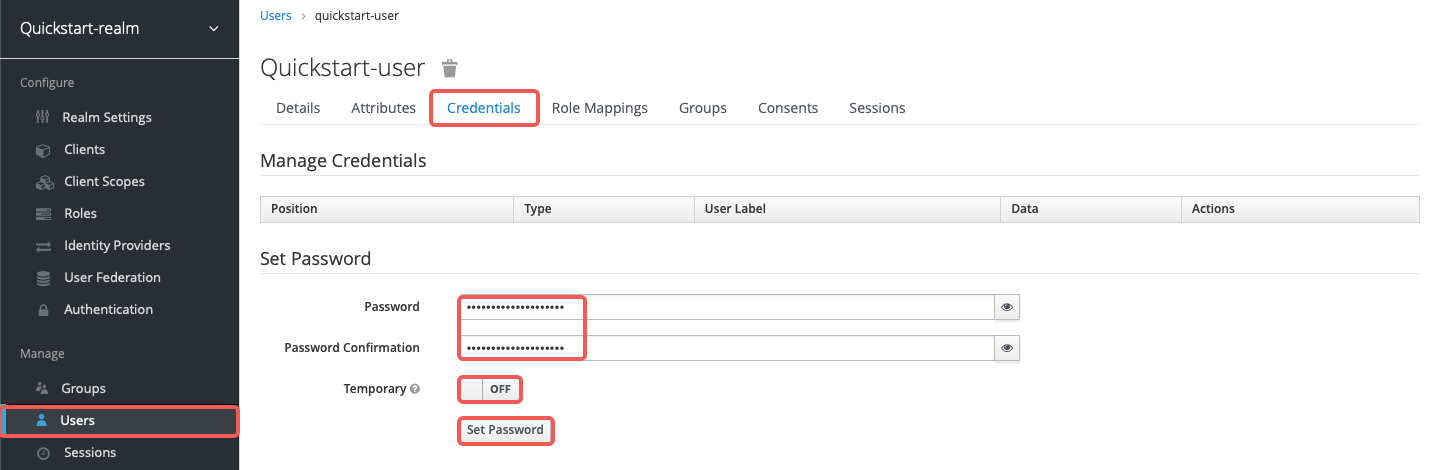
Set the password to quickstart-user-pass and turn off Temporary:
Save the client secret from Clients > apisix-quickstart-client > Credentials:
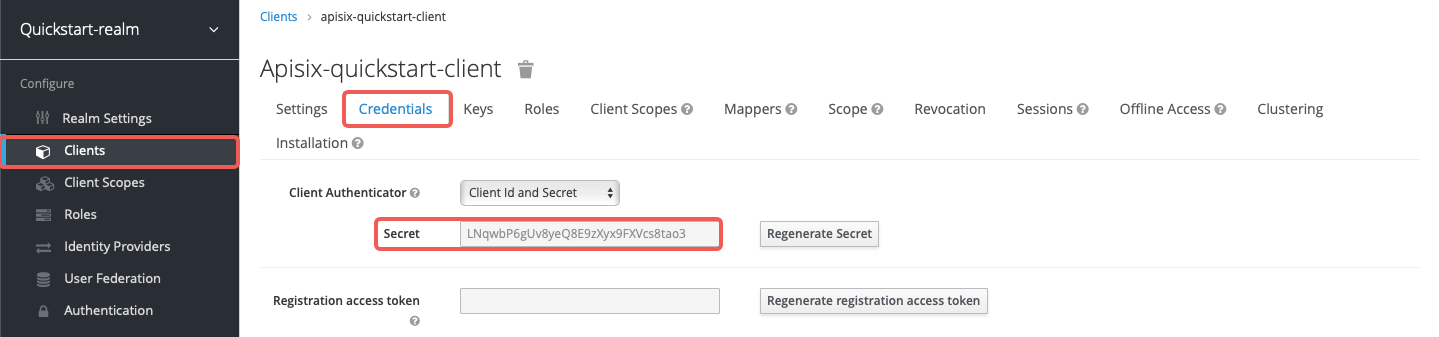
Save the OIDC client ID and secret to environment variables:
OIDC_CLIENT_ID=apisix-quickstart-client
OIDC_CLIENT_SECRET=bSaIN3MV1YynmtXvU8lKkfeY0iwpr9cH  # replace with your value
If APISIX runs in Kubernetes, use the same Keycloak hostname consistently in both the plugin configuration and the token request. Otherwise, Keycloak may reject the bearer token because the token issuer does not match the configured authorization endpoints.
Request Access Token
Request an access token from Keycloak and save it to ACCESS_TOKEN:
- Docker
- Kubernetes
ACCESS_TOKEN=$(curl -sS "$KEYCLOAK_URL/realms/quickstart-realm/protocol/openid-connect/token" \
  -d 'grant_type=client_credentials' \
  -d 'client_id='$OIDC_CLIENT_ID'' \
  -d 'client_secret='$OIDC_CLIENT_SECRET'' | jq -r '.access_token')
Run the token request inside the Keycloak pod and save the result to ACCESS_TOKEN:
ACCESS_TOKEN=$(kubectl exec -n aic deploy/keycloak -- env OIDC_CLIENT_SECRET="$OIDC_CLIENT_SECRET" sh -lc 'curl -sS "http://keycloak.aic.svc.cluster.local:8080/realms/quickstart-realm/protocol/openid-connect/token" \
  -d grant_type=client_credentials \
  -d client_id=apisix-quickstart-client \
  -d client_secret="$OIDC_CLIENT_SECRET"' | jq -r '.access_token')
Use Lazy Load Path and Resource Registration Endpoint
The examples below demonstrate how you can configure authz-keycloak to dynamically resolve the request URI to one or more resources using the resource registration endpoint instead of static permissions.
- Admin API
- ADC
- Ingress Controller
Create a route with authz-keycloak-route as follows:
curl "http://127.0.0.1:9180/apisix/admin/routes" -X PUT \
  -H "X-API-KEY: ${ADMIN_API_KEY}" \
  --data-binary @- <<EOF
  {
    "id": "authz-keycloak-route",
    "uri": "/anything",
    "plugins": {
      "authz-keycloak": {
        "lazy_load_paths": true,
        "resource_registration_endpoint": "$KEYCLOAK_URL/realms/quickstart-realm/authz/protection/resource_set",
        "discovery": "$KEYCLOAK_URL/realms/quickstart-realm/.well-known/uma2-configuration",
        "client_id": "$OIDC_CLIENT_ID",
        "client_secret": "$OIDC_CLIENT_SECRET"
      }
    },
    "upstream": {
      "type": "roundrobin",
      "nodes": {
        "httpbin.org:80": 1
      }
    }
  }
EOF
Create a route with authz-keycloak configured in ADC:
services:
  - name: authz-keycloak-service
    routes:
      - name: authz-keycloak-route
        uris:
          - /anything
        plugins:
          authz-keycloak:
            lazy_load_paths: true
            resource_registration_endpoint: ${KEYCLOAK_URL}/realms/quickstart-realm/authz/protection/resource_set
            discovery: ${KEYCLOAK_URL}/realms/quickstart-realm/.well-known/uma2-configuration
            client_id: ${OIDC_CLIENT_ID}
            client_secret: ${OIDC_CLIENT_SECRET}
    upstream:
      type: roundrobin
      nodes:
        - host: httpbin.org
          port: 80
          weight: 1
Synchronize the configuration to the gateway:
adc sync -f adc.yaml
Configure authz-keycloak on the route:
- Gateway API
- APISIX CRD
apiVersion: v1
kind: Service
metadata:
  namespace: aic
  name: httpbin-external-domain
spec:
  type: ExternalName
  externalName: httpbin.org
---
apiVersion: apisix.apache.org/v1alpha1
kind: PluginConfig
metadata:
  namespace: aic
  name: authz-keycloak-plugin-config
spec:
  plugins:
    - name: authz-keycloak
      config:
        lazy_load_paths: true
        resource_registration_endpoint: http://keycloak.aic.svc.cluster.local:8080/realms/quickstart-realm/authz/protection/resource_set
        discovery: http://keycloak.aic.svc.cluster.local:8080/realms/quickstart-realm/.well-known/uma2-configuration
        client_id: apisix-quickstart-client
        client_secret: replace-with-your-client-secret
---
apiVersion: gateway.networking.k8s.io/v1
kind: HTTPRoute
metadata:
  namespace: aic
  name: authz-keycloak-route
spec:
  parentRefs:
    - name: apisix
  rules:
    - matches:
        - path:
            type: Exact
            value: /anything
      filters:
        - type: ExtensionRef
          extensionRef:
            group: apisix.apache.org
            kind: PluginConfig
            name: authz-keycloak-plugin-config
      backendRefs:
        - name: httpbin-external-domain
          port: 80
Apply the configuration to your cluster:
kubectl apply -f authz-keycloak-ic.yaml
apiVersion: apisix.apache.org/v2
kind: ApisixUpstream
metadata:
  namespace: aic
  name: httpbin-external-domain
spec:
  ingressClassName: apisix
  externalNodes:
    - type: Domain
      name: httpbin.org
---
apiVersion: apisix.apache.org/v2
kind: ApisixPluginConfig
metadata:
  namespace: aic
  name: authz-keycloak-plugin-config
spec:
  ingressClassName: apisix
  plugins:
    - name: authz-keycloak
      enable: true
      config:
        lazy_load_paths: true
        resource_registration_endpoint: http://keycloak.aic.svc.cluster.local:8080/realms/quickstart-realm/authz/protection/resource_set
        discovery: http://keycloak.aic.svc.cluster.local:8080/realms/quickstart-realm/.well-known/uma2-configuration
        client_id: apisix-quickstart-client
        client_secret: replace-with-your-client-secret
---
apiVersion: apisix.apache.org/v2
kind: ApisixRoute
metadata:
  namespace: aic
  name: authz-keycloak-route
spec:
  ingressClassName: apisix
  http:
    - name: authz-keycloak-route
      match:
        paths:
          - /anything
        methods:
          - GET
      upstreams:
        - name: httpbin-external-domain
      plugin_config_name: authz-keycloak-plugin-config
Apply the configuration to your cluster:
kubectl apply -f authz-keycloak-ic.yaml
❶ Set lazy_load_paths to true.
❷ Set resource_registration_endpoint to Keycloak's UMA-compliant resource registration endpoint. Required when lazy_load_paths is true.
❸ Set discovery to the discovery document endpoint of Keycloak authorization services.
❹ Set client_id to the client ID created previously.
❺ Set client_secret to the client secret created previously. Required when lazy_load_paths is true.
Send a request to the route:
curl "http://127.0.0.1:9080/anything" -H "Authorization: Bearer $ACCESS_TOKEN"
You should see an HTTP/1.1 200 OK response similar to the following:
{
  "args": {},
  "data": "",
  "files": {},
  "form": {},
  "headers": {
    "Accept": "*/*",
    "Authorization": "Bearer eyJhbGciOiJSU..."
  },
  "json": null,
  "method": "GET",
  "url": "http://127.0.0.1/anything"
}
Use Static Permissions
The examples below demonstrate how you can configure authz-keycloak to use the static permission httpbin-anything#access.
- Admin API
- ADC
- Ingress Controller
Create a route with authz-keycloak-route as follows:
curl "http://127.0.0.1:9180/apisix/admin/routes" -X PUT \
  -H "X-API-KEY: ${ADMIN_API_KEY}" \
  --data-binary @- <<EOF
  {
    "id": "authz-keycloak-route",
    "uri": "/anything",
    "plugins": {
      "authz-keycloak": {
        "lazy_load_paths": false,
        "discovery": "$KEYCLOAK_URL/realms/quickstart-realm/.well-known/uma2-configuration",
        "permissions": ["httpbin-anything#access"],
        "client_id": "$OIDC_CLIENT_ID"
      }
    },
    "upstream": {
      "type": "roundrobin",
      "nodes": {
        "httpbin.org:80": 1
      }
    }
  }
EOF
Create a route with authz-keycloak configured in ADC:
services:
  - name: authz-keycloak-service
    routes:
      - name: authz-keycloak-route
        uris:
          - /anything
        plugins:
          authz-keycloak:
            lazy_load_paths: false
            discovery: ${KEYCLOAK_URL}/realms/quickstart-realm/.well-known/uma2-configuration
            permissions:
              - "httpbin-anything#access"
            client_id: ${OIDC_CLIENT_ID}
    upstream:
      type: roundrobin
      nodes:
        - host: httpbin.org
          port: 80
          weight: 1
Synchronize the configuration to the gateway:
adc sync -f adc.yaml
Configure authz-keycloak on the route:
- Gateway API
- APISIX CRD
apiVersion: v1
kind: Service
metadata:
  namespace: aic
  name: httpbin-external-domain
spec:
  type: ExternalName
  externalName: httpbin.org
---
apiVersion: apisix.apache.org/v1alpha1
kind: PluginConfig
metadata:
  namespace: aic
  name: authz-keycloak-plugin-config
spec:
  plugins:
    - name: authz-keycloak
      config:
        lazy_load_paths: false
        discovery: http://keycloak.aic.svc.cluster.local:8080/realms/quickstart-realm/.well-known/uma2-configuration
        permissions:
          - "httpbin-anything#access"
        client_id: apisix-quickstart-client
---
apiVersion: gateway.networking.k8s.io/v1
kind: HTTPRoute
metadata:
  namespace: aic
  name: authz-keycloak-route
spec:
  parentRefs:
    - name: apisix
  rules:
    - matches:
        - path:
            type: Exact
            value: /anything
      filters:
        - type: ExtensionRef
          extensionRef:
            group: apisix.apache.org
            kind: PluginConfig
            name: authz-keycloak-plugin-config
      backendRefs:
        - name: httpbin-external-domain
          port: 80
Apply the configuration to your cluster:
kubectl apply -f authz-keycloak-ic.yaml
apiVersion: apisix.apache.org/v2
kind: ApisixUpstream
metadata:
  namespace: aic
  name: httpbin-external-domain
spec:
  ingressClassName: apisix
  externalNodes:
    - type: Domain
      name: httpbin.org
---
apiVersion: apisix.apache.org/v2
kind: ApisixPluginConfig
metadata:
  namespace: aic
  name: authz-keycloak-plugin-config
spec:
  ingressClassName: apisix
  plugins:
    - name: authz-keycloak
      enable: true
      config:
        lazy_load_paths: false
        discovery: http://keycloak.aic.svc.cluster.local:8080/realms/quickstart-realm/.well-known/uma2-configuration
        permissions:
          - "httpbin-anything#access"
        client_id: apisix-quickstart-client
---
apiVersion: apisix.apache.org/v2
kind: ApisixRoute
metadata:
  namespace: aic
  name: authz-keycloak-route
spec:
  ingressClassName: apisix
  http:
    - name: authz-keycloak-route
      match:
        paths:
          - /anything
        methods:
          - GET
      upstreams:
        - name: httpbin-external-domain
      plugin_config_name: authz-keycloak-plugin-config
Apply the configuration to your cluster:
kubectl apply -f authz-keycloak-ic.yaml
❶ Set lazy_load_paths to false.
❷ Set discovery to the discovery document endpoint of Keycloak authorization services.
❸ Set permissions to resource httpbin-anything and scope access.
Send a request to the route:
curl "http://127.0.0.1:9080/anything" -H "Authorization: Bearer $ACCESS_TOKEN"
You should see an HTTP/1.1 200 OK response.
If you remove the client scope httpbin-access from apisix-quickstart-client, you should receive a 401 Unauthorized response when requesting the resource.
Generate Token with Password Grant at Custom Token Endpoint
The examples below demonstrate how you can configure authz-keycloak to request a token with the password grant at a custom endpoint.
- Admin API
- ADC
- Ingress Controller
Create a route with authz-keycloak-route as follows:
curl "http://127.0.0.1:9180/apisix/admin/routes" -X PUT \
  -H "X-API-KEY: ${ADMIN_API_KEY}" \
  --data-binary @- <<EOF
  {
    "id": "authz-keycloak-route",
    "uri": "/api/*",
    "plugins": {
      "authz-keycloak": {
        "lazy_load_paths": true,
        "resource_registration_endpoint": "$KEYCLOAK_URL/realms/quickstart-realm/authz/protection/resource_set",
        "client_id": "$OIDC_CLIENT_ID",
        "client_secret": "$OIDC_CLIENT_SECRET",
        "token_endpoint": "$KEYCLOAK_URL/realms/quickstart-realm/protocol/openid-connect/token",
        "password_grant_token_generation_incoming_uri": "/api/token"
      }
    },
    "upstream": {
      "type": "roundrobin",
      "nodes": {
        "httpbin.org:80": 1
      }
    }
  }
EOF
Create a route with authz-keycloak configured in ADC:
services:
  - name: authz-keycloak-service
    routes:
      - name: authz-keycloak-route
        uris:
          - /api/*
        plugins:
          authz-keycloak:
            lazy_load_paths: true
            resource_registration_endpoint: ${KEYCLOAK_URL}/realms/quickstart-realm/authz/protection/resource_set
            client_id: ${OIDC_CLIENT_ID}
            client_secret: ${OIDC_CLIENT_SECRET}
            token_endpoint: ${KEYCLOAK_URL}/realms/quickstart-realm/protocol/openid-connect/token
            password_grant_token_generation_incoming_uri: /api/token
    upstream:
      type: roundrobin
      nodes:
        - host: httpbin.org
          port: 80
          weight: 1
Synchronize the configuration to the gateway:
adc sync -f adc.yaml
Configure authz-keycloak on the route:
- Gateway API
- APISIX CRD
apiVersion: v1
kind: Service
metadata:
  namespace: aic
  name: httpbin-external-domain
spec:
  type: ExternalName
  externalName: httpbin.org
---
apiVersion: apisix.apache.org/v1alpha1
kind: PluginConfig
metadata:
  namespace: aic
  name: authz-keycloak-plugin-config
spec:
  plugins:
    - name: authz-keycloak
      config:
        lazy_load_paths: true
        resource_registration_endpoint: http://keycloak.aic.svc.cluster.local:8080/realms/quickstart-realm/authz/protection/resource_set
        client_id: apisix-quickstart-client
        client_secret: replace-with-your-client-secret
        token_endpoint: http://keycloak.aic.svc.cluster.local:8080/realms/quickstart-realm/protocol/openid-connect/token
        password_grant_token_generation_incoming_uri: /api/token
---
apiVersion: gateway.networking.k8s.io/v1
kind: HTTPRoute
metadata:
  namespace: aic
  name: authz-keycloak-route
spec:
  parentRefs:
    - name: apisix
  rules:
    - matches:
        - path:
            type: PathPrefix
            value: /api/
      filters:
        - type: ExtensionRef
          extensionRef:
            group: apisix.apache.org
            kind: PluginConfig
            name: authz-keycloak-plugin-config
      backendRefs:
        - name: httpbin-external-domain
          port: 80
Apply the configuration to your cluster:
kubectl apply -f authz-keycloak-ic.yaml
apiVersion: apisix.apache.org/v2
kind: ApisixUpstream
metadata:
  namespace: aic
  name: httpbin-external-domain
spec:
  ingressClassName: apisix
  externalNodes:
    - type: Domain
      name: httpbin.org
---
apiVersion: apisix.apache.org/v2
kind: ApisixPluginConfig
metadata:
  namespace: aic
  name: authz-keycloak-plugin-config
spec:
  ingressClassName: apisix
  plugins:
    - name: authz-keycloak
      enable: true
      config:
        lazy_load_paths: true
        resource_registration_endpoint: http://keycloak.aic.svc.cluster.local:8080/realms/quickstart-realm/authz/protection/resource_set
        client_id: apisix-quickstart-client
        client_secret: replace-with-your-client-secret
        token_endpoint: http://keycloak.aic.svc.cluster.local:8080/realms/quickstart-realm/protocol/openid-connect/token
        password_grant_token_generation_incoming_uri: /api/token
---
apiVersion: apisix.apache.org/v2
kind: ApisixRoute
metadata:
  namespace: aic
  name: authz-keycloak-route
spec:
  ingressClassName: apisix
  http:
    - name: authz-keycloak-route
      match:
        paths:
          - /api/*
        methods:
          - GET
          - POST
      upstreams:
        - name: httpbin-external-domain
      plugin_config_name: authz-keycloak-plugin-config
Apply the configuration to your cluster:
kubectl apply -f authz-keycloak-ic.yaml
❶ Set token_endpoint to the Keycloak token endpoint. Required when the discovery document is not provided.
❷ Set password_grant_token_generation_incoming_uri to a custom URI path where users can obtain tokens.
Send a request to the configured token endpoint. The request should use the POST method and application/x-www-form-urlencoded as the Content-Type:
OIDC_USER=quickstart-user
OIDC_PASSWORD=quickstart-user-pass

curl "http://127.0.0.1:9080/api/token" -X POST \
  -H "Content-Type: application/x-www-form-urlencoded" \
  -H "Accept: application/json" \
  -d 'username='$OIDC_USER'' \
  -d 'password='$OIDC_PASSWORD''
You should see a JSON response with an access token similar to the following:
{
  "access_token": "eyJhbGciOiJSUzI1NiIsInR5cCIgOiAiSldUIi...",
  "expires_in": 300,
  "refresh_expires_in": 1800,
  "token_type": "Bearer",
  "scope": "profile email httpbin-access"
}