Log in to API7 Dashboard with SSO
Single Sign-On (SSO) allows users to log in once and access multiple systems without re-entering credentials. It improves efficiency, enhances user experience, and strengthens security by eliminating the need for multiple passwords.
In API7 Enterprise, you can use multiple login options simultaneously. It is possible to create users within API7 while also importing them from other existing systems.
Architecture
Take LDAP as an example:
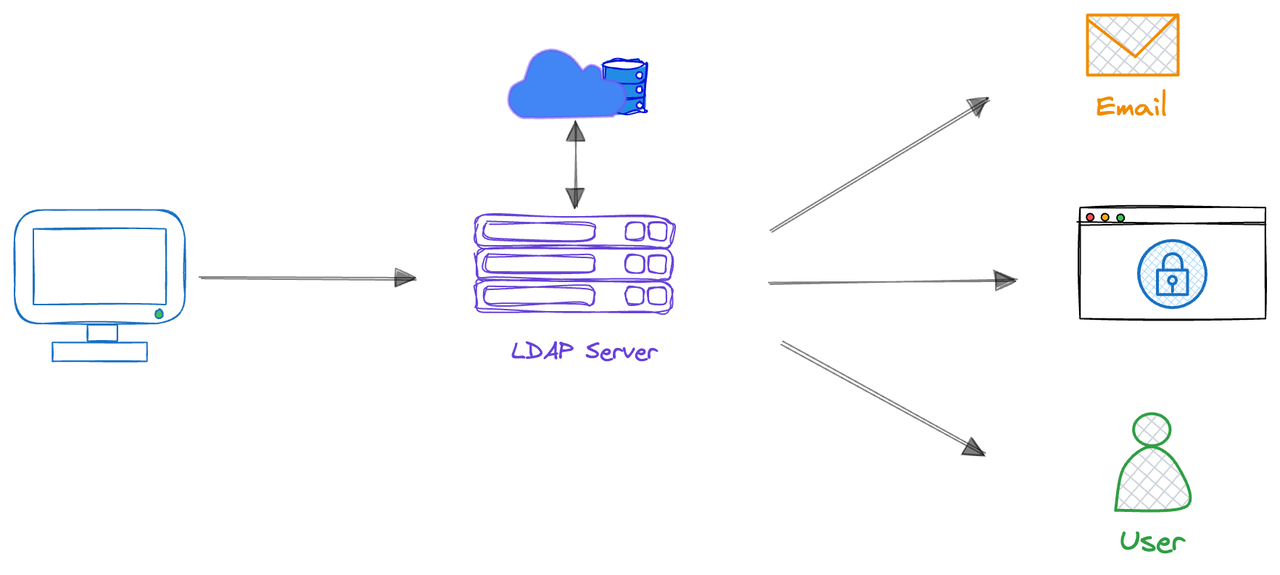
- User Login Request: Users enter their username and password when logging into API7 Enterprise.
- LDAP Verification: API7 Enterprise transfers the credentials provided by the user to the LDAP server for verification.
- Authentication: The LDAP server verifies whether the user's credentials match the user information stored in the LDAP directory.
- Authorization: If verification is successful, the LDAP server returns authorization information to API7 Enterprise, and the system authorizes the user to access corresponding resources based on this information.
- Accessing Resources: Users access API7 Enterprise with the verified identity without having to re-enter credentials.
Integrate with SSO
API7 Enterprise supports Single Sign-On with the following implementations. Integrating API7 Enterprise with other user systems enables you to log your existing users into API7 Enterprise without signing up for a new API7 account.
- LDAP
- OIDC
- SAML
- Select Organization from the top navigation bar, then choose Settings.
- Click Add Login Option.
- Fill in the form:
- Name: the unique login name. The name should be identifiable for users. For example, if you configure the name to be
Employee Account, you will seeLogin with Employee Accountoption in the Dashboard login. - Provider: choose
LDAP. - Host: the LDAP host domain. For example,
ldap.example.com. - Port: For example,
1563. - Base Distinguished Name: For example,
oc=users,dc=org,dc=example. - Bind Distinguished Name: the LDAP Bind Distinguished Name (DN) used to perform LDAP search for the user. This LDAP Bind DN should have permissions to search for the user being authenticated. For example,
cn=admin,dc=org,dc=example. - Bind Password: the LDAP bind password used to authenticate with the LDAP server.
- Identifier: the attribute used to identify LDAP users. For example,
cn. - Attributes Mapping: map API7 internal fields to related LDAP attributes to seamlessly integrate and synchronize data.
- Click Add.
- Select Organization from the top navigation bar, then choose Settings.
- Click Add Login Option.
- Fill in the form:
- Name: the unique login name. The name should be identifiable for users. For example, if you configure the name to be
Employee Account, you will seeLogin with Employee Accountoption in the Dashboard login. - Provider: choose
OIDC. - Issuer: the identifier of the OpenID Connect provider. For example,
https://accounts.example.com. - Client ID: the unique identifier of your application, assigned by the OIDC provider. For example,
API7. - Client Secret: secret key used for authentication, assigned by the OIDC provider.
- Request Scope: Access tokens often possess different scopes, which limit their usage. For example,
profile,email. - Root URL: the URL used to access API7 for generating callback URL. For example,
https://auth.example.com/oidc. - SSL Verify : default value is open.
- Click Add.
Below is an interactive demo that provides a hands-on introduction to the OpenID Connect (OIDC) protocol for Single Sign-On (SSO). You will better understand how to use it in API7 Enterprise by clicking and following the steps.
- Select Organization from the top navigation bar, then choose Settings.
- Click Add Login Option.
- Fill in the form:
- Name: the unique login name. The name should be identifiable for users. For example, if you configure the name to be
Employee Account, you will seeLogin with Employee Accountoption in the Dashboard login. - Provider: choose
SAML. - Identity Provider Metadata URL: URL used to obtain information about the Identity Provider, such as its public key, supported SAML versions, signature algorithms, etc. For example,
https://idp.example.com/metadata. - Service Provider Root URL: the entity that requests authentication and authorization from the Identity Provider (IdP). For example,
https://sp.example.com. - Entity ID: a unique identifier for the Service Provider (SP) or Identity Provider (IdP) entity. It typically serves as a globally unique identifier for the entity within the SAML federation. For example,
https://sp.example.com/saml/metadata.
- Click Add.
Use Cases
Login with SSO
Once you have configured the Login Options, external users will be able to directly log in to the API7 Dashboard without the need for signing up.
- Visit the API7 Enterprise at
https://localhost:7443. - Choose from the login option name, for example, Login with Employee Account.
- Enter your username and password.
- Click Login.
Delete Imported Users
If you delete a user with SSO login options in Users, it only means that the user will lose all their roles. However, they can still log in to the API7 Dashboard as a new user. To completely block their access to the API7 Dashboard, you must delete them from the original system.
Sync User Data from IdP
SCIM (System for Cross-domain Identity Management) is a protocol that can be used to synchronize user and group information from the original Identity Provider (IdP) to API7 Enterprise. This can eliminate the need to manually manage user and group information in multiple systems, which can save time and reduce the risk of errors.
With SCIM Provisioning, API7 Enterprise automatically synchronizes user data whenever a new user is registered or deleted in your IdP.
- Select Organization from the top navigation bar, then choose Settings.
- Click Enable of SCIM Provisioning.
- Copy the
API7 SCIM Endpoint URLandSCIM Token. - Configure Your IdP (if it supports SCIM):
- Log in to your IdP administration console.
- Locate the SCIM configuration settings (these may vary depending on your IdP).
- Paste the copied API7 SCIM Endpoint URL and SCIM Token into the appropriate fields.
- Save your configuration changes and configure them on your IdP side (make sure your IdP supports SCIM protocol).
Assign Roles for Imported Users
Update Roles Manually
See how to update user roles..
Set Role Mapping
Imported users are automatically assigned roles based on relevant attributes from their original system (title, position, department, etc.). These roles are synchronized and refreshed upon login for seamless access. Role mapping of a login option can involve multiple rules that work together to determine user access.
Role mapping takes precedence over manual role assignments. Any manual adjustments to a user's roles will be overwritten upon the next user login when role mapping is active.
- Select Organization from the top navigation bar, then choose Settings.
- Choose the login option by clicking its name.
- Click Enable of Role Mapping.
- Fill in the form:
- Internal Role: For example,
Super Admin. - Role Attribute: For example,
Position. - Operation: For example,
=. - Role Value: For example,
Team Lead.
- Click Enable.
Now all users with Position = Team Lead from IdP will gain the Super Admin role.
Note that this role mapping is dynamic. If a user's job title changes in the identity provider, from Team Lead to Team Member for example, their role will be automatically updated the next time they log in to API7 Enterprise.
Set Permission Boundary Mapping
Imported users are automatically assigned permission boundaries based on relevant attributes from their original system (title, position, department, etc.). These permission boundaries are synchronized and refreshed upon login for seamless access. Permission boundary mapping of a login option can involve multiple rules that work together to determine user access.
Permission boundary mapping takes precedence over manual permission boundary modification. Any manual adjustments to a user's permission boundaries will be overwritten upon the next user login when permission boundary mapping is active.
- Select Organization from the top navigation bar, then choose Settings.
- Choose the login option by clicking its name.
- Click Enable of Permission Boundary Mapping.
- Fill in the form:
- Permission Policy: For example,
Prohibit License Operation. - Permission Boundary Attribute: For example,
Position. - Operation: For example,
=. - Permission Boundary Value: For example,
Team Member.
- Click Enable.
Now all users with Position = Team Member from IdP will be restricted by Prohibit License Operation policy, even if they were assigned the Super Admin role.
Note that this permission boundary mapping is dynamic. If a user's job title changes in the identity provider, from Team Member to Team Lead for example, their permission boundary will be automatically updated the next time they log in to API7 Enterprise.
Delete a Login Option
Deleting a login option will result in the removal of all users associated with it.
- Select Organization from the top navigation bar, then choose Users.
- Check if there are any users still using this login option. If yes, notify them first.
- Select Organization from the top navigation bar, then choose Settings.
- Click Delete of the target login option.
- Double confirm.
Additional Resources
- Key Concepts
- Getting Started
- Reference