Dashboard SSO using LDAP
Single Sign-On (SSO) allows users to access multiple applications using a single set of credentials, streamlining the authentication process. In API7 Enterprise, SSO supports multiple protocols and provides the capability to manage users by importing them from existing identity providers.
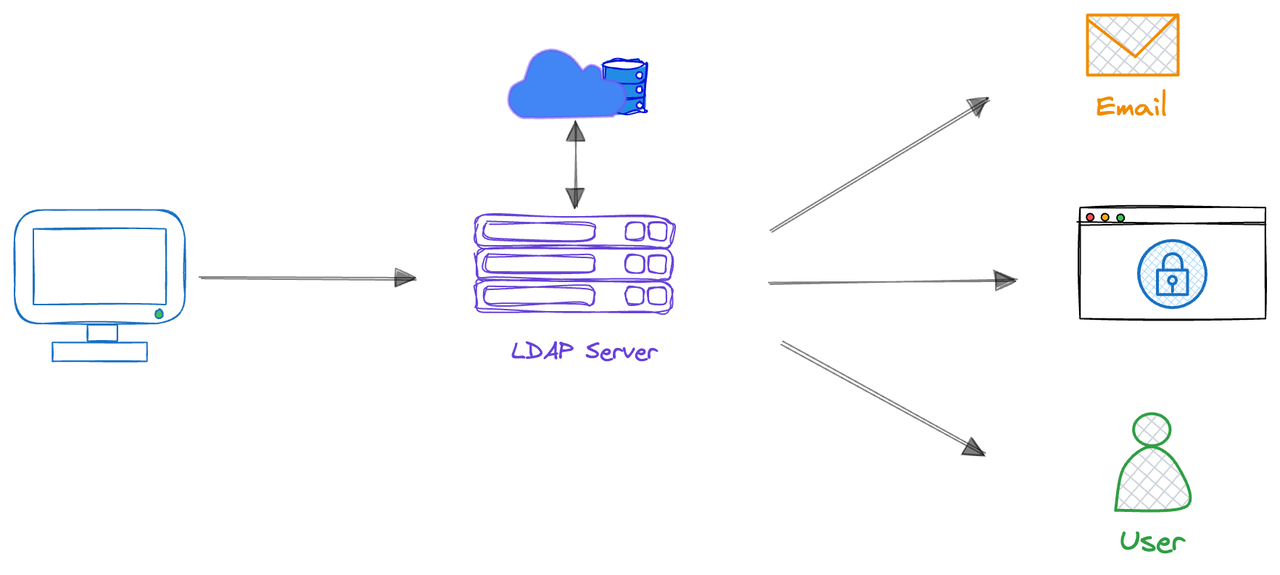
- User Login Request: Users enter their username and password when logging into API7 Enterprise.
- LDAP Verification: API7 Enterprise transfers the credentials provided by the user to the LDAP server for verification.
- Authentication: The LDAP server verifies whether the user's credentials match the user information stored in the LDAP directory.
- Authorization: If verification is successful, the LDAP server returns authorization information to API7 Enterprise, and the system authorizes the user to access corresponding resources based on this information.
- Accessing Resources: Users access API7 Enterprise with the verified identity without having to re-enter credentials.
This guide walks you through configuring Single Sign-On (SSO) for the API7 Enterprise Dashboard using the LDAP protocol, and setting up role and permission boundary mappings for imported users.
Set Up SSO Integration
This section guides you through configuring Single Sign-On (SSO) for the API7 Enterprise Dashboard using the LDAP protocol.
Configure LDAP Server
Define the directory structure. Plan your Base DN and organizational units (OUs). For example:
# Base DN: dc=example,dc=com

# Root entry
dn: dc=example,dc=com
objectClass: top
objectClass: dcObject
objectClass: organization
o: Example Company
dc: example

# LDAP admin account (used as Bind DN)
dn: cn=read-only-admin,dc=example,dc=com
objectClass: inetOrgPerson
objectClass: organizationalPerson
objectClass: person
objectClass: top
cn: read-only-admin
sn: Admin
uid: read-only-admin
userPassword:: e1NTSEF9JGFsdGhvdmVyJGFsdGhvdmVy
mail: admin@example.com

# User accounts
dn: uid=alice,dc=example,dc=com
objectClass: inetOrgPerson
objectClass: organizationalPerson
objectClass: person
objectClass: top
uid: alice
cn: Alice Johnson
sn: Johnson
mail: alice.johnson@example.com
telephoneNumber: 555-123-4567

dn: uid=bob,dc=example,dc=com
objectClass: inetOrgPerson
objectClass: organizationalPerson
objectClass: person
objectClass: top
uid: bob
cn: Bob Smith
sn: Smith
mail: bob.smith@example.com
telephoneNumber: 555-234-5678

# Group entry
dn: ou=admins,dc=example,dc=com
objectClass: top
objectClass: groupOfUniqueNames
ou: admins
cn: Admins
uniqueMember: uid=alice,dc=example,dc=com
uniqueMember: uid=bob,dc=example,dc=com
Create a Dashboard Login Option
- Select Organization from the top navigation bar, then choose Settings.
- Click Add Login Option.
- Fill in the configuration:
- Name: The unique login name. The name should be identifiable for users. For example, if you configure the name to be
Employee Account, you will seeLogin with Employee Accountoption in the Dashboard login page. - Provider: Choose
LDAP. - Host: The LDAP host domain, for example,
ldap.example.com. - Port: The LDAP server port, for example,
389(non-SSL) or636(SSL). - Base DN: The distinguished name that defines the root of the LDAP directory tree where user searches start, for example,
dc=example,dc=com. - Bind Distinguished Name: The distinguished name used to perform LDAP search for users, for example,
cn=read-only-admin,dc=example,dc=com. This account must have permission to read or search for the users being authenticated. - Bind Password: The credential used by the LDAP client to authenticate as the bind DN (user account) when connecting to the LDAP server.
- Identifier: The attribute used to identify LDAP users, for example,
uid. - Attributes Mapping: API7 user fields mapping to LDAP attributes. For example:
- username:
uid - email:
mail - name:
cn
- username:
- Click Add.
A new login option should now appear on the API7 Dashboard login page, allowing you to authenticate using the user created in your IdP. After the user signs in, log in as the admin user, navigate to Organization in the top navigation bar, then select Users to view the user.
Note that this user has no roles assigned yet, and therefore lacks permissions to manage resources in the Dashboard.
Deleting a user in the Dashboard removes all roles and permission boundaries assigned in the API7 Dashboard, but the user can still log in as a new user. To fully revoke access to the API7 Dashboard, the user must be removed from the IdP.
Manage User Roles and Permissions
When automatic mappings are enabled, imported users can be automatically assigned roles and permission boundaries based on attributes from their identity provider, such as title, position, or department. These roles and permission boundaries are synchronized each time the user logs in, ensuring consistent access. A login option’s mapping can include multiple rules that collectively determine a user’s access privileges.
If you prefer to manually update roles and permission boundaries for users (best suited for ad-hoc adjustments), see Update a User Role and Set Permission Boundary.
Automatic mappings take precedence over manually modified roles and permission boundaries. When mappings are active, manual changes in the Dashboard will be overwritten the next time the user logs in.
Configure LDAP Server
Role and permission boundary mappings rely on values configured in the IdP and passed to API7 Enterprise. The same IdP configuration applies when setting up mappings for roles and permission boundaries.
For instance, to assign an attribute to a user, you can configure it either user attribute or via group membership.
In a production environment, it is recommended to implement fine-grained permission controls. For example, you can create detailed permissions in API7 and bind them to a role, then use the API7 Login Options settings to explicitly map each LDAP user atribute to the corresponding API7 role. Finally, assign the appropriate attribute to each user in the LDAP server to ensure proper access control.
Configure as a User Attribute
Assign an attribute, for example title, with the value admin to users who should later have the API7 admin role. The LDIF entry for these users should look similar to the following:
dn: uid=alice,dc=example,dc=com
objectClass: inetOrgPerson
objectClass: organizationalPerson
objectClass: person
objectClass: top
cn: Alice Johnson
sn: Johnson
uid: alice
mail: alice.johnson@example.com
telephoneNumber: 222-123-4567
title: admin
In API7 Dashboard, you can use title, Exact Match, admin mapping rule. See Configure Mappings in Dashboard for configuration steps.
Configure via Group Membership
Suppose that you have a group admins similar to the following:
dn: ou=admins,dc=example,dc=com
objectClass: top
objectClass: groupOfUniqueNames
ou: admins
cn: Admins
uniqueMember: uid=alice,dc=example,dc=com
uniqueMember: uid=bob,dc=example,dc=com
Enable the memberOf module, so that users’ LDAP entries automatically include a memberOf attribute reflecting all the groups they belong to. OpenLDAP does not have this option enabled by default. After enabling the module, each user entry will automatically include a memberOf attribute listing the groups they belong to, for example:
dn: uid=alice,dc=example,dc=com
objectClass: inetOrgPerson
objectClass: organizationalPerson
objectClass: person
objectClass: top
cn: Alice Johnson
sn: Johnson
uid: alice
mail: alice.johnson@example.com
telephoneNumber: 222-123-4567
memberOf: ou=admins,dc=example,dc=com
In API7 Dashboard, you can use memberOf, Contains String, admins mapping rule. See Configure Mappings in Dashboard for configuration steps.
Configure Mappings in Dashboard
This section describes how to configure role and permission boundary mappings in the API7 Enterprise Dashboard to define how user attributes from the identity provider are translated into access controls.
Enable Role Mappings
- Select Organization from the top navigation bar, then choose Settings.
- Select the login option.
- Enable Role Mapping.
- Fill in the configuration:
- Internal Role: The role in API7 Enterprise to assign. For example,
Super Admin. - Role Attribute: The JSONPath to the corresponding attribute in the IdP. The attribute should correspond to an attribute in the user entry, for example,
title. - Operation: The comparison method used to match the attribute value. For example,
Exact Match. - Role Value: The value of the IdP attribute, for example,
admin.
- Click Enable.
Now all users with the title attribute set to admin in the IdP will automatically be assigned the Super Admin role upon their next login.
Note that role mapping is dynamic. If a user's attribute changes in the IdP, their role will be automatically updated based on the role mapping rules the next time they log in to API7 Enterprise.
Enable Permission Boundary Mappings
- Select Organization from the top navigation bar, then choose Settings.
- Select the previously created login option.
- Enable Permission Boundary Mapping.
- Fill in the configuration:
- Permission Policy: The permission policy to assign in API7 Enterprise. For example, you can create a policy such as
Admin License Restricted, which grants full resource access while restricting license updates; and apply the policy to this field. - Permission Boundary Attribute: The JSONPath to the corresponding attribute in the IdP. The attribute should correspond to an attribute in the user entry, for example,
title. - Operation: The comparison method used to match the attribute value. For example,
Exact Match. - Permission Boundary Value: The value of the IdP attribute. For example,
admin.
- Click Enable.
Now all users with the title attribute set to admin in the IdP will be automatically assigned the Admin License Restricted permission boundary upon their next login.
Note that permission boundary mapping is dynamic. If a user's attribute changes in the IdP, their permission boundary will be automatically updated based on the mapping rules the next time they log in to API7 Enterprise.
Delete a Login Option
Deleting a login option will remove all users associated with that option in API7 Dashboard.
- Select Organization from the top navigation bar, then choose Users.
- Check if any users are still using this login option. If so, notify them before making any changes.
- Select Organization from the top navigation bar, then choose Settings.
- Click Delete of the target login option.
Additional Resources
- Key Concepts
- Getting Started
- Reference