acl
The acl plugin allows or denies request access to upstream resources by verifying whether the user initiating the request is in the access control lists.
Examples
The examples below demonstrate how you can use the acl plugin for different scenarios.
Control Access by Examining Consumer Labels
The following example demonstrates how to control consumer access based on consumer labels, upon a successful authentication.
- Admin API
- ADC
- Ingress Controller
Create two consumers, john and jane, each with their own labels for organizations and projects:
curl "http://127.0.0.1:9180/apisix/admin/consumers" -X PUT \
  -H "X-API-KEY: ${ADMIN_API_KEY}" \
  -d '{
    "username": "john",
    "labels": {
      "org": "[\"opensource\",\"apache\"]",
      "project": "[\"tomcat\",\"web-server\",\"http,server\"]"
    }
  }'
curl "http://127.0.0.1:9180/apisix/admin/consumers" -X PUT \
  -H "X-API-KEY: ${ADMIN_API_KEY}" \
  -d '{
    "username": "jane",
    "labels": {
      "org": "apache",
      "project": "gateway,apisix,web-server"
    }
  }'
Create key-auth credentials for john and jane:
curl "http://127.0.0.1:9180/apisix/admin/consumers/john/credentials" -X PUT \
  -H "X-API-KEY: ${ADMIN_API_KEY}" \
  -d '{
    "id": "cred-john-key-auth",
    "plugins": {
      "key-auth": {
        "key": "john-key"
      }
    }
  }'
curl "http://127.0.0.1:9180/apisix/admin/consumers/jane/credentials" -X PUT \
  -H "X-API-KEY: ${ADMIN_API_KEY}" \
  -d '{
    "id": "cred-jane-key-auth",
    "plugins": {
      "key-auth": {
        "key": "jane-key"
      }
    }
  }'
Consumer labels can be configured with either of the two approaches:
- comma-separated string value, such as
{"project": "gateway,apisix"} - character escaped string array,such as
{"project": "[\"gateway\",\"apisix\"]"}
Create a route with key-auth enabled, and configure the acl plugin:
curl "http://127.0.0.1:9180/apisix/admin/routes" -X PUT \
  -H "X-API-KEY: ${ADMIN_API_KEY}" \
  -d '{
    "id": "acl-route",
    "uri": "/get",
    "plugins": {
      "key-auth": {},
      "acl": {
        "allow_labels": {
          "org": ["opensource"]
        }
      }
    },
    "upstream": {
      "type": "roundrobin",
      "nodes": {
        "httpbin.org:80": 1
      }
    }
  }'
❶ Allow only consumers with org label value opensource to access the upstream resource.
Create two consumers, john and jane, each with their own labels, credentials, and a route with key-auth and acl plugins configured:
consumers:
  - username: john
    labels:
      org: "[\"opensource\",\"apache\"]"
      project: "[\"tomcat\",\"web-server\",\"http,server\"]"
    credentials:
      - name: cred-john-key-auth
        type: key-auth
        config:
          key: john-key
  - username: jane
    labels:
      org: "apache"
      project: "gateway,apisix,web-server"
    credentials:
      - name: cred-jane-key-auth
        type: key-auth
        config:
          key: jane-key
services:
  - name: acl-service
    routes:
      - name: acl-route
        uris:
          - /get
        plugins:
          key-auth: {}
          acl:
            allow_labels:
              org:
                - opensource
    upstream:
      type: roundrobin
      nodes:
        - host: httpbin.org
          port: 80
          weight: 1
❶ Consumer labels can be configured with either of the two approaches: comma-separated string value, such as "apache", or character escaped string array, such as "[\"opensource\",\"apache\"]".
❷ Allow only consumers with org label value opensource to access the upstream resource.
Synchronize the configuration to the gateway:
adc sync -f adc.yaml
- Gateway API
- APISIX CRD
Create two labeled consumers and attach the acl plugin through a PluginConfig referenced by HTTPRoute:
apiVersion: apisix.apache.org/v2
kind: ApisixConsumer
metadata:
  namespace: aic
  name: john
  labels:
    org: opensource
spec:
  ingressClassName: apisix
  authParameter:
    keyAuth:
      value:
        key: john-key
---
apiVersion: apisix.apache.org/v2
kind: ApisixConsumer
metadata:
  namespace: aic
  name: jane
  labels:
    org: apache
spec:
  ingressClassName: apisix
  authParameter:
    keyAuth:
      value:
        key: jane-key
---
apiVersion: v1
kind: Service
metadata:
  namespace: aic
  name: httpbin-external-domain
spec:
  type: ExternalName
  externalName: httpbin.org
---
apiVersion: apisix.apache.org/v1alpha1
kind: PluginConfig
metadata:
  namespace: aic
  name: acl-plugin-config
spec:
  plugins:
    - name: key-auth
      config: {}
    - name: acl
      config:
        allow_labels:
          org:
            - opensource
---
apiVersion: gateway.networking.k8s.io/v1
kind: HTTPRoute
metadata:
  namespace: aic
  name: acl-route
spec:
  parentRefs:
    - name: apisix
  rules:
    - matches:
        - path:
            type: Exact
            value: /get
      filters:
        - type: ExtensionRef
          extensionRef:
            group: apisix.apache.org
            kind: PluginConfig
            name: acl-plugin-config
      backendRefs:
        - name: httpbin-external-domain
          port: 80
Apply the configuration to your cluster:
kubectl apply -f acl-gateway-api.yaml
Create two labeled consumers and apply the acl plugin through an ApisixRoute:
apiVersion: apisix.apache.org/v2
kind: ApisixConsumer
metadata:
  namespace: aic
  name: john
  labels:
    org: opensource
spec:
  ingressClassName: apisix
  authParameter:
    keyAuth:
      value:
        key: john-key
---
apiVersion: apisix.apache.org/v2
kind: ApisixConsumer
metadata:
  namespace: aic
  name: jane
  labels:
    org: apache
spec:
  ingressClassName: apisix
  authParameter:
    keyAuth:
      value:
        key: jane-key
---
apiVersion: apisix.apache.org/v2
kind: ApisixRoute
metadata:
  namespace: aic
  name: acl-route
spec:
  ingressClassName: apisix
  http:
    - name: acl
      match:
        paths:
          - /get
      backends:
        - serviceName: httpbin
          servicePort: 80
      plugins:
        - name: key-auth
          config: {}
        - name: acl
          config:
            allow_labels:
              org:
                - opensource
Apply the configuration to your cluster:
kubectl apply -f acl-apisix-crd.yaml
Send a request to the route as consumer jane:
curl -i "http://127.0.0.1:9080/get" -H 'apikey: jane-key'
You should see an HTTP/1.1 403 Forbidden response, as consumer jane was not configured with the required label to access the route.
Send a request to the route as consumer john:
curl -i "http://127.0.0.1:9080/get" -H 'apikey: john-key'
You should see an HTTP/1.1 200 OK response, as consumer john was configured with the required label to access the route.
Control Access by Examining User Information from External Identity Provider
The following example demonstrates how to control user access based on user labels, upon a successful authentication with an external identity provider. Specifically, the example uses Keycloak and user groups as labels.
Follow the steps in set up SSO with Keycloak how-to guide to create a realm, a client, and a user.
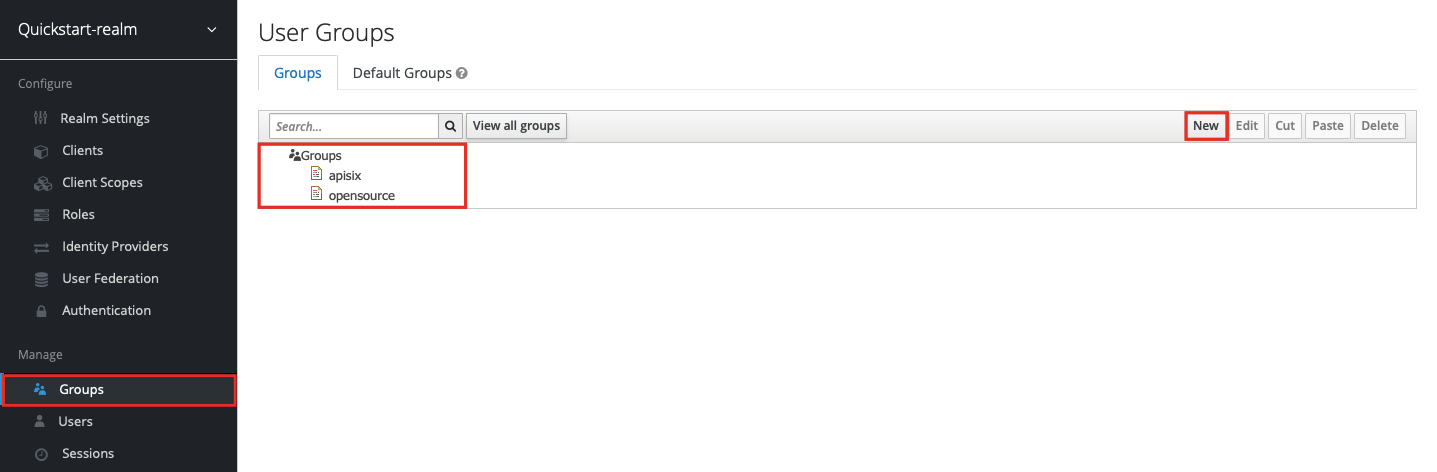
Go to Groups and create two new groups, apisix and opensource:
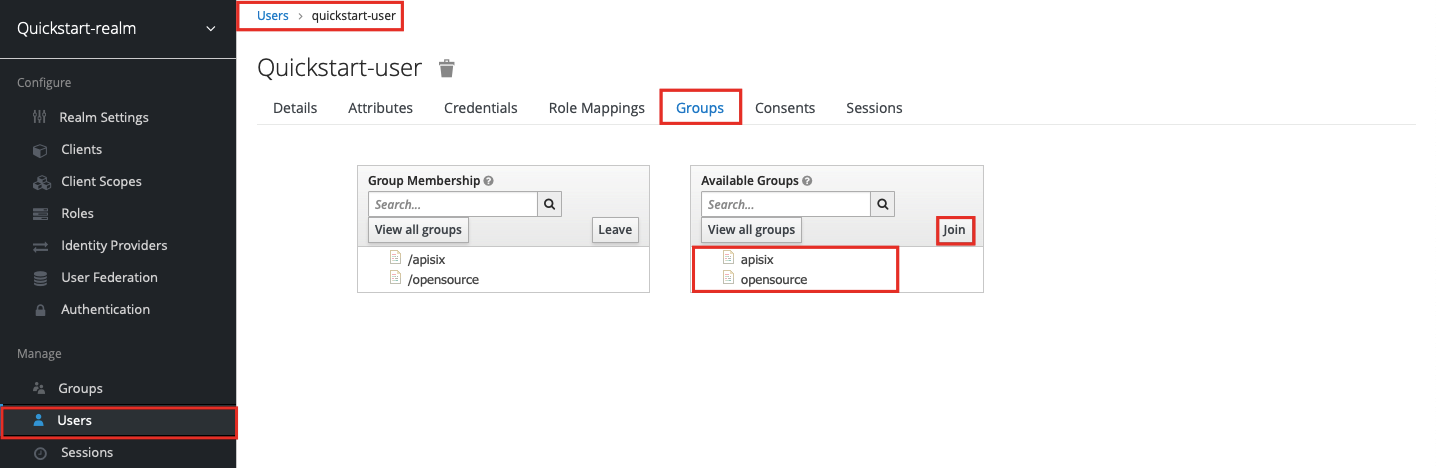
To add the user to group memberships, click into the user and go to the Groups tab. Select each group in turn and click join:
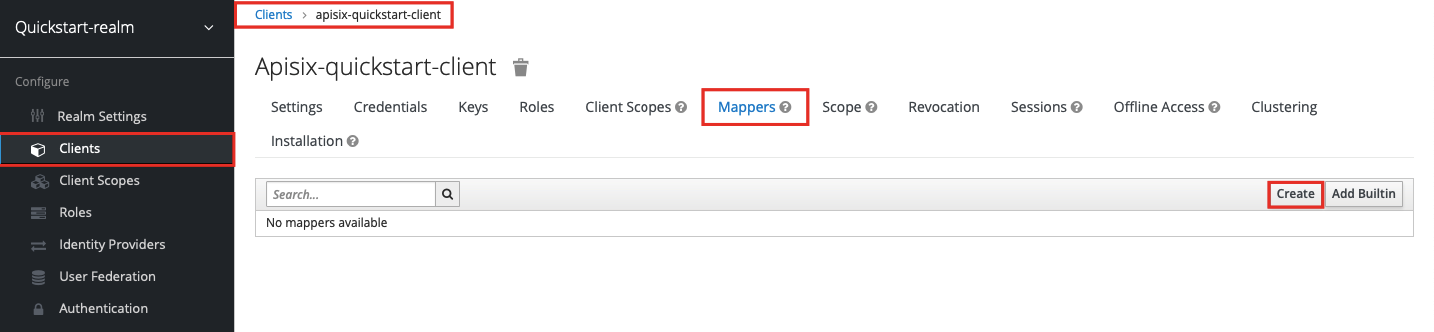
To include the group membership when user info is requested from Keycloak, go to the client and go to the Mappers tab. Create a new mapper:
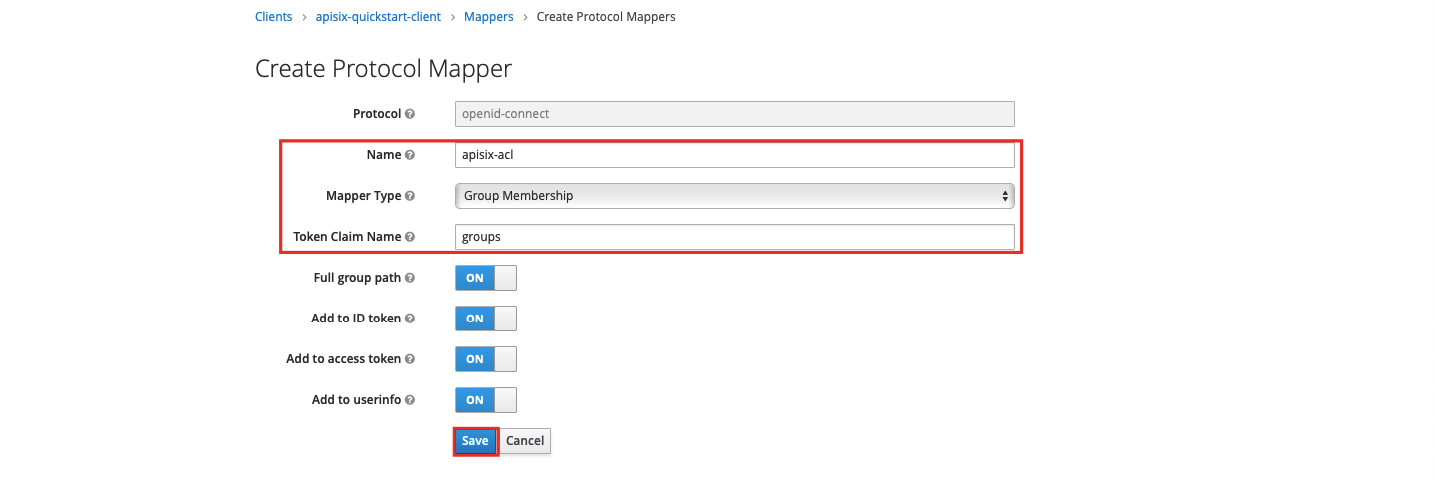
Fill in the name for the protocol mapper, select Group Membership as the mapper type, use groups as the token claim name, and click Save:
To verify if the attribute will be visible when requesting user info, first obtain an access token from Keycloak:
OIDC_USER=quickstart-user
OIDC_PASSWORD=quickstart-user-pass
OIDC_CLIENT_ID=apisix-quickstart-client
OIDC_CLIENT_SECRET=bi9NFscFT4k0ljaRzQWlJWthrlygUn3x   # replace with your client secret

curl "http://$KEYCLOAK_IP:8080/realms/quickstart-realm/protocol/openid-connect/token" -X POST \
  -d 'grant_type=password' \
  -d 'client_id='$OIDC_CLIENT_ID'' \
  -d 'client_secret='$OIDC_CLIENT_SECRET'' \
  -d 'username='$OIDC_USER'' \
  -d 'password='$OIDC_PASSWORD''
Save the access token to an environment variable called ACCESS_TOKEN and send a request to the Keycloak user info endpoint with the token:
curl "http://$KEYCLOAK_IP:8080/realms/quickstart-realm/protocol/openid-connect/userinfo" -H "Authorization: Bearer $ACCESS_TOKEN"
You should see a response similar to the following:
{
  "sub":"4310e97c-d4c3-479b-bbbd-8c66120e6cee",
  "email_verified":false,
  "groups":["/apisix", "/opensource"],
  "preferred_username":"quickstart-user"
}
Suppose you would like to only allow users with /apisix value in the groups attribute to access upstream resources.
Create a route with openid-connect and acl plugins as such:
- Admin API
- ADC
- Ingress Controller
KEYCLOAK_IP=192.168.1.81    # replace with your host IP
OIDC_DISCOVERY=http://${KEYCLOAK_IP}:8080/realms/quickstart-realm/.well-known/openid-configuration

curl "http://127.0.0.1:9180/apisix/admin/routes" -X PUT \
  -H "X-API-KEY: ${ADMIN_API_KEY}" \
  -d '{
    "id": "acl-route",
    "uri":"/anything/*",
    "plugins": {
      "openid-connect": {
        "bearer_only": true,
        "client_id": "'"$OIDC_CLIENT_ID"'",
        "client_secret": "'"$OIDC_CLIENT_SECRET"'",
        "discovery": "'"$OIDC_DISCOVERY"'",
        "scope": "openid profile",
        "redirect_uri": "http://localhost:9080/anything/callback"
      },
      "acl": {
        "external_user_label_field": "groups",
        "allow_labels": {
          "groups": ["/apisix"]
        }
      }
    },
    "upstream":{
      "type":"roundrobin",
      "nodes":{
        "httpbin.org:80":1
      }
    }
  }'
❶ Configure external_user_label_field to the name mapped to the group.
❷ Allow only users with groups attribute value /apisix to access the upstream resource.
services:
  - name: acl-service
    routes:
      - name: acl-route
        uris:
          - /anything/*
        plugins:
          openid-connect:
            bearer_only: true
            client_id: ${OIDC_CLIENT_ID}
            client_secret: ${OIDC_CLIENT_SECRET}
            discovery: http://${KEYCLOAK_IP}:8080/realms/quickstart-realm/.well-known/openid-configuration
            scope: "openid profile"
            redirect_uri: http://localhost:9080/anything/callback
          acl:
            external_user_label_field: groups
            allow_labels:
              groups:
                - /apisix
    upstream:
      type: roundrobin
      nodes:
        - host: httpbin.org
          port: 80
          weight: 1
❶ Configure external_user_label_field to the name mapped to the group.
❷ Allow only users with groups attribute value /apisix to access the upstream resource.
Synchronize the configuration to the gateway:
adc sync -f adc.yaml
This example requires an external Keycloak instance and environment-specific variables. Configure the openid-connect plugin parameters according to your Keycloak setup.
- Gateway API
- APISIX CRD
apiVersion: v1
kind: Service
metadata:
  namespace: aic
  name: httpbin-external-domain
spec:
  type: ExternalName
  externalName: httpbin.org
---
apiVersion: apisix.apache.org/v1alpha1
kind: PluginConfig
metadata:
  namespace: aic
  name: acl-plugin-config
spec:
  plugins:
    - name: openid-connect
      config:
        bearer_only: true
        client_id: apisix-quickstart-client
        client_secret: bi9NFscFT4k0ljaRzQWlJWthrlygUn3x
        discovery: http://192.168.1.81:8080/realms/quickstart-realm/.well-known/openid-configuration
        scope: "openid profile"
        redirect_uri: http://localhost:9080/anything/callback
    - name: acl
      config:
        external_user_label_field: groups
        allow_labels:
          groups:
            - /apisix
---
apiVersion: gateway.networking.k8s.io/v1
kind: HTTPRoute
metadata:
  namespace: aic
  name: acl-route
spec:
  parentRefs:
    - name: apisix
  rules:
    - matches:
        - path:
            type: PathPrefix
            value: /anything/
      filters:
        - type: ExtensionRef
          extensionRef:
            group: apisix.apache.org
            kind: PluginConfig
            name: acl-plugin-config
      backendRefs:
        - name: httpbin-external-domain
          port: 80
❶ Configure openid-connect plugin with your Keycloak details.
❷ Configure external_user_label_field to the name mapped to the group.
❸ Allow only users with groups attribute value /apisix to access the upstream resource.
Apply the configuration to your cluster:
kubectl apply -f acl-ic.yaml
apiVersion: apisix.apache.org/v2
kind: ApisixUpstream
metadata:
  namespace: aic
  name: httpbin-external-domain
spec:
  ingressClassName: apisix
  externalNodes:
  - type: Domain
    name: httpbin.org
---
apiVersion: apisix.apache.org/v2
kind: ApisixRoute
metadata:
  namespace: aic
  name: acl-route
spec:
  ingressClassName: apisix
  http:
    - name: acl-route
      match:
        paths:
          - /anything/*
      upstreams:
      - name: httpbin-external-domain
      plugins:
      - name: openid-connect
        enable: true
        config:
          bearer_only: true
          client_id: apisix-quickstart-client
          client_secret: bi9NFscFT4k0ljaRzQWlJWthrlygUn3x
          discovery: http://192.168.1.81:8080/realms/quickstart-realm/.well-known/openid-configuration
          scope: "openid profile"
          redirect_uri: http://localhost:9080/anything/callback
      - name: acl
        enable: true
        config:
          external_user_label_field: groups
          allow_labels:
            groups:
              - /apisix
❶ Configure openid-connect plugin with your Keycloak details.
❷ Configure external_user_label_field to the name mapped to the group.
❸ Allow only users with groups attribute value /apisix to access the upstream resource.
Apply the configuration to your cluster:
kubectl apply -f acl-ic.yaml
Send a request to the route with a valid access token:
curl -i "http://127.0.0.1:9080/anything/test" -H "Authorization: Bearer $ACCESS_TOKEN"
You should see an HTTP/1.1 200 OK response, which verifies that the API call was authorized and allowed to access upstream resources.
To see how the acl plugin restricts access, update the plugin to require an attribute that the user info does not include:
- Admin API
- ADC
- Ingress Controller
curl "http://127.0.0.1:9180/apisix/admin/routes/acl-route" -X PATCH \
  -H "X-API-KEY: ${ADMIN_API_KEY}" \
  -d '{
    "plugins": {
      "acl": {
        "allow_labels": {
          "groups": ["foobar"]
        }
      }
    }
  }'
Update adc.yaml to change the allow_labels value:
services:
  - name: acl-service
    routes:
      - name: acl-route
        uris:
          - /anything/*
        plugins:
          openid-connect:
            bearer_only: true
            client_id: ${OIDC_CLIENT_ID}
            client_secret: ${OIDC_CLIENT_SECRET}
            discovery: http://${KEYCLOAK_IP}:8080/realms/quickstart-realm/.well-known/openid-configuration
            scope: "openid profile"
            redirect_uri: http://localhost:9080/anything/callback
          acl:
            external_user_label_field: groups
            allow_labels:
              groups:
                - foobar
    upstream:
      type: roundrobin
      nodes:
        - host: httpbin.org
          port: 80
          weight: 1
Synchronize the configuration to the gateway:
adc sync -f adc.yaml
Update the plugin configuration to change the allow_labels value:
- Gateway API
- APISIX CRD
# Other Configs
# ---
apiVersion: apisix.apache.org/v1alpha1
kind: PluginConfig
metadata:
  namespace: aic
  name: acl-plugin-config
spec:
  plugins:
    - name: openid-connect
      config:
        bearer_only: true
        client_id: apisix-quickstart-client
        client_secret: bi9NFscFT4k0ljaRzQWlJWthrlygUn3x
        discovery: http://192.168.1.81:8080/realms/quickstart-realm/.well-known/openid-configuration
        scope: "openid profile"
        redirect_uri: http://localhost:9080/anything/callback
    - name: acl
      config:
        external_user_label_field: groups
        allow_labels:
          groups:
            - foobar
# Other Configs
# ---
apiVersion: apisix.apache.org/v2
kind: ApisixRoute
metadata:
  namespace: aic
  name: acl-route
spec:
  ingressClassName: apisix
  http:
    - name: acl-route
      match:
        paths:
          - /anything/*
      upstreams:
      - name: httpbin-external-domain
      plugins:
      - name: openid-connect
        enable: true
        config:
          bearer_only: true
          client_id: apisix-quickstart-client
          client_secret: bi9NFscFT4k0ljaRzQWlJWthrlygUn3x
          discovery: http://192.168.1.81:8080/realms/quickstart-realm/.well-known/openid-configuration
          scope: "openid profile"
          redirect_uri: http://localhost:9080/anything/callback
      - name: acl
        enable: true
        config:
          external_user_label_field: groups
          allow_labels:
            groups:
              - foobar
Apply the configuration to your cluster:
kubectl apply -f acl-ic.yaml
Send another request to the same route with a valid access token:
curl -i "http://127.0.0.1:9080/anything/test" -H "Authorization: Bearer $ACCESS_TOKEN"
You should see an HTTP/1.1 403 Forbidden response, which shows the access is restricted.
Control Access by Examining Nested User Information from External Identity Provider
The following example demonstrates how you can configure the acl plugin to fetch labels from a nested JSON structure and control access by examining whether these labels are whitelisted.
If you are using Keycloak as the identity provider, the steps of configuration are similar to the last example, except that when you create the Group Membership, configure the Token Claim Name as a fully qualified name for group membership to be displayed in the nested JSON object:
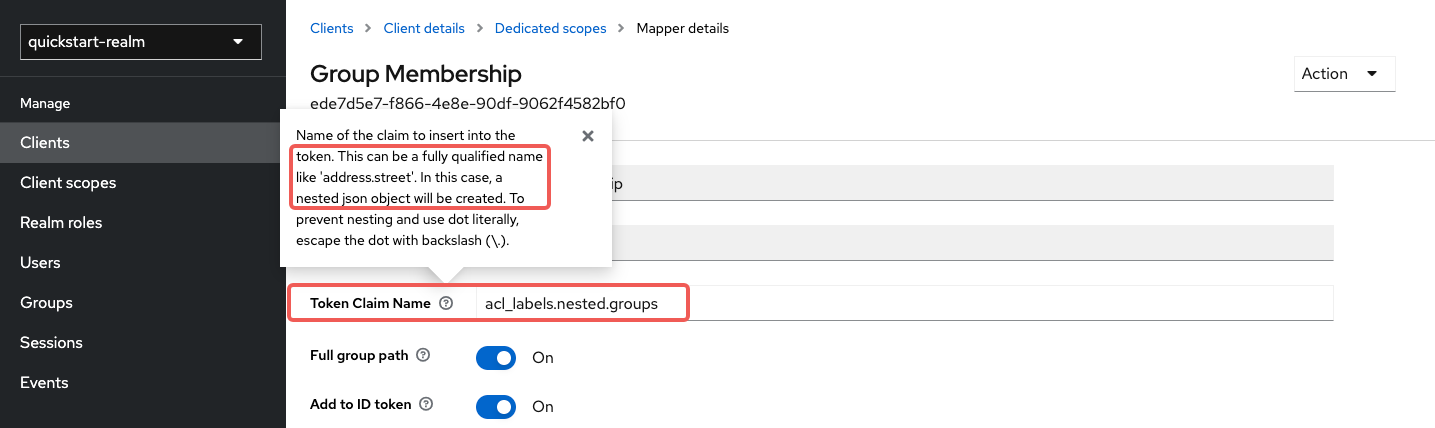
The earlier versions of Keycloak have a bug that caused Keycloak to return the dots in Token Claim Name as string literals when requesting user information, instead of returning a nested JSON structure. Please use Keycloak >= 23.0.0.
Next, request user access token and user information from /userinfo endpoint, similar to the last example. You should see Keycloak returning user information similar to the following:
{
  "sub": "f62086ef-29e1-4401-8609-451a2d724bd7",
  "email_verified": false,
  "acl_labels": {
    "nested": {
      "groups": [
        "/apisix",
        "/opensource"
      ]
    }
  },
  "preferred_username": "quickstart-user"
}
In API7, create a route with openid-connect to authenticate with Keycloak and configure acl plugins as such:
- Admin API
- ADC
- Ingress Controller
KEYCLOAK_IP=192.168.1.81    # replace with your host IP
OIDC_DISCOVERY=http://${KEYCLOAK_IP}:8080/realms/quickstart-realm/.well-known/openid-configuration

curl "http://127.0.0.1:9180/apisix/admin/routes" -X PUT \
  -H "X-API-KEY: ${ADMIN_API_KEY}" \
  -d '{
    "id": "acl-route",
    "uri":"/anything/*",
    "plugins": {
      "openid-connect": {
        "bearer_only": true,
        "client_id": "'"$OIDC_CLIENT_ID"'",
        "client_secret": "'"$OIDC_CLIENT_SECRET"'",
        "discovery": "'"$OIDC_DISCOVERY"'",
        "scope": "openid profile",
        "redirect_uri": "http://localhost:9080/anything/callback"
      },
      "acl": {
        "external_user_label_field": "$..groups",
        "external_user_label_field_key": "groups",
        "external_user_label_field_parser": "json",
        "allow_labels": {
          "groups": ["/apisix"]
        }
      }
    },
    "upstream":{
      "type":"roundrobin",
      "nodes":{
        "httpbin.org:80":1
      }
    }
  }'
❶ Configure user label field with a valid JSONPath to the nested field with labels.
❷ Set the field key to the name of the nested field.
❸ Set the parser to json to be consistent with the user information data structure.
❹ Allow only users with groups attribute value /apisix to access the upstream resource.
services:
  - name: acl-service
    routes:
      - name: acl-route
        uris:
          - /anything/*
        plugins:
          openid-connect:
            bearer_only: true
            client_id: ${OIDC_CLIENT_ID}
            client_secret: ${OIDC_CLIENT_SECRET}
            discovery: http://${KEYCLOAK_IP}:8080/realms/quickstart-realm/.well-known/openid-configuration
            scope: "openid profile"
            redirect_uri: http://localhost:9080/anything/callback
          acl:
            external_user_label_field: "$..groups"
            external_user_label_field_key: groups
            external_user_label_field_parser: json
            allow_labels:
              groups:
                - /apisix
    upstream:
      type: roundrobin
      nodes:
        - host: httpbin.org
          port: 80
          weight: 1
❶ Configure user label field with a valid JSONPath to the nested field with labels.
❷ Set the field key to the name of the nested field.
❸ Set the parser to json to be consistent with the user information data structure.
❹ Allow only users with groups attribute value /apisix to access the upstream resource.
Synchronize the configuration to the gateway:
adc sync -f adc.yaml
This example requires an external Keycloak instance and environment-specific variables. Configure the openid-connect plugin parameters according to your Keycloak setup.
- Gateway API
- APISIX CRD
apiVersion: v1
kind: Service
metadata:
  namespace: aic
  name: httpbin-external-domain
spec:
  type: ExternalName
  externalName: httpbin.org
---
apiVersion: apisix.apache.org/v1alpha1
kind: PluginConfig
metadata:
  namespace: aic
  name: acl-nested-plugin-config
spec:
  plugins:
    - name: openid-connect
      config:
        bearer_only: true
        client_id: apisix-quickstart-client
        client_secret: bi9NFscFT4k0ljaRzQWlJWthrlygUn3x
        discovery: http://192.168.1.81:8080/realms/quickstart-realm/.well-known/openid-configuration
        scope: "openid profile"
        redirect_uri: http://localhost:9080/anything/callback
    - name: acl
      config:
        external_user_label_field: "$..groups"
        external_user_label_field_key: groups
        external_user_label_field_parser: json
        allow_labels:
          groups:
            - /apisix
---
apiVersion: gateway.networking.k8s.io/v1
kind: HTTPRoute
metadata:
  namespace: aic
  name: acl-nested-route
spec:
  parentRefs:
    - name: apisix
  rules:
    - matches:
        - path:
            type: PathPrefix
            value: /anything/
      filters:
        - type: ExtensionRef
          extensionRef:
            group: apisix.apache.org
            kind: PluginConfig
            name: acl-nested-plugin-config
      backendRefs:
        - name: httpbin-external-domain
          port: 80
❶ Configure user label field with a valid JSONPath to the nested field with labels.
❷ Set the field key to the name of the nested field.
❸ Set the parser to json to be consistent with the user information data structure.
❹ Allow only users with groups attribute value /apisix to access the upstream resource.
Apply the configuration to your cluster:
kubectl apply -f acl-nested-ic.yaml
apiVersion: apisix.apache.org/v2
kind: ApisixUpstream
metadata:
  namespace: aic
  name: httpbin-external-domain
spec:
  ingressClassName: apisix
  externalNodes:
  - type: Domain
    name: httpbin.org
---
apiVersion: apisix.apache.org/v2
kind: ApisixRoute
metadata:
  namespace: aic
  name: acl-nested-route
spec:
  ingressClassName: apisix
  http:
    - name: acl-nested-route
      match:
        paths:
          - /anything/*
      upstreams:
      - name: httpbin-external-domain
      plugins:
      - name: openid-connect
        enable: true
        config:
          bearer_only: true
          client_id: apisix-quickstart-client
          client_secret: bi9NFscFT4k0ljaRzQWlJWthrlygUn3x
          discovery: http://192.168.1.81:8080/realms/quickstart-realm/.well-known/openid-configuration
          scope: "openid profile"
          redirect_uri: http://localhost:9080/anything/callback
      - name: acl
        enable: true
        config:
          external_user_label_field: "$..groups"
          external_user_label_field_key: groups
          external_user_label_field_parser: json
          allow_labels:
            groups:
              - /apisix
❶ Configure user label field with a valid JSONPath to the nested field with labels.
❷ Set the field key to the name of the nested field.
❸ Set the parser to json to be consistent with the user information data structure.
❹ Allow only users with groups attribute value /apisix to access the upstream resource.
Apply the configuration to your cluster:
kubectl apply -f acl-nested-ic.yaml
To verify the ACL, send a request to the route with a valid access token:
curl -i "http://127.0.0.1:9080/anything/test" -H "Authorization: Bearer $ACCESS_TOKEN"
You should see an HTTP/1.1 200 OK response, which verifies that the API call was authorized and allowed to access upstream resources.
To see how the acl plugin restricts access, update the plugin to require an attribute that the user info does not include:
- Admin API
- ADC
- Ingress Controller
curl "http://127.0.0.1:9180/apisix/admin/routes/acl-route" -X PATCH \
  -H "X-API-KEY: ${ADMIN_API_KEY}" \
  -d '{
    "plugins": {
      "acl": {
        "allow_labels": {
          "groups": ["foobar"]
        }
      }
    }
  }'
Update adc.yaml to change the allow_labels value:
services:
  - name: acl-service
    routes:
      - name: acl-route
        uris:
          - /anything/*
        plugins:
          openid-connect:
            bearer_only: true
            client_id: ${OIDC_CLIENT_ID}
            client_secret: ${OIDC_CLIENT_SECRET}
            discovery: http://${KEYCLOAK_IP}:8080/realms/quickstart-realm/.well-known/openid-configuration
            scope: "openid profile"
            redirect_uri: http://localhost:9080/anything/callback
          acl:
            external_user_label_field: "$..groups"
            external_user_label_field_key: groups
            external_user_label_field_parser: json
            allow_labels:
              groups:
                - foobar
    upstream:
      type: roundrobin
      nodes:
        - host: httpbin.org
          port: 80
          weight: 1
Synchronize the configuration to the gateway:
adc sync -f adc.yaml
Update the plugin configuration to change the allow_labels value:
- Gateway API
- APISIX CRD
# Other Configs
# ---
apiVersion: apisix.apache.org/v1alpha1
kind: PluginConfig
metadata:
  namespace: aic
  name: acl-nested-plugin-config
spec:
  plugins:
    - name: openid-connect
      config:
        bearer_only: true
        client_id: apisix-quickstart-client
        client_secret: bi9NFscFT4k0ljaRzQWlJWthrlygUn3x
        discovery: http://192.168.1.81:8080/realms/quickstart-realm/.well-known/openid-configuration
        scope: "openid profile"
        redirect_uri: http://localhost:9080/anything/callback
    - name: acl
      config:
        external_user_label_field: "$..groups"
        external_user_label_field_key: groups
        external_user_label_field_parser: json
        allow_labels:
          groups:
            - foobar
# Other Configs
# ---
apiVersion: apisix.apache.org/v2
kind: ApisixRoute
metadata:
  namespace: aic
  name: acl-nested-route
spec:
  ingressClassName: apisix
  http:
    - name: acl-nested-route
      match:
        paths:
          - /anything/*
      upstreams:
      - name: httpbin-external-domain
      plugins:
      - name: openid-connect
        enable: true
        config:
          bearer_only: true
          client_id: apisix-quickstart-client
          client_secret: bi9NFscFT4k0ljaRzQWlJWthrlygUn3x
          discovery: http://192.168.1.81:8080/realms/quickstart-realm/.well-known/openid-configuration
          scope: "openid profile"
          redirect_uri: http://localhost:9080/anything/callback
      - name: acl
        enable: true
        config:
          external_user_label_field: "$..groups"
          external_user_label_field_key: groups
          external_user_label_field_parser: json
          allow_labels:
            groups:
              - foobar
Apply the configuration to your cluster:
kubectl apply -f acl-nested-ic.yaml
Send another request to the same route with a valid access token:
curl -i "http://127.0.0.1:9080/anything/test" -H "Authorization: Bearer $ACCESS_TOKEN"
You should see an HTTP/1.1 403 Forbidden response, which shows the access is restricted.