Set Up SSO with Keycloak
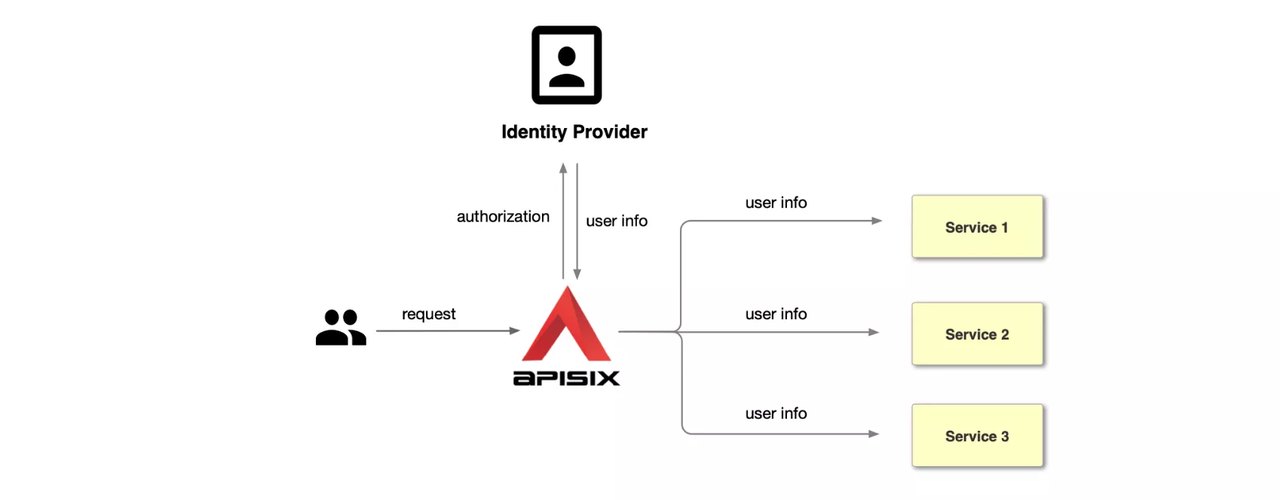
OpenID Connect (OIDC) is a simple identity layer on top of the OAuth 2.0 protocol. It allows clients to verify the identity of end users based on the authentication performed by the identity provider, as well as to obtain basic profile information about end users in an interoperable and REST-like manner. With APISIX and Keycloak, you can implement OIDC-based authentication processes to protect your APIs and enable single sign-on (SSO).
Keycloak is an open-source identity and access management solution for modern applications and services. Keycloak supports single sign-on (SSO), which enables services to interface with Keycloak through protocols such as OIDC and OAuth 2.0. In addition, Keycloak also supports delegating authentication to third party identity providers such as Facebook and Google.
The guide will show you how to integrate APISIX with Keycloak using authorization code grant, client credentials grant, and password grant, using the openid-connect plugin.
Starting from APISIX 3.16.0, the default value of ssl_verify in the openid-connect plugin changed from false to true. If your Keycloak instance is served over HTTPS with a self-signed or untrusted certificate, you must either set "ssl_verify": false in your plugin configuration or configure APISIX to trust the certificate authority.
This guide runs Keycloak in development mode over HTTP, so this breaking change does not affect the examples below.
Prerequisite(s)
- Install Docker.
- Install cURL to send requests to the services for validation.
- Follow the Getting Started tutorial to start a new APISIX instance in Docker or on Kubernetes.
Configure Keycloak
Start a Keycloak instance named apisix-quickstart-keycloak with the administrator name quickstart-admin and password quickstart-admin-pass in development mode:
docker run -d --name "apisix-quickstart-keycloak" \
  -e 'KEYCLOAK_ADMIN=quickstart-admin' \
  -e 'KEYCLOAK_ADMIN_PASSWORD=quickstart-admin-pass' \
  -p 8080:8080 \
  quay.io/keycloak/keycloak:18.0.2 start-dev
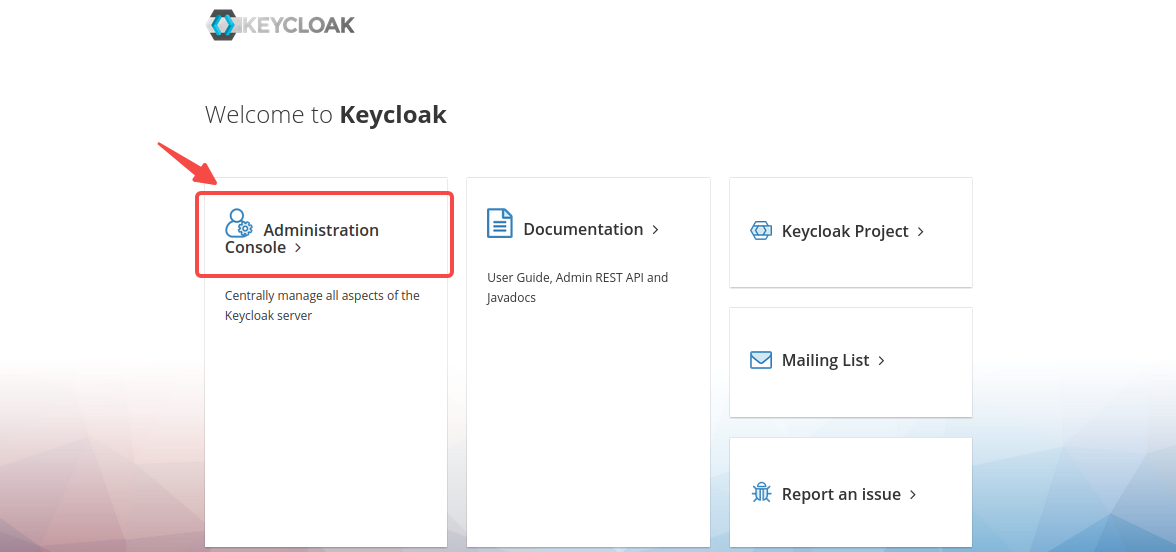
Keycloak provides an easy-to-use web UI to help the administrator manage all resources, such as clients, roles, and users.
Navigate to http://localhost:8080 in browser to access the Keycloak web page, then click Administration Console:
Enter the administrator’s username quickstart-admin and password quickstart-admin-pass and sign in:
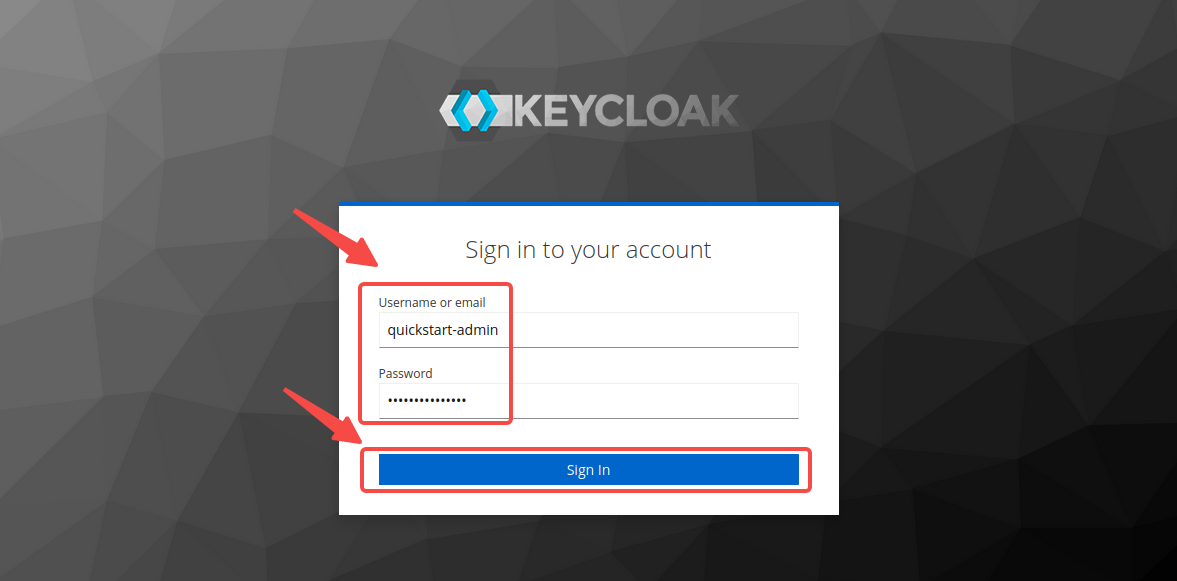
You need to maintain the login status to configure Keycloak during the following steps.
Create a Realm
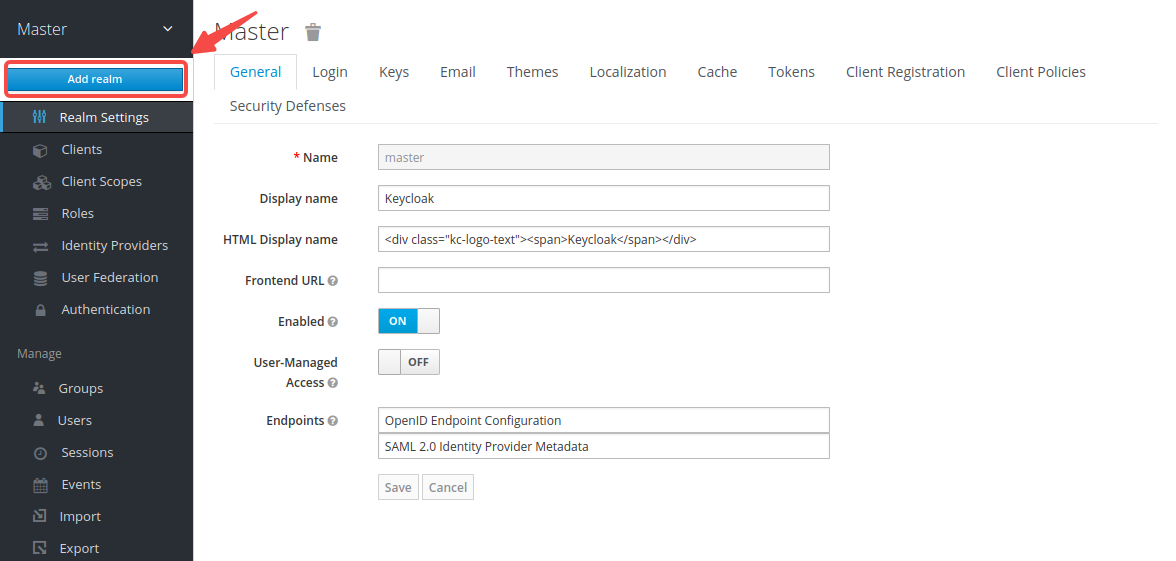
Realms in Keycloak are workspaces to manage resources such as users, credentials, and roles. The resources in different realms are isolated from each other. You need to create a realm named quickstart-realm for APISIX.
In the left menu, hover over Master, and select Add realm in the dropdown:
Enter the realm name quickstart-realm and click Create to create it:

Create a Client
Clients in Keycloak are entities that request Keycloak to authenticate a user. More often, clients are applications that want to use Keycloak to secure themselves and provide a single sign-on solution. APISIX is equivalent to a client that is responsible for initiating authentication requests to Keycloak, so you need to create its corresponding client named apisix-quickstart-client.
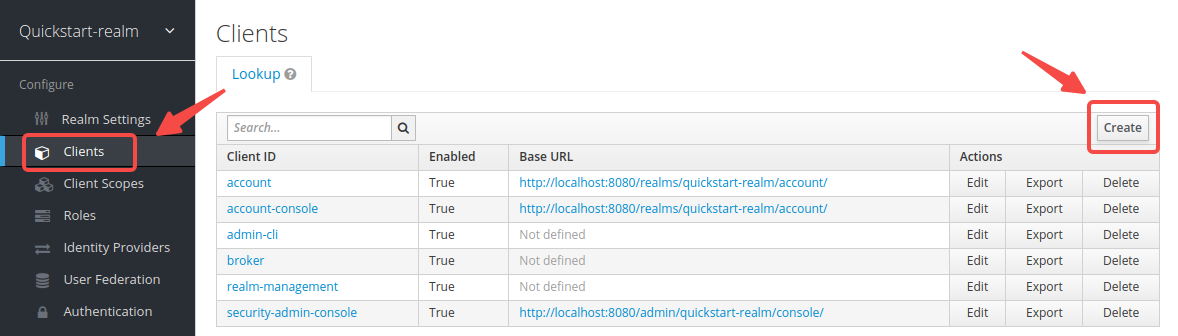
Click Clients > Create to open the Add Client page:
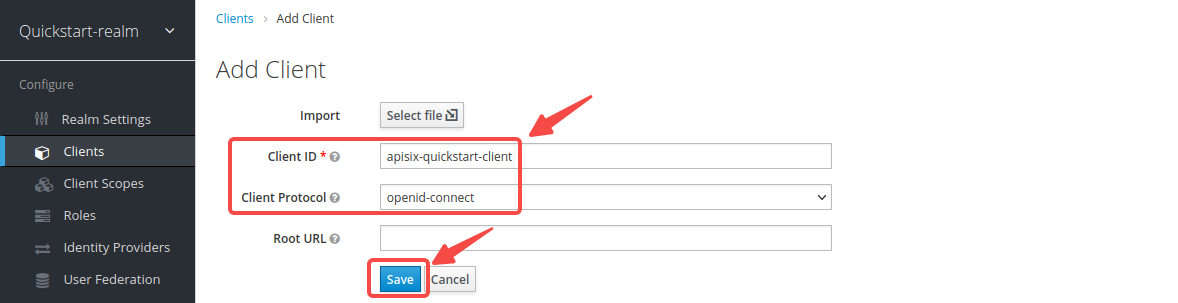
Enter Client ID as apisix-quickstart-client, then select Client Protocol as openid-connect and Save:
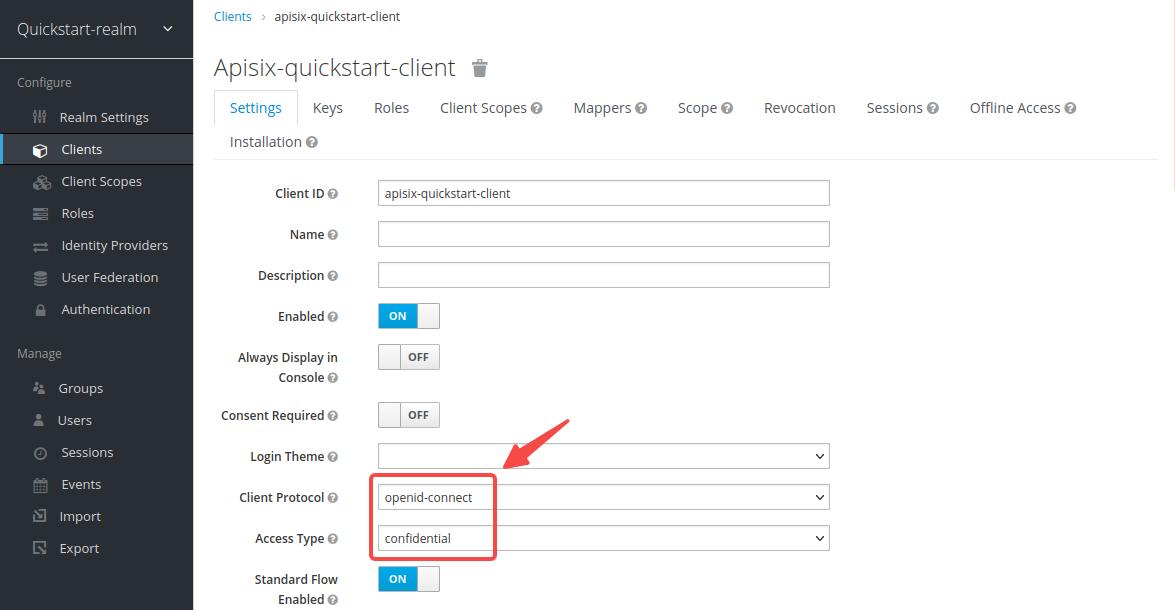
The client apisix-quickstart-client is created. After redirecting to the detailed page, select confidential as the Access Type:
When the user login is successful during the SSO, Keycloak will carry the state and code to redirect the client to the addresses in Valid Redirect URIs. To simplify the operation, enter wildcard * to consider any URI valid:

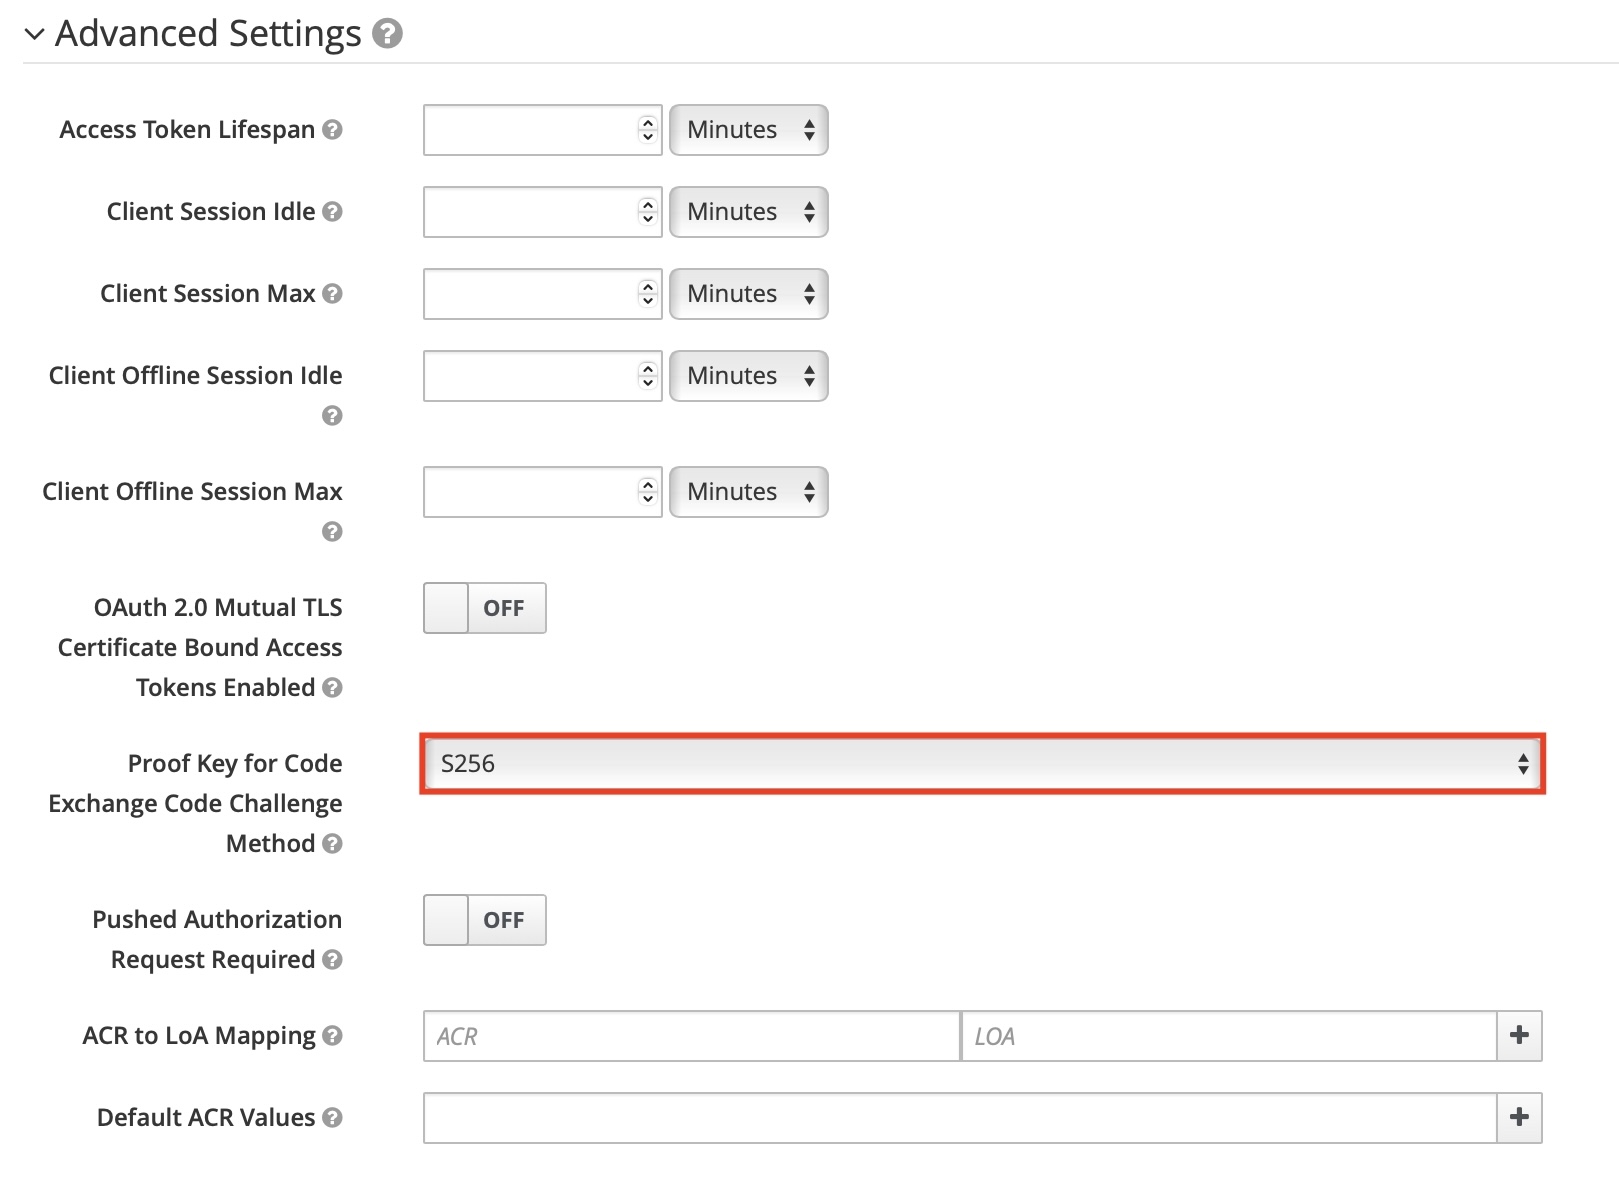
If you are implementing the authorization code grant with PKCE, configure the PKCE challenge method in the client's advanced settings:
If you are implementing client credentials grant, enable service accounts for the client:

Select Save to apply custom configurations.
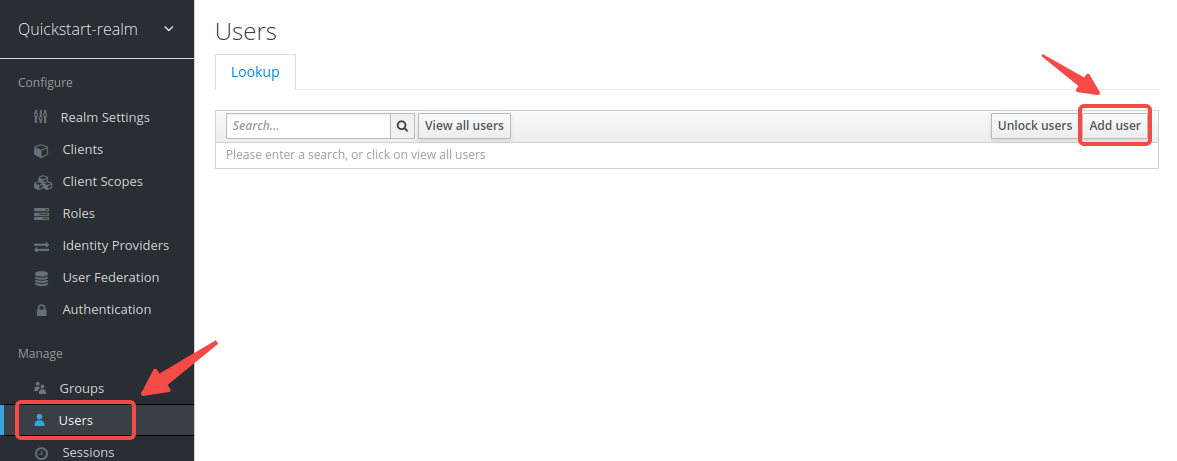
Create a User
Users in Keycloak are entities that are able to log into the system. They can have attributes associated with themselves, such as username, email, and address.
If you are only implementing client credentials grant, you can skip this section.
Click Users > Add user to open the Add user page:
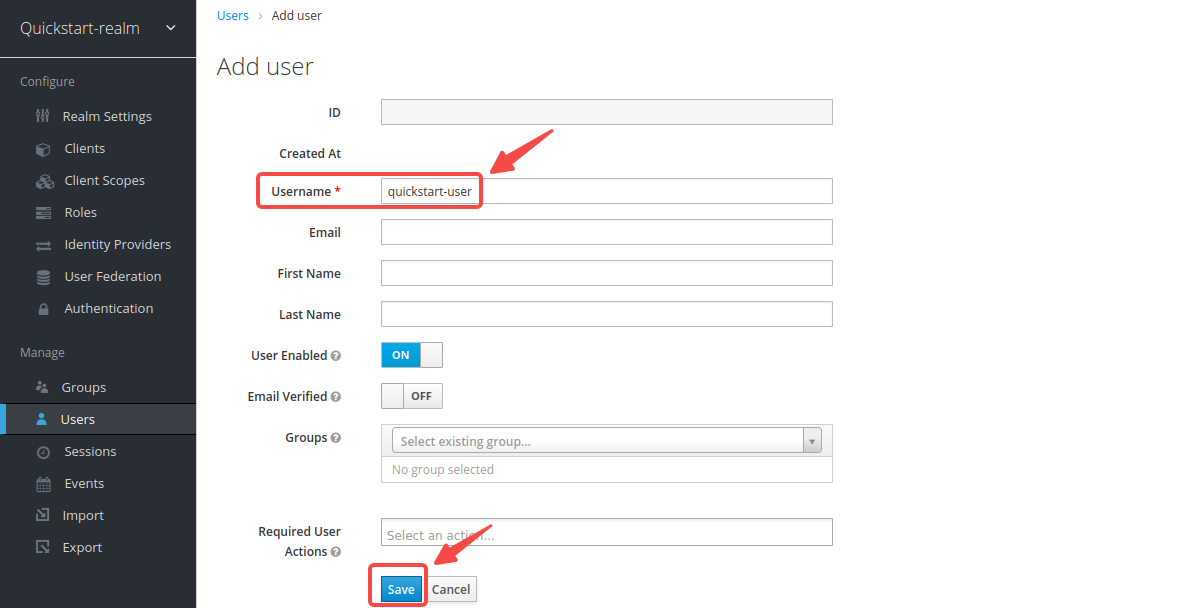
Enter the Username as quickstart-user and select Save:
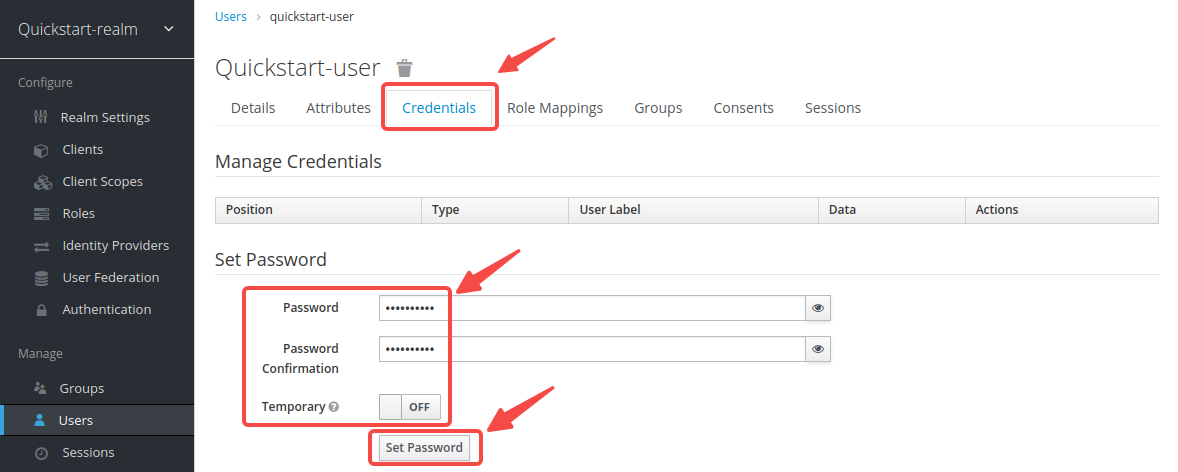
Click on Credentials, then set the Password as quickstart-user-pass. Switch Temporary to OFF to turn off the restriction, so that you need not to change password the first time you log in:
Obtain the OIDC Configuration
In this section, you will obtain the key OIDC configuration from Keycloak and define them as shell variables. Steps after this section will use these variables to configure the OIDC by shell commands.
Open a separate terminal to follow the steps and define related shell variables. Then steps after this section could use the defined variables directly.
Get Discovery Endpoint
Click Realm Settings, then right click OpenID Endpoints Configuration and copy the link.
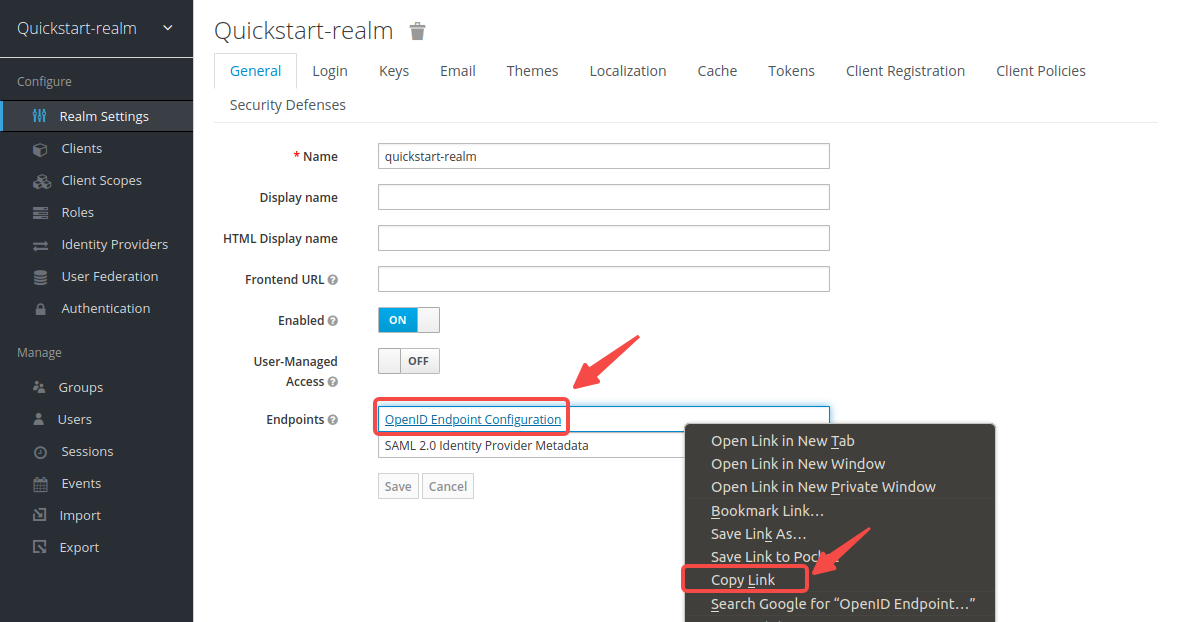
The link should be the same as the following:
http://localhost:8080/realms/quickstart-realm/.well-known/openid-configuration
Configuration values exposed with this endpoint are required during OIDC authentication.
Update the address with your host IP and save to environment variables:
export KEYCLOAK_IP=192.168.42.145    # replace with your host IP
export OIDC_DISCOVERY=http://${KEYCLOAK_IP}:8080/realms/quickstart-realm/.well-known/openid-configuration
Get Client ID and Secret
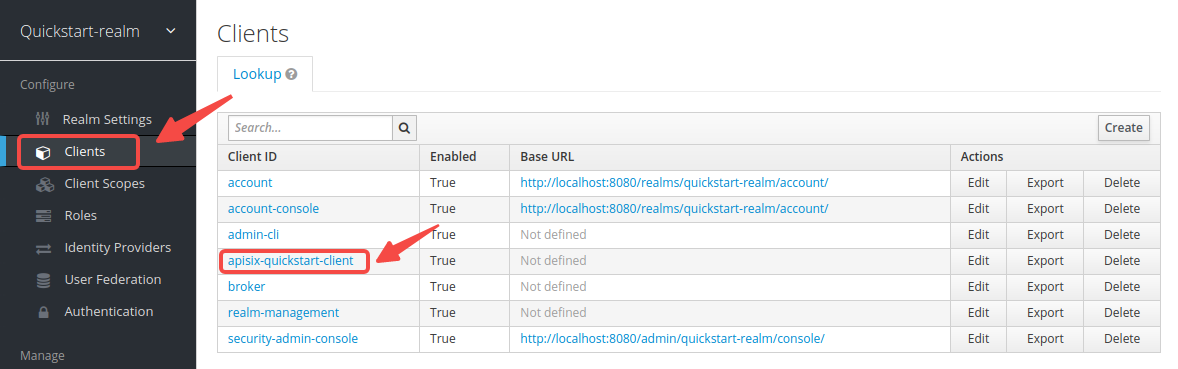
Click on Clients > apisix-quickstart-client > Credentials, and copy the client secret from Secret:

Save the OIDC client ID and secret to environment variables:
export OIDC_CLIENT_ID=apisix-quickstart-client
export OIDC_CLIENT_SECRET=bSaIN3MV1YynmtXvU8lKkfeY0iwpr9cH  # replace with your value
Implement Authorization Code Grant
The authorization code grant is used by web and mobile applications. The flow starts by authorization server displaying a login page in browser where users could key in their credentials. During the process, a short-lived authorization code is exchanged for an access token, which APISIX stores in browser session cookies and will be sent with every request visiting the upstream resource server.
To implement authorization code grant, create a route with openid-connect plugin as such:
- Admin API
- ADC
curl -i "http://127.0.0.1:9180/apisix/admin/routes" -X PUT -d '
{
  "id": "auth-with-oidc",
  "uri":"/anything/*",
  "plugins": {
    "openid-connect": {
      "bearer_only": false,
      "session": {
        "secret": "f86cf31663a9c9fa0a28c2cc78badef1"
      },
      "client_id": "'"$OIDC_CLIENT_ID"'",
      "client_secret": "'"$OIDC_CLIENT_SECRET"'",
      "discovery": "'"$OIDC_DISCOVERY"'",
      "scope": "openid profile",
      "redirect_uri": "http://localhost:9080/anything/callback"
    }
  },
  "upstream":{
    "type":"roundrobin",
    "nodes":{
      "httpbin.org:80":1
    }
  }
}'
❶ bearer_only: Set to false for authorization code grant.
❷ session.secret: Replace with your key used for session encryption and HMAC operation. Required when bearer_only is false.
❸ client_id: Keycloak client ID.
❹ client_secret: Keycloak client secret.
❺ discovery: URI to discovery document.
❺ redirect_uri: URI to redirect to after authentication with Keycloak. See Redirect URIs.
services:
  - name: httpbin Service
    routes:
      - uris:
          - /anything/*
        name: auth-with-oidc
        plugins:
          openid-connect:
            bearer_only: false
            session:
              secret: "f86cf31663a9c9fa0a28c2cc78badef1"
            client_id: "apisix-quickstart-client"
            client_secret: "bSaIN3MV1YynmtXvU8lKkfeY0iwpr9cH"
            discovery: "http://192.168.42.145:8080/realms/quickstart-realm/.well-known/openid-configuration"
            scope: openid profile
            redirect_uri: "http://localhost:9080/anything/callback"
    upstream:
      type: roundrobin
      nodes:
        - host: httpbin.org
          port: 80
          weight: 1
❶ bearer_only: Set to false for authorization code grant.
❷ session.secret: Replace with your key used for session encryption and HMAC operation. Required when bearer_only is false.
❸ client_id: Keycloak client ID.
❹ client_secret: Keycloak client secret.
❺ discovery: URI to discovery document.
❺ redirect_uri: URI to redirect to after authentication with Keycloak. See Redirect URIs.
Synchronize the configuration to APISIX:
adc sync -f adc.yaml
Alternatively, if you would like to implement authorization code grant with PKCE, create a route with openid-connect plugin similar to the previous example, but enable the use_pkce option:
- Admin API
- ADC
curl -i "http://127.0.0.1:9180/apisix/admin/routes" -X PUT -d '
{
  "id": "auth-with-oidc",
  "uri":"/anything/*",
  "plugins": {
    "openid-connect": {
      "bearer_only": false,
      "session": {
        "secret": "f86cf31663a9c9fa0a28c2cc78badef1"
      },
      "use_pkce": true,
"client_id": "'"$OIDC_CLIENT_ID"'",
      "client_secret": "'"$OIDC_CLIENT_SECRET"'",
      "discovery": "'"$OIDC_DISCOVERY"'",
      "scope": "openid profile",
      "redirect_uri": "http://localhost:9080/anything/callback"
    }
  },
  "upstream":{
    "type":"roundrobin",
    "nodes":{
      "httpbin.org:80":1
    }
  }
}'
❶ Use the JWKS endpoint of the identity provider to verify the token. The endpoint is obtained from the discovery document.
services:
  - name: httpbin Service
    routes:
      - uris:
          - /anything/*
        name: auth-with-oidc
        plugins:
          openid-connect:
            bearer_only: false
            session:
              secret: "f86cf31663a9c9fa0a28c2cc78badef1"
            use_pkce: true
            client_id: "apisix-quickstart-client"
            client_secret: "bSaIN3MV1YynmtXvU8lKkfeY0iwpr9cH"
            discovery: "http://192.168.42.145:8080/realms/quickstart-realm/.well-known/openid-configuration"
            scope: openid profile
            redirect_uri: "http://localhost:9080/anything/callback"
    upstream:
      type: roundrobin
      nodes:
        - host: httpbin.org
          port: 80
          weight: 1
❶ use_pkce: Set to true to enable PKCE.
Synchronize the configuration to APISIX:
adc sync -f adc.yaml
Verify with Valid Credentials
Navigate to http://localhost:9080/anything/test in browser. The request will be redirected to a login page:
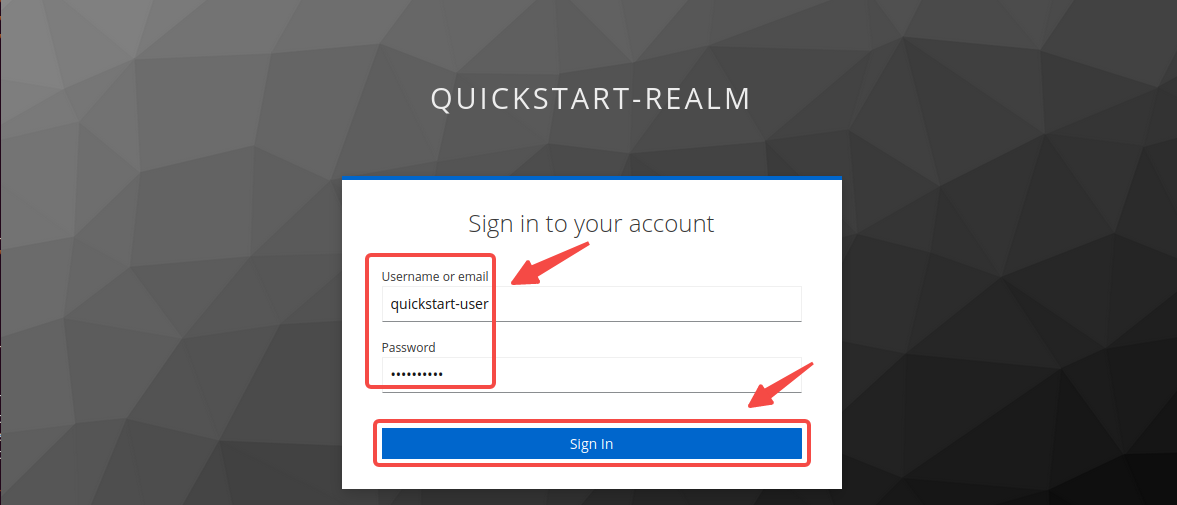
Log in with the correct username quickstart-user and password quickstart-user-pass. If successful, the request will be forwarded to httpbin.org and you should see a response similar to the following:
{
  "args": {},
  "data": "",
  "files": {},
  "form": {},
  "headers": {
    "Accept": "text/html..."
    ...
  },
  "json": null,
  "method": "GET",
  "origin": "127.0.0.1, 59.71.244.81",
  "url": "http://127.0.0.1/anything/test"
}
Verify with Invalid Credentials
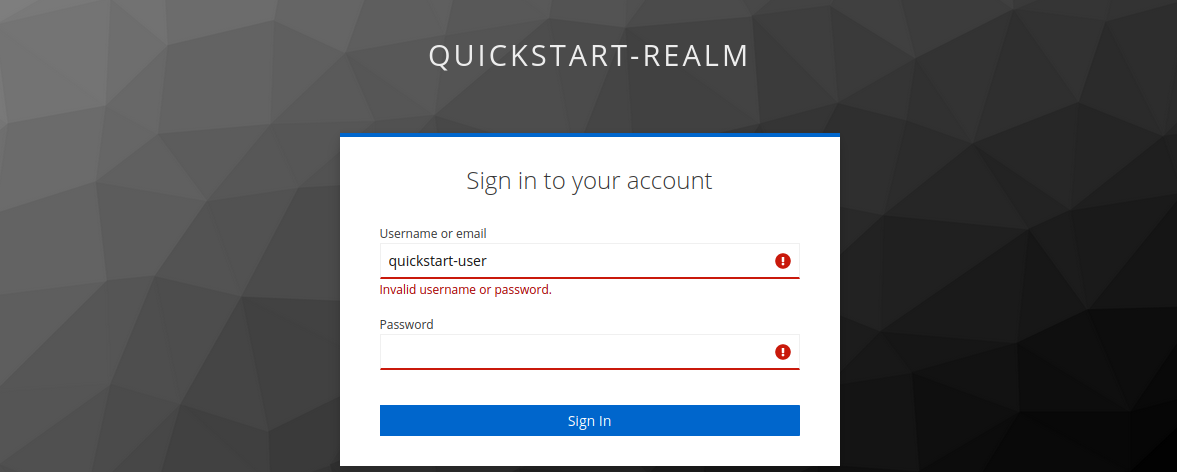
Sign in with the wrong credentials. You should see an authentication failure:
Implement Client Credentials Grant
In client credentials grant, clients obtain access tokens without any users involved. It is typically used in machine-to-machine (M2M) communications.
To implement client credentials grant, create a route with openid-connect plugin as such:
- Admin API
- ADC
curl -i "http://127.0.0.1:9180/apisix/admin/routes" -X PUT -d '
{
  "id": "auth-with-oidc",
  "uri":"/anything/*",
  "plugins": {
    "openid-connect": {
      "bearer_only": false,
      "session": {
        "secret": "f86cf31663a9c9fa0a28c2cc78badef1"
      },
      "use_jwks": true,
      "client_id": "'"$OIDC_CLIENT_ID"'",
      "client_secret": "'"$OIDC_CLIENT_SECRET"'",
      "discovery": "'"$OIDC_DISCOVERY"'",
      "scope": "openid profile",
      "redirect_uri": "http://localhost:9080/anything/callback"
    }
  },
  "upstream":{
    "type":"roundrobin",
    "nodes":{
      "httpbin.org:80":1
    }
  }
}'
❶ Use the JWKS endpoint of the identity provider to verify the token. The endpoint is obtained from the discovery document.
services:
  - name: httpbin Service
    routes:
      - uris:
          - /anything/*
        name: auth-with-oidc
        plugins:
          openid-connect:
            bearer_only: false
            session:
              secret: f86cf31663a9c9fa0a28c2cc78badef1
            use_jwks: true
            client_id: "apisix-quickstart-client"
            client_secret: "bSaIN3MV1YynmtXvU8lKkfeY0iwpr9cH"
            discovery: "http://192.168.42.145:8080/realms/quickstart-realm/.well-known/openid-configuration"
            scope: openid profile
            redirect_uri: "http://localhost:9080/anything/callback"
    upstream:
      type: roundrobin
      nodes:
        - host: httpbin.org
          port: 80
          weight: 1
❶ Use the JWKS endpoint of the identity provider to verify the token. The endpoint is obtained from the discovery document.
Synchronize the configuration to APISIX:
adc sync -f adc.yaml
Alternatively, if you would like to use the introspection endpoint to verify the token, create the route as such:
- Admin API
- ADC
curl -i "http://127.0.0.1:9180/apisix/admin/routes" -X PUT -d '
{
  "id": "auth-with-oidc",
  "uri":"/anything/*",
  "plugins": {
    "openid-connect": {
      "bearer_only": true,
      "client_id": "'"$OIDC_CLIENT_ID"'",
      "client_secret": "'"$OIDC_CLIENT_SECRET"'",
      "discovery": "'"$OIDC_DISCOVERY"'",
      "scope": "openid profile",
      "redirect_uri": "http://localhost:9080/anything/callback"
    }
  },
  "upstream":{
    "type":"roundrobin",
    "nodes":{
      "httpbin.org:80":1
    }
  }
}'
services:
  - name: httpbin Service
    routes:
      - uris:
          - /anything/*
        name: auth-with-oidc
        plugins:
          openid-connect:
            bearer_only: true
            client_id: "apisix-quickstart-client"
            client_secret: "bSaIN3MV1YynmtXvU8lKkfeY0iwpr9cH"
            discovery: "http://192.168.42.145:8080/realms/quickstart-realm/.well-known/openid-configuration"
            scope: openid profile
            redirect_uri: "http://localhost:9080/anything/callback"
    upstream:
      type: roundrobin
      nodes:
        - host: httpbin.org
          port: 80
          weight: 1
Synchronize the configuration to APISIX:
adc sync -f adc.yaml
The introspection endpoint will be obtained from the discovery document.
Verify With Valid Access Token
Obtain an access token for the Keycloak server at the token endpoint:
curl -i "http://127.0.0.1:8080/realms/quickstart-realm/protocol/openid-connect/token" -X POST \
  -d 'grant_type=client_credentials' \
  -d 'client_id='$OIDC_CLIENT_ID'' \
  -d 'client_secret='$OIDC_CLIENT_SECRET''
The expected response is similar to the following:
{"access_token":"eyJhbGciOiJSUzI1NiIsInR5cCIgOiAiSldUIiwia2lkIiA6ICJoT3ludlBPY2d6Y3VWWnYtTU42bXZKMUczb0dOX2d6MFo3WFl6S2FSa1NBIn0.eyJleHAiOjE3MDM4MjU1NjQsImlhdCI6MTcwMzgyNTI2NCwianRpIjoiMWQ4NWE4N2UtZDFhMC00NThmLThiMTItNGZiYWM2ODA5YmYwIiwiaXNzIjoiaHR0cDovLzE5Mi4xNjguMS44Mzo4MDgwL3JlYWxtcy9xdWlja3N0YXJ0LXJlYWxtIiwiYXVkIjoiYWNjb3VudCIsInN1YiI6IjE1OGUzOWFlLTk0YjAtNDI3Zi04ZGU3LTU3MTRhYWYwOGYzOSIsInR5cCI6IkJlYXJlciIsImF6cCI6ImFwaXNpeC1xdWlja3N0YXJ0LWNsaWVudCIsImFjciI6IjEiLCJyZWFsbV9hY2Nlc3MiOnsicm9sZXMiOlsiZGVmYXVsdC1yb2xlcy1xdWlja3N0YXJ0LXJlYWxtIiwib2ZmbGluZV9hY2Nlc3MiLCJ1bWFfYXV0aG9yaXphdGlvbiJdfSwicmVzb3VyY2VfYWNjZXNzIjp7ImFjY291bnQiOnsicm9sZXMiOlsibWFuYWdlLWFjY291bnQiLCJtYW5hZ2UtYWNjb3VudC1saW5rcyIsInZpZXctcHJvZmlsZSJdfX0sInNjb3BlIjoiZW1haWwgcHJvZmlsZSIsImVtYWlsX3ZlcmlmaWVkIjpmYWxzZSwiY2xpZW50SG9zdCI6IjE3Mi4xNy4wLjEiLCJjbGllbnRJZCI6ImFwaXNpeC1xdWlja3N0YXJ0LWNsaWVudCIsInByZWZlcnJlZF91c2VybmFtZSI6InNlcnZpY2UtYWNjb3VudC1hcGlzaXgtcXVpY2tzdGFydC1jbGllbnQiLCJjbGllbnRBZGRyZXNzIjoiMTcyLjE3LjAuMSJ9.TltzSXqrJuVID7aGrb35jn-oc07U_-jugSn-3jKz4A44LwtAsME_8b3qkmR4boMOIht_5pF6bnnp70MFAlg6JKu4_yIQDxF_GAHjnZXEO8OCKhtIKwXm2w-hnnJVIhIdGkIVkbPP0HfILuar_m0hpa53VpPBGYR-OS4pyh0KTUs8MB22xAEqyz9zjCm6SX9vXCqgeVkSpRW2E8NaGEbAdY25uY-ZC4dI_pON87Ey5e8GdD6HQLXQlGIOdCDi3N7k0HDoD9TZRv2bMRPfy4zVYm1ZlClIuF79A-ZBwr0c-XYuq7t6EY0gPGEXB-s0SaKlrIU5S9JBeVXRzYvqAih41g","expires_in":300,"refresh_expires_in":0,"token_type":"Bearer","not-before-policy":0,"scope":"email profile"}
Save the access token to an environment variable:
# replace with your access token
export ACCESS_TOKEN="eyJhbGciOiJSUzI1NiIsInR5cCIgOiAiSldUIiwia2lkIiA6ICJoT3ludlBPY2d6Y3VWWnYtTU42bXZKMUczb0dOX2d6MFo3WFl6S2FSa1NBIn0.eyJleHAiOjE3MDM4MjU1NjQsImlhdCI6MTcwMzgyNTI2NCwianRpIjoiMWQ4NWE4N2UtZDFhMC00NThmLThiMTItNGZiYWM2ODA5YmYwIiwiaXNzIjoiaHR0cDovLzE5Mi4xNjguMS44Mzo4MDgwL3JlYWxtcy9xdWlja3N0YXJ0LXJlYWxtIiwiYXVkIjoiYWNjb3VudCIsInN1YiI6IjE1OGUzOWFlLTk0YjAtNDI3Zi04ZGU3LTU3MTRhYWYwOGYzOSIsInR5cCI6IkJlYXJlciIsImF6cCI6ImFwaXNpeC1xdWlja3N0YXJ0LWNsaWVudCIsImFjciI6IjEiLCJyZWFsbV9hY2Nlc3MiOnsicm9sZXMiOlsiZGVmYXVsdC1yb2xlcy1xdWlja3N0YXJ0LXJlYWxtIiwib2ZmbGluZV9hY2Nlc3MiLCJ1bWFfYXV0aG9yaXphdGlvbiJdfSwicmVzb3VyY2VfYWNjZXNzIjp7ImFjY291bnQiOnsicm9sZXMiOlsibWFuYWdlLWFjY291bnQiLCJtYW5hZ2UtYWNjb3VudC1saW5rcyIsInZpZXctcHJvZmlsZSJdfX0sInNjb3BlIjoiZW1haWwgcHJvZmlsZSIsImVtYWlsX3ZlcmlmaWVkIjpmYWxzZSwiY2xpZW50SG9zdCI6IjE3Mi4xNy4wLjEiLCJjbGllbnRJZCI6ImFwaXNpeC1xdWlja3N0YXJ0LWNsaWVudCIsInByZWZlcnJlZF91c2VybmFtZSI6InNlcnZpY2UtYWNjb3VudC1hcGlzaXgtcXVpY2tzdGFydC1jbGllbnQiLCJjbGllbnRBZGRyZXNzIjoiMTcyLjE3LjAuMSJ9.TltzSXqrJuVID7aGrb35jn-oc07U_-jugSn-3jKz4A44LwtAsME_8b3qkmR4boMOIht_5pF6bnnp70MFAlg6JKu4_yIQDxF_GAHjnZXEO8OCKhtIKwXm2w-hnnJVIhIdGkIVkbPP0HfILuar_m0hpa53VpPBGYR-OS4pyh0KTUs8MB22xAEqyz9zjCm6SX9vXCqgeVkSpRW2E8NaGEbAdY25uY-ZC4dI_pON87Ey5e8GdD6HQLXQlGIOdCDi3N7k0HDoD9TZRv2bMRPfy4zVYm1ZlClIuF79A-ZBwr0c-XYuq7t6EY0gPGEXB-s0SaKlrIU5S9JBeVXRzYvqAih41g"
Send a request to the route with the valid access token:
curl -i "http://127.0.0.1:9080/anything/test" -H "Authorization: Bearer $ACCESS_TOKEN"
An HTTP/1.1 200 OK response verifies that the request to the upstream resource was authorized.
Verify With Invalid Access Token
Send a request to the route with invalid access token:
curl -i "http://127.0.0.1:9080/anything/test" -H "Authorization: Bearer invalid-access-token"
An HTTP/1.1 401 Unauthorized response verifies that the OIDC plugin rejects requests with invalid access token.
Verify without Access Token
Send a request to the route without access token:
curl -i "http://127.0.0.1:9080/anything/test"
An HTTP/1.1 401 Unauthorized response verifies that the OIDC plugin rejects requests without access token.
Implement Password Grant
Password grant is a legacy approach to exchange user credentials for an access token.
To implement password grant, create a route with openid-connect plugin as such:
- Admin API
- ADC
curl -i "http://127.0.0.1:9180/apisix/admin/routes" -X PUT -d '
{
  "id": "auth-with-oidc",
  "uri":"/anything/*",
  "plugins": {
    "openid-connect": {
      "use_jwks": true,
      "client_id": "'"$OIDC_CLIENT_ID"'",
      "client_secret": "'"$OIDC_CLIENT_SECRET"'",
      "discovery": "'"$OIDC_DISCOVERY"'",
      "scope": "openid profile",
      "redirect_uri": "http://localhost:9080/anything/callback"
    }
  },
  "upstream":{
    "type":"roundrobin",
    "nodes":{
      "httpbin.org:80":1
    }
  }
}'
❶ Use the JWKS endpoint of the identity provider to verify the token. The endpoint is obtained from the discovery document.
services:
  - name: httpbin Service
    routes:
      - uris:
          - /anything/*
        name: auth-with-oidc
        plugins:
          openid-connect:
            use_jwks: true
            client_id: "apisix-quickstart-client"
            client_secret: "bSaIN3MV1YynmtXvU8lKkfeY0iwpr9cH"
            discovery: "http://192.168.42.145:8080/realms/quickstart-realm/.well-known/openid-configuration"
            scope: openid profile
            redirect_uri: "http://localhost:9080/anything/callback"
    upstream:
      type: roundrobin
      nodes:
        - host: httpbin.org
          port: 80
          weight: 1
❶ Use the JWKS endpoint of the identity provider to verify the token. The endpoint is obtained from the discovery document.
Synchronize the configuration to APISIX:
adc sync -f adc.yaml
Verify With Valid Access Token
Obtain an access token for the Keycloak server at the token endpoint:
OIDC_USER=quickstart-user
OIDC_PASSWORD=quickstart-user-pass
curl -i "http://127.0.0.1:8080/realms/quickstart-realm/protocol/openid-connect/token" -X POST \
  -d 'grant_type=password' \
  -d 'client_id='$OIDC_CLIENT_ID'' \
  -d 'client_secret='$OIDC_CLIENT_SECRET'' \
  -d 'username='$OIDC_USER'' \
  -d 'password='$OIDC_PASSWORD''
The expected response is similar to the following:
{"access_token":"eyJhbGciOiJSUzI1NiIsInR5cCIgOiAiSldUIiwia2lkIiA6ICJ6U3FFaXN6VlpuYi1sRWMzZkp0UHNpU1ZZcGs4RGN3dXI1Mkx5V05aQTR3In0.eyJleHAiOjE2ODAxNjA5NjgsImlhdCI6MTY4MDE2MDY2OCwianRpIjoiMzQ5MTc4YjQtYmExZC00ZWZjLWFlYTUtZGY2MzJiMDJhNWY5IiwiaXNzIjoiaHR0cDovLzE5Mi4xNjguNDIuMTQ1OjgwODAvcmVhbG1zL3F1aWNrc3RhcnQtcmVhbG0iLCJhdWQiOiJhY2NvdW50Iiwic3ViIjoiMTg4MTVjM2EtNmQwNy00YTY2LWJjZjItYWQ5NjdmMmIwMTFmIiwidHlwIjoiQmVhcmVyIiwiYXpwIjoiYXBpc2l4LXF1aWNrc3RhcnQtY2xpZW50Iiwic2Vzc2lvbl9zdGF0ZSI6ImIxNmIyNjJlLTEwNTYtNDUxNS1hNDU1LWYyNWUwNzdjY2I3NiIsImFjciI6IjEiLCJyZWFsbV9hY2Nlc3MiOnsicm9sZXMiOlsiZGVmYXVsdC1yb2xlcy1xdWlja3N0YXJ0LXJlYWxtIiwib2ZmbGluZV9hY2Nlc3MiLCJ1bWFfYXV0aG9yaXphdGlvbiJdfSwicmVzb3VyY2VfYWNjZXNzIjp7ImFjY291bnQiOnsicm9sZXMiOlsibWFuYWdlLWFjY291bnQiLCJtYW5hZ2UtYWNjb3VudC1saW5rcyIsInZpZXctcHJvZmlsZSJdfX0sInNjb3BlIjoicHJvZmlsZSBlbWFpbCIsInNpZCI6ImIxNmIyNjJlLTEwNTYtNDUxNS1hNDU1LWYyNWUwNzdjY2I3NiIsImVtYWlsX3ZlcmlmaWVkIjpmYWxzZSwicHJlZmVycmVkX3VzZXJuYW1lIjoicXVpY2tzdGFydC11c2VyIn0.uD_7zfZv5182aLXu9-YBzBDK0nr2mE4FWb_4saTog2JTqFTPZZa99Gm8AIDJx2ZUcZ_ElkATqNUZ4OpWmL2Se5NecMw3slJReewjD6xgpZ3-WvQuTGpoHdW5wN9-Rjy8ungilrnAsnDA3tzctsxm2w6i9KISxvZrzn5Rbk-GN6fxH01VC5eekkPUQJcJgwuJiEiu70SjGnm21xDN4VGkNRC6jrURoclv3j6AeOqDDIV95kA_MTfBswDFMCr2PQlj5U0RTndZqgSoxwFklpjGV09Azp_jnU7L32_Sq-8coZd0nj5mSdbkJLJ8ZDQDV_PP3HjCP7EHdy4P6TyZ7oGvjw","expires_in":300,"refresh_expires_in":1800,"refresh_token":"eyJhbGciOiJIUzI1NiIsInR5cCIgOiAiSldUIiwia2lkIiA6ICI0YjFiNTQ3Yi0zZmZjLTQ5YzQtYjE2Ni03YjdhNzIxMjk1ODcifQ.eyJleHAiOjE2ODAxNjI0NjgsImlhdCI6MTY4MDE2MDY2OCwianRpIjoiYzRjNjNlMTEtZTdlZS00ZmEzLWJlNGYtNDMyZWQ4ZmY5OTQwIiwiaXNzIjoiaHR0cDovLzE5Mi4xNjguNDIuMTQ1OjgwODAvcmVhbG1zL3F1aWNrc3RhcnQtcmVhbG0iLCJhdWQiOiJodHRwOi8vMTkyLjE2OC40Mi4xNDU6ODA4MC9yZWFsbXMvcXVpY2tzdGFydC1yZWFsbSIsInN1YiI6IjE4ODE1YzNhLTZkMDctNGE2Ni1iY2YyLWFkOTY3ZjJiMDExZiIsInR5cCI6IlJlZnJlc2giLCJhenAiOiJhcGlzaXgtcXVpY2tzdGFydC1jbGllbnQiLCJzZXNzaW9uX3N0YXRlIjoiYjE2YjI2MmUtMTA1Ni00NTE1LWE0NTUtZjI1ZTA3N2NjYjc2Iiwic2NvcGUiOiJwcm9maWxlIGVtYWlsIiwic2lkIjoiYjE2YjI2MmUtMTA1Ni00NTE1LWE0NTUtZjI1ZTA3N2NjYjc2In0.8xYP4bhDg1U9B5cTaEVD7B4oxNp8wwAYEynUne_Jm78","token_type":"Bearer","not-before-policy":0,"session_state":"b16b262e-1056-4515-a455-f25e077ccb76","scope":"profile email"}
Save the access token and refresh token to environment variables. The refresh token will be used in the refresh token step.
# replace with your access token
export ACCESS_TOKEN="eyJhbGciOiJSUzI1NiIsInR5cCIgOiAiSldUIiwia2lkIiA6ICJ6U3FFaXN6VlpuYi1sRWMzZkp0UHNpU1ZZcGs4RGN3dXI1Mkx5V05aQTR3In0.eyJleHAiOjE2ODAxNjA5NjgsImlhdCI6MTY4MDE2MDY2OCwianRpIjoiMzQ5MTc4YjQtYmExZC00ZWZjLWFlYTUtZGY2MzJiMDJhNWY5IiwiaXNzIjoiaHR0cDovLzE5Mi4xNjguNDIuMTQ1OjgwODAvcmVhbG1zL3F1aWNrc3RhcnQtcmVhbG0iLCJhdWQiOiJhY2NvdW50Iiwic3ViIjoiMTg4MTVjM2EtNmQwNy00YTY2LWJjZjItYWQ5NjdmMmIwMTFmIiwidHlwIjoiQmVhcmVyIiwiYXpwIjoiYXBpc2l4LXF1aWNrc3RhcnQtY2xpZW50Iiwic2Vzc2lvbl9zdGF0ZSI6ImIxNmIyNjJlLTEwNTYtNDUxNS1hNDU1LWYyNWUwNzdjY2I3NiIsImFjciI6IjEiLCJyZWFsbV9hY2Nlc3MiOnsicm9sZXMiOlsiZGVmYXVsdC1yb2xlcy1xdWlja3N0YXJ0LXJlYWxtIiwib2ZmbGluZV9hY2Nlc3MiLCJ1bWFfYXV0aG9yaXphdGlvbiJdfSwicmVzb3VyY2VfYWNjZXNzIjp7ImFjY291bnQiOnsicm9sZXMiOlsibWFuYWdlLWFjY291bnQiLCJtYW5hZ2UtYWNjb3VudC1saW5rcyIsInZpZXctcHJvZmlsZSJdfX0sInNjb3BlIjoicHJvZmlsZSBlbWFpbCIsInNpZCI6ImIxNmIyNjJlLTEwNTYtNDUxNS1hNDU1LWYyNWUwNzdjY2I3NiIsImVtYWlsX3ZlcmlmaWVkIjpmYWxzZSwicHJlZmVycmVkX3VzZXJuYW1lIjoicXVpY2tzdGFydC11c2VyIn0.uD_7zfZv5182aLXu9-YBzBDK0nr2mE4FWb_4saTog2JTqFTPZZa99Gm8AIDJx2ZUcZ_ElkATqNUZ4OpWmL2Se5NecMw3slJReewjD6xgpZ3-WvQuTGpoHdW5wN9-Rjy8ungilrnAsnDA3tzctsxm2w6i9KISxvZrzn5Rbk-GN6fxH01VC5eekkPUQJcJgwuJiEiu70SjGnm21xDN4VGkNRC6jrURoclv3j6AeOqDDIV95kA_MTfBswDFMCr2PQlj5U0RTndZqgSoxwFklpjGV09Azp_jnU7L32_Sq-8coZd0nj5mSdbkJLJ8ZDQDV_PP3HjCP7EHdy4P6TyZ7oGvjw"
export REFRESH_TOKEN="eyJhbGciOiJIUzI1NiIsInR5cCIgOiAiSldUIiwia2lkIiA6ICI0YjFiNTQ3Yi0zZmZjLTQ5YzQtYjE2Ni03YjdhNzIxMjk1ODcifQ.eyJleHAiOjE2ODAxNjI0NjgsImlhdCI6MTY4MDE2MDY2OCwianRpIjoiYzRjNjNlMTEtZTdlZS00ZmEzLWJlNGYtNDMyZWQ4ZmY5OTQwIiwiaXNzIjoiaHR0cDovLzE5Mi4xNjguNDIuMTQ1OjgwODAvcmVhbG1zL3F1aWNrc3RhcnQtcmVhbG0iLCJhdWQiOiJodHRwOi8vMTkyLjE2OC40Mi4xNDU6ODA4MC9yZWFsbXMvcXVpY2tzdGFydC1yZWFsbSIsInN1YiI6IjE4ODE1YzNhLTZkMDctNGE2Ni1iY2YyLWFkOTY3ZjJiMDExZiIsInR5cCI6IlJlZnJlc2giLCJhenAiOiJhcGlzaXgtcXVpY2tzdGFydC1jbGllbnQiLCJzZXNzaW9uX3N0YXRlIjoiYjE2YjI2MmUtMTA1Ni00NTE1LWE0NTUtZjI1ZTA3N2NjYjc2Iiwic2NvcGUiOiJwcm9maWxlIGVtYWlsIiwic2lkIjoiYjE2YjI2MmUtMTA1Ni00NTE1LWE0NTUtZjI1ZTA3N2NjYjc2In0.8xYP4bhDg1U9B5cTaEVD7B4oxNp8wwAYEynUne_Jm78"
Send a request to the route with the valid access token:
curl -i "http://127.0.0.1:9080/anything/test" -H "Authorization: Bearer $ACCESS_TOKEN"
An HTTP/1.1 200 OK response verifies that the request to the upstream resource was authorized.
Verify With Invalid Access Token
Send a request to the route with invalid access token:
curl -i "http://127.0.0.1:9080/anything/test" -H "Authorization: Bearer invalid-access-token"
An HTTP/1.1 401 Unauthorized response verifies that the OIDC plugin rejects requests with invalid access token.
Verify without Access Token
Send a request to the route without access token:
curl -i "http://127.0.0.1:9080/anything/test"
An HTTP/1.1 401 Unauthorized response verifies that the OIDC plugin rejects requests without access token.
Refresh Token
To refresh the access token, send a request to the Keycloak token endpoint as such:
curl -i "http://127.0.0.1:8080/realms/quickstart-realm/protocol/openid-connect/token" -X POST \
  -d 'grant_type=refresh_token' \
  -d 'client_id='$OIDC_CLIENT_ID'' \
  -d 'client_secret='$OIDC_CLIENT_SECRET'' \
  -d 'refresh_token='$REFRESH_TOKEN''
You should see a response similar to the following, with the new access token and refresh token, which you can use for subsequent requests and token refreshes:
{"access_token":"eyJhbGciOiJSUzI1NiIsInR5cCIgOiAiSldUIiwia2lkIiA6ICJTdnVwLXlPMHhDdTJBVi1za2pCZ0h6SHZNaG1mcDVDQWc0NHpYb2QxVTlNIn0.eyJleHAiOjE3MzAyNzQ3NDUsImlhdCI6MTczMDI3NDQ0NSwianRpIjoiMjk2Mjk5MWUtM2ExOC00YWFiLWE0NzAtODgxNWEzNjZjZmM4IiwiaXNzIjoiaHR0cDovLzE5Mi4xNjguMTUyLjU6ODA4MC9yZWFsbXMvcXVpY2tzdGFydC1yZWFsbSIsImF1ZCI6ImFjY291bnQiLCJzdWIiOiI2ZWI0ZTg0Yy00NmJmLTRkYzUtOTNkMC01YWM5YzE5MWU0OTciLCJ0eXAiOiJCZWFyZXIiLCJhenAiOiJhcGlzaXgtcXVpY2tzdGFydC1jbGllbnQiLCJzZXNzaW9uX3N0YXRlIjoiNTU2ZTQyYjktMjE2Yi00NTEyLWE5ZjAtNzE3ZTAyYTQ4MjZhIiwiYWNyIjoiMSIsInJlYWxtX2FjY2VzcyI6eyJyb2xlcyI6WyJkZWZhdWx0LXJvbGVzLXF1aWNrc3RhcnQtcmVhbG0iLCJvZmZsaW5lX2FjY2VzcyIsInVtYV9hdXRob3JpemF0aW9uIl19LCJyZXNvdXJjZV9hY2Nlc3MiOnsiYWNjb3VudCI6eyJyb2xlcyI6WyJtYW5hZ2UtYWNjb3VudCIsIm1hbmFnZS1hY2NvdW50LWxpbmtzIiwidmlldy1wcm9maWxlIl19fSwic2NvcGUiOiJlbWFpbCBwcm9maWxlIiwic2lkIjoiNTU2ZTQyYjktMjE2Yi00NTEyLWE5ZjAtNzE3ZTAyYTQ4MjZhIiwiZW1haWxfdmVyaWZpZWQiOmZhbHNlLCJwcmVmZXJyZWRfdXNlcm5hbWUiOiJxdWlja3N0YXJ0LXVzZXIifQ.KLqn1LQdazoPBqLLR856C35XpqbMO9I7WFt3KrDxZF1N8vwv4AvZYWI_2rsbdjCakh9JmPgyYRgEGufYLiDBsqy9CrMVejAIJPYsJIonIXBCp5Ysu92ODJuqtTKuuJ6K7dam7fisBFfCBbVvGspnZ3p0caedpOaF_kSd-F8ARHKVsmkuX3_ucDrP3UctjEXHezefTY4YHjNMB9wuMDPXX2vXt2BsOasnznsIHHHX-ZH8JY6eEfWPtfx0qAED6lVZICT6Rqj_j5-Cf9ogzFtLyy_XvtG9BbHME2B8AXYpxdzqxOxmVVbZdrB8elfmFjs1R3vUn2r3xA9hO_znZo_IoQ","expires_in":300,"refresh_expires_in":1800,"refresh_token":"eyJhbGciOiJIUzI1NiIsInR5cCIgOiAiSldUIiwia2lkIiA6ICIwYWYwZTAwYy0xMThjLTRkNDktYmIwMS1iMDIwNDE3MmFjMzIifQ.eyJleHAiOjE3MzAyNzYyNDUsImlhdCI6MTczMDI3NDQ0NSwianRpIjoiZGQyZTJmYTktN2Y3Zi00MjM5LWEwODAtNWQyZDFiZTdjNzk4IiwiaXNzIjoiaHR0cDovLzE5Mi4xNjguMTUyLjU6ODA4MC9yZWFsbXMvcXVpY2tzdGFydC1yZWFsbSIsImF1ZCI6Imh0dHA6Ly8xOTIuMTY4LjE1Mi41OjgwODAvcmVhbG1zL3F1aWNrc3RhcnQtcmVhbG0iLCJzdWIiOiI2ZWI0ZTg0Yy00NmJmLTRkYzUtOTNkMC01YWM5YzE5MWU0OTciLCJ0eXAiOiJSZWZyZXNoIiwiYXpwIjoiYXBpc2l4LXF1aWNrc3RhcnQtY2xpZW50Iiwic2Vzc2lvbl9zdGF0ZSI6IjU1NmU0MmI5LTIxNmItNDUxMi1hOWYwLTcxN2UwMmE0ODI2YSIsInNjb3BlIjoiZW1haWwgcHJvZmlsZSIsInNpZCI6IjU1NmU0MmI5LTIxNmItNDUxMi1hOWYwLTcxN2UwMmE0ODI2YSJ9.Uad4BVuojHfyxqedFT5BHliWjIqVDbjM-Xeme0G2AAg","token_type":"Bearer","not-before-policy":0,"session_state":"556e42b9-216b-4512-a9f0-717e02a4826a","scope":"email profile"}
Next Steps
APISIX supports the integration with many other OIDC identity providers, such as Okta, Auth0, Authgear, and Microsoft Entra ID (Azure AD).
In addition, APISIX also supports built-in authentication approaches such as key authentication, basic authentication, and JWT.