Configure Dynamic Client Registration with Keycloak
Dynamic Client Registration (DCR) is an OAuth 2.0 mechanism that allows client applications to be registered programmatically with an authorization server, without manual configuration in the Identity Provider (IdP). Instead of pre-creating credentials, applications receive a client ID and client secret at runtime based on defined registration policies, enabling scalable and automated onboarding.
In the API7 Portal, Dynamic Client Registration (DCR) automates the OAuth client registration process:
- An administrator provides API7 with an initial access token from Keycloak, which allows API7 to call Keycloak’s registration API.
- Developers add an OAuth client directly in the Developer Portal, without manually creating a client in Keycloak.
- API7 uses the initial access token to dynamically create the OAuth client in Keycloak.
This guide explains how to integrate the API7 Enterprise Developer Portal with Keycloak as an Identity Provider (IdP) using DCR. You will publish an API in the Provider Portal, configure Keycloak for DCR, and use the Developer Portal to create an application, subscribe to the API, and obtain an OAuth 2.0 access token to securely consume the API.
Prerequisites
- API7 Enterprise v3.9.0 or later installed and activated with a Portal-enabled license. If you are using a trial license, the Portal is enabled by default. See Install API7 Enterprise.
- Developer Portal deployed and configured.
- Keycloak deployed and accessible. This guide uses the
quay.io/keycloak/keycloak:21.1.1image for testing. Behavior may vary across Keycloak versions, so adjust the steps as needed if you are using a different version.
Configure the Provider Portal
In this section, you will configure a DCR provider and create an API product in the API7 Provider Portal.
Publish a Service
- Follow Launch Your First API to create a service and a route.
- Add a label to the route, for example
portal:dcr:require_any_scopes: phone. When requesting an access token, thescopespecified in the request must match the value set in the route's label.

Configure DCR Provider
- In your Keycloak realm (e.g.
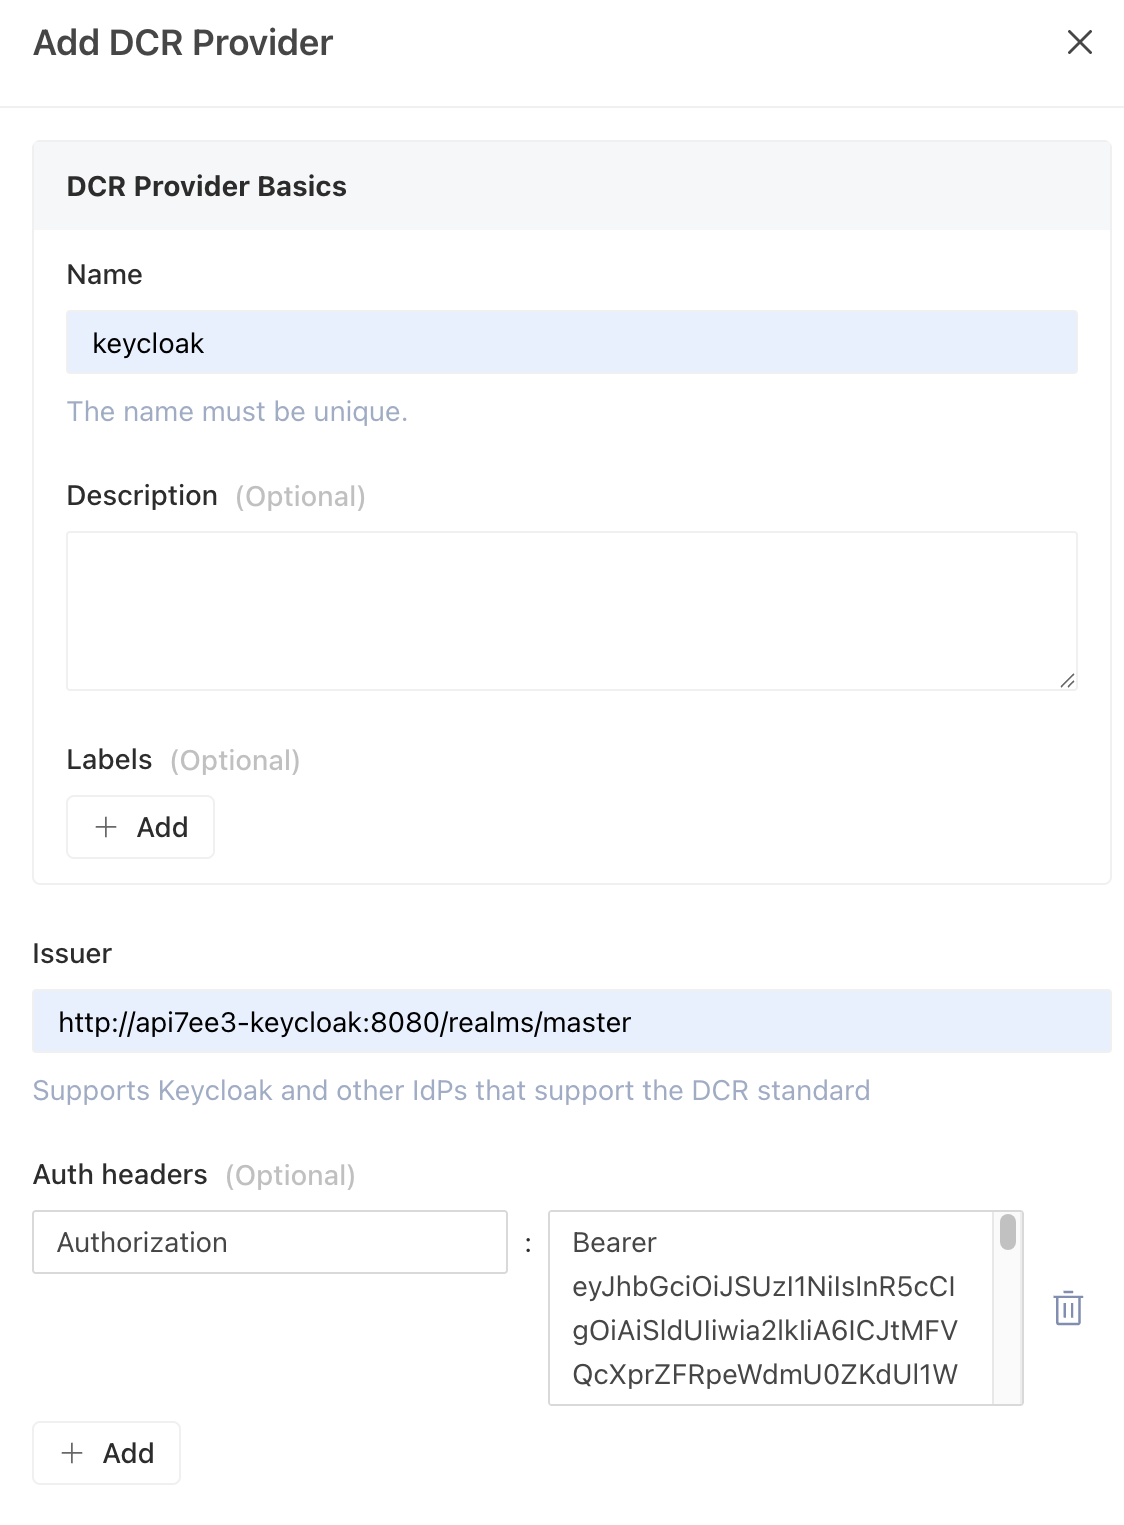
master), create an initial access token. - In the Provider Portal, navigate to DCR Providers and click Add DCR Provider.
- Fill in the DCR provider details:
- Name: Enter a descriptive name for the provider.
- Issuer: Enter the Keycloak issuer URL.
- Auth Headers: Enter
Authorizationas the header name, with valueBearer ${ACCESS_TOKEN}. Replace with your Keycloak initial access token.
Create API Product
-
Navigate to API Products and click Add API Product. Create the product From API7 Gateway.
-
Configure the API product:
- Name: Enter a descriptive name for the API product.
- Authentication Type: Select DCR.
- DCR Provider: Select the Keycloak provider configured previously.
- Add Linked Gateway Service: Select the gateway group and the previously published service (for example,
httpbin).
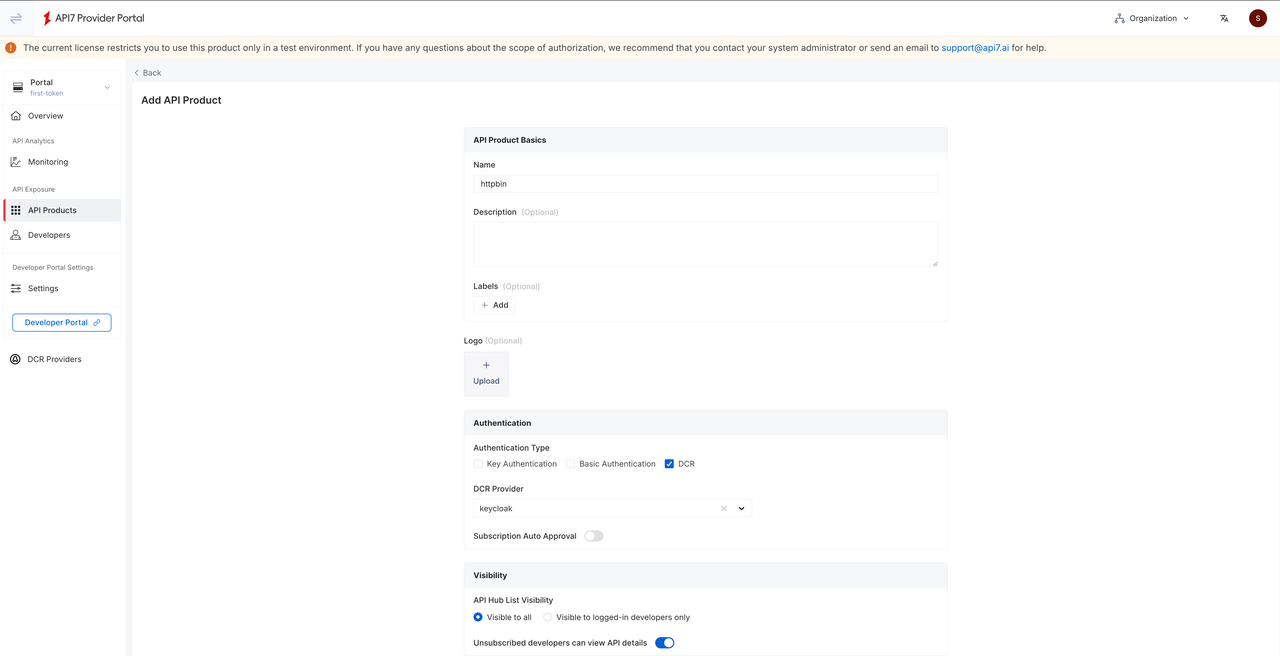
Once the configuration is complete, click Add.
-
The newly created API product is in
draftby default and it is not visible on the Developer Portal. To publish the product, click Actions in the top-right corner, then select Publish to make the API Product visible in the Developer Portal.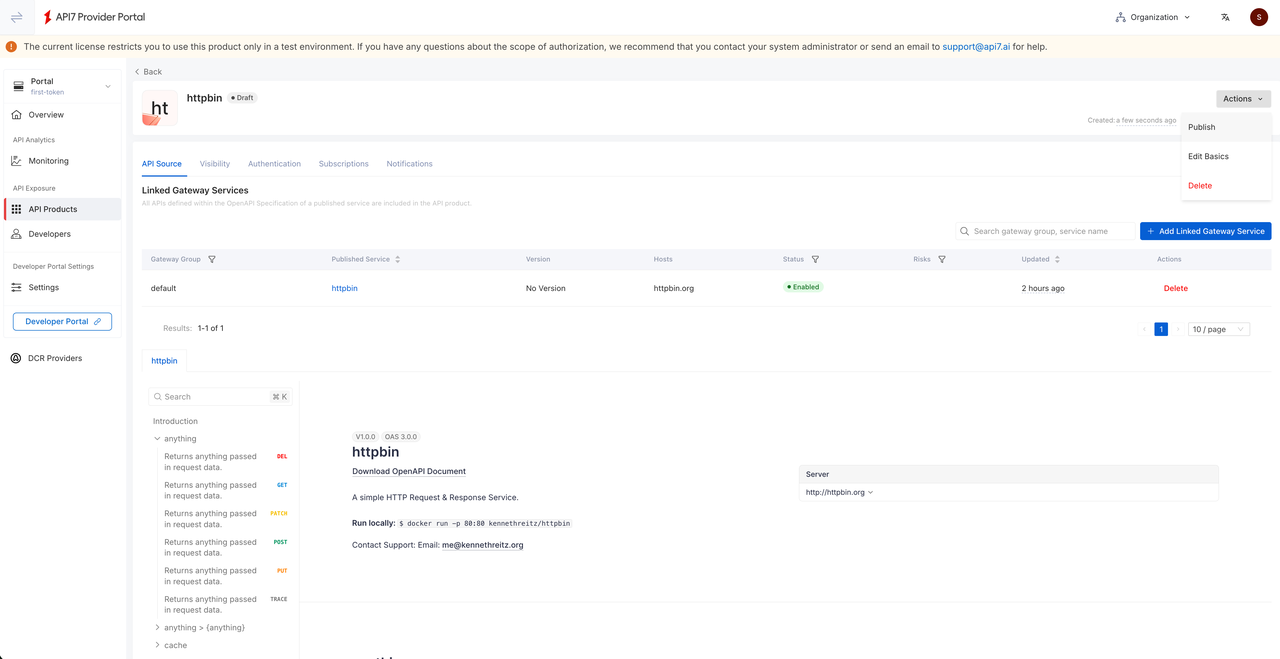
Developer Portal Operations
The following instructions assume that your Developer Portal is bootstrapped from the API7 Developer Portal Boilerplate. If your Developer Portal is customized, adjust the steps accordingly.
Subscribe to API Product
As an API developer:
- Register a new user and organization.
- Use a developer account to log in to the Developer Portal.
- Navigate to My Applications and click Add Application to create an application.
- Select API Hub from the top navigation bar.
- Select an API product (for example,
httpbin). Explore the API details to ensure they meet your needs. - Click Subscriptions, then Subscribe to Application, and select the application created previously.
- Wait for the subscription request to be approved.
Approve Subscription Request
Approval is required only when Subscription Auto Approval is disabled during API product creation. Skip this section if the developer subscription is automatically approved.
As an API provider:
- In the Provider Portal, select Organization from the top navigation bar, then click Approvals.
- Locate the specific request and click Accept.
Create an Application and OAuth Client
As an API developer:
- Navigate to My Applications and select the previously created application.
- Go to the Authentication Type tab and click OAuth.
- Click Add OAuth Client to create a new OAuth Client.
- Fill in the OAuth client details:
- Identity Provider: Select Keycloak as the OAuth provider.
- Redirect URIs: Enter the callback URL(s). These redirect URIs will be automatically configured in the Keycloak client through DCR.
- Copy the Client ID and Client Secret for later verification.
Each OAuth client created in the Developer Portal maps to a single client in Keycloak. An application can contain multiple OAuth clients, each with its own corresponding Keycloak client.
Verify API Access
As an API developer:
-
Request an access token. The
scoperequested here must correspond to the value set in the route's label (phonein this case), otherwise, the validation will fail.# Define variablesexport KEYCLOAK_HOST="your_keycloak_host"export ADMIN_USERNAME="your_admin_username"export ADMIN_PASSWORD="your_admin_password"export CLIENT_ID="your_client_id"export CLIENT_SECRET="your_client_secret"export DP_HOST="your_dp_host"export KEYCLOAK_REALM="your_realm"# Request the access tokenexport ACCESS_TOKEN="$(curl --location --request POST "http://${KEYCLOAK_HOST}:8080/realms/${KEYCLOAK_REALM}/protocol/openid-connect/token" \--header 'Content-Type: application/x-www-form-urlencoded' \--data-urlencode 'grant_type=password' \--data-urlencode "client_id=${CLIENT_ID}" \--data-urlencode "client_secret=${CLIENT_SECRET}" \--data-urlencode "username=${ADMIN_USERNAME}" \--data-urlencode "password=${ADMIN_PASSWORD}" \--data-urlencode 'scope=phone' | jq -r '.access_token')" -
Use the obtained access token to call the API:
# Update with your gateway addresscurl "http://127.0.0.1:9080/ip" -H "Host: httpbin.org" -H "Authorization: Bearer $ACCESS_TOKEN"You should see the following response:
{"origin": "127.0.0.1"}