Log in to API7 Dashboard with SSO
Single Sign-On (SSO) allows users to log in once and access multiple systems without re-entering credentials. It improves efficiency, enhances user experience, and strengthens security by eliminating the need for multiple passwords.
In API7 Enterprise, you can use multiple login options simultaneously. It is possible to create users within API7 while also importing them from other existing systems.
Architecture
Take LDAP as an example:
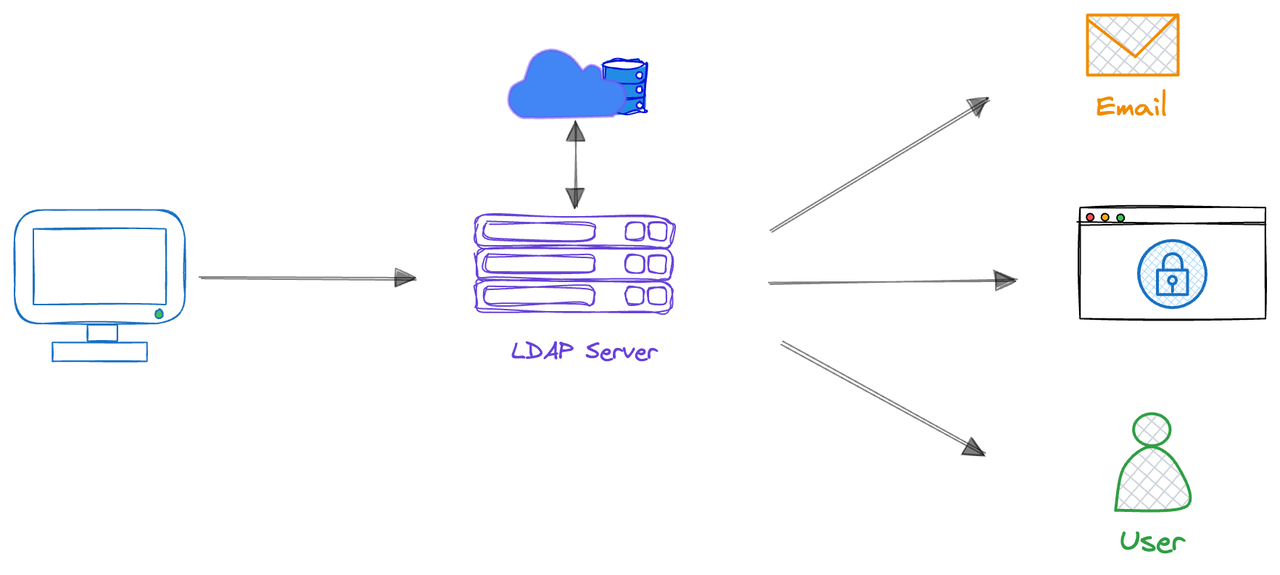
- User Login Request: Users enter their username and password when logging into API7 Enterprise.
- LDAP Verification: API7 Enterprise transfers the credentials provided by the user to the LDAP server for verification.
- Authentication: The LDAP server verifies whether the user's credentials match the user information stored in the LDAP directory.
- Authorization: If verification is successful, the LDAP server returns authorization information to API7 Enterprise, and the system authorizes the user to access corresponding resources based on this information.
- Accessing Resources: Users access API7 Enterprise with the verified identity without having to re-enter credentials.
Create a Login Option
API7 Enterprise supports Single Sign-On with the following implementations. Integrating API7 Enterprise with other user systems enables you to log your existing users into API7 Enterprise without signing up for a new API7 account.
- LDAP
- OIDC
- SAML
IdP Configuration
Coming soon.
API7 Dashboard Configuration
- Select Organization from the top navigation bar, then choose Settings.
- Click Add Login Option.
- Fill in the configuration:
- Name: the unique login name. The name should be identifiable for users. For example, if you configure the name to be
Employee Account, you will seeLogin with Employee Accountoption in the Dashboard login page. - Provider: choose
LDAP. - Host: the LDAP host domain. For example,
ldap.example.com. - Port: For example,
389(non-SSL) or636(SSL). - Base Distinguished Name: For example,
ou=users,dc=org,dc=example. - Bind Distinguished Name: the LDAP Bind Distinguished Name (DN) used to perform LDAP search for the user. This LDAP Bind DN should have permissions to search for the user being authenticated. For example,
cn=admin,dc=org,dc=example. - Bind Password: the LDAP bind password used to authenticate with the LDAP server.
- Identifier: the attribute used to identify LDAP users. For example,
cn. - Attributes Mapping: map API7 internal fields to related LDAP attributes to seamlessly integrate and synchronize data.
- Click Add.
IdP Configuration
This section describes configuration in Keycloak 26.3.3. If you are using a different version of Keycloak or a different identity provider (IdP), refer to your IdP's documentation and adjust the configuration accordingly.
- Create a realm, for example
quickstart-realm. - Create a client, for example
apisix-quickstart-client. In the client:- Enable client authentication, which sets the access type to be confidential.
- Enable standard flow (authorization code grant).
- Configure the redirect URL, for example
*. - After creating the client, navigate to the Credentials tab and obtain the client secret. Record this value for later use.
- Create a user. In the user:
- Create a user password.
- Configure the user email, first name, and last name as needed.
- In the realm settings, find the link to the discovery document. In the discovery document, record these values for later use:
- The
issuerURL, for example,http://192.168.10.101:8080/realms/quickstart-realm. - The
end_session_endpointURL, for example,http://192.168.10.101:8080/realms/quickstart-realm/protocol/openid-connect/logout.
- The
API7 Dashboard Configuration
- Select Organization from the top navigation bar, then choose Settings.
- Click Add Login Option.
- Fill in the configuration:
- Name: The unique login name. The name should be identifiable for users. For example, if you configure the name to be
Employee Account, you will seeLogin with Employee Accountoption in the Dashboard login page. - Provider: Choose
OIDC. - Issuer: The issuer URL of the OpenID Connect provider, for example,
http://192.168.10.101:8080/realms/quickstart-realm. - Client ID: The unique identifier of your application assigned by the OIDC provider, for example
apisix-quickstart-client. - Client Secret: Secret key used for authentication assigned by the OIDC provider.
- Request Scope: Scope values requested from the OIDC provider, which define the level of access and the claims included in the tokens. The
openidscope is mandatory for all OIDC requests. Additional scopes can be included as needed, separated by spaces. For example,openid profile email. - Root URL: The root address through which users access the API7 Dashboard, for example,
https://dashboard.your-company.com. This URL must exactly match what users enter in their browsers, including the protocol (HTTP or HTTPS) and the port number if it differs from the standard ports (80 or 443).- The callback URL will be automatically generated as
<Root_URL>/api/oidc/<LOGIN_OPTION_ID>/callback.
- The callback URL will be automatically generated as
- SSL verify: Whether the OIDC provider’s SSL/TLS certificate should be validated.
- Logout URL: The URL that ends the user session and redirects them to the sign-in page. This should be the
end_session_endpointURL with thepost_logout_redirect_uriquery parameter set to the API7 Dashboard URL, for examplehttp://192.168.10.101:8080/realms/quickstart-realm/protocol/openid-connect/logout?post_logout_redirect_uri=https://dashboard.your-company.com. - Attributes Mapping: API7 user fields mapping to OIDC claims. For example:
- username:
preferred_username - email:
email - name:
name
- username:
- Click Add.
IdP Configuration
This section describes configuration in Microsoft Entra ID (Azure AD). If you are using a different identity provider (IdP), refer to your IdP's documentation and adjust the configuration accordingly.
- In Azure Portal, navigate to Microsoft Entra ID.
- Create an enterprise application. Select the option to create your own application:
- Fill in the name of the app, for example
API7. - Select the Integrate any other application you don't find in the gallery (Non-gallery) option.
- Fill in the name of the app, for example
- In the application, select the users and groups tab to add all necessary users and groups. Only the users and groups added can log into API7 via SSO.
- In the application, navigate to the single sign-on tab and enable SAML. After SAML is enabled, find the following information for your app:
- App Federation Metadata URL: The URL that exposes SAML configuration details, for example,
https://login.microsoftonline.com/<TENANT_ID>/federationmetadata/2007-06/federationmetadata.xml?appid=<APP_ID>. - Claim Names: Unique identifiers for user attributes in a SAML token, used to map identity provider data to corresponding fields in the service provider. Find the claim names for username and email, for example,
http://schemas.xmlsoap.org/ws/2005/05/identity/claims/nameandhttp://schemas.xmlsoap.org/ws/2005/05/identity/claims/emailaddress.
- App Federation Metadata URL: The URL that exposes SAML configuration details, for example,
- Complete the API7 Dashboard Configuration instructions below, as the subsequent configurations require information from API7.
- In the application, navigate to the single sign-on tab and edit the Basic SAML Configuration:
- Identifier (Entity ID): A unique identifier used to represent a specific entity in a SAML federation. This identifier must be unique and consistent between API7 and the IdP. It is recommended to use the API7 Dashboard URL, for example,
https://dashboard.your-company.com, although any unique string can be used. - Reply URL (Assertion Consumer Service URL): The endpoint on the Service Provider where the Identity Provider sends the SAML authentication response after a user successfully signs in, for example,
https://dashboard3.apiseven.com/api/saml/<LOGIN_OPTION_ID>/acs.
- Identifier (Entity ID): A unique identifier used to represent a specific entity in a SAML federation. This identifier must be unique and consistent between API7 and the IdP. It is recommended to use the API7 Dashboard URL, for example,
The configuration is now complete. You should now be able to log in to API7 Dashboard with the new login option.
API7 Dashboard Configuration
- Select Organization from the top navigation bar, then choose Settings.
- Click Add Login Option.
- Fill in the configuration:
- Name: The unique login name. The name should be identifiable for users. For example, if you configure the name to be
Employee Account, you will seeLogin with Employee Accountoption in the Dashboard login. - Provider: choose
SAML. - Identity Provider Metadata URL: The identity provider metadata URL, for example,
https://login.microsoftonline.com/<TENANT_ID>/federationmetadata/2007-06/federationmetadata.xml?appid=<APP_ID>. - Service Provider Root URL: The root URL of your Service Provider. Typically, it is the API7 Enterprise Dashboard address, for example,
https://dashboard.your-company.com. - Entity ID: A unique identifier used to represent a specific entity in a SAML federation. This identifier must be unique and consistent between API7 and the IdP. It is recommended to use the API7 Dashboard URL, for example,
https://dashboard.your-company.com, although any unique string can be used. - Attributes Mapping: API7 user fields mapping to SAML claims. For example:
- username:
http://schemas.xmlsoap.org/ws/2005/05/identity/claims/name - email:
http://schemas.xmlsoap.org/ws/2005/05/identity/claims/emailaddress - name:
http://schemas.xmlsoap.org/ws/2005/05/identity/claims/name
- username:
- Terminates IdP Session on Logout: You can optionally enable terminating IdP session on logout.
- Click Add.
- In the new SAML login option, find the Service Provider ACS URL, for example,
https://dashboard3.apiseven.com/api/saml/<LOGIN_OPTION_ID>/acs. - Return to the IdP Configuration above, step 6.
A new login option should now appear on the API7 Dashboard login page, allowing you to authenticate using the user created in your IdP. After the user signs in, navigate to Organization in the top navigation bar, then select Users to view the user.
Note that this user has no roles assigned yet, and therefore lacks permissions to manage resources in the Dashboard.
Deleting a user in the Dashboard removes all roles assigned in the API7 Dashboard, but the user can still log in as a new user. To fully revoke access to the API7 Dashboard, the user must be removed from the IdP.
Manage Roles and Permissions for IdP Users
To manage user roles and permission boundaries, you can use the API7 Dashboard to configure them manually or set up automatic mapping.
Manual Update
See update user role and set permission boundary for how to manually update roles and permission boundaries for users in API7 Dashboard.
Manual changes in the Dashboard will be overridden when role mapping or permission boundary mapping are enabled. Manual configuration is best suited for ad-hoc adjustments.
Automatic Mapping
Imported users can be automatically assigned roles and permission boundaries based on attributes from their identity provider, such as title, position, or department. These roles and permission boundaries are synchronized each time the user logs in, ensuring consistent access. A login option’s mapping can include multiple rules that collectively determine a user’s access privileges.
Automatic mappings take precedence over manually modified roles and permission boundaries. When mappings are active, manual changes in the Dashboard will be overwritten the next time the user logs in.
IdP Configuration
Role and permission boundary mappings rely on values configured in the IdP and passed to API7 Enterprise. The configuration process is the same for both. Update example names and values as needed, depending on which you are configuring.
- LDAP
- OIDC
- SAML
Coming soon.
This section describes configuration in Keycloak 26.3.3. If you are using a different version of Keycloak or a different identity provider (IdP), refer to your IdP's documentation and adjust the configuration accordingly.
To assign the position attribute with the value admin to a user in Keycloak, you can configure it either as a user attribute or via group membership.
Configure as a User Attribute
-
Enable Unmanaged Attributes from the Realm Settings.
-
Navigate to the user in Keycloak.
-
Go to the Attributes tab.
-
Add a new attribute, for example, with
Keyset topositionandValueset toadmin. -
Navigate to Client Scopes and select a scope to which you want to add a mapper, for example,
profile. Note that the selected scope should be configured in the API7 Dashboard Request Scope. -
Add a mapper by configuration. Select User Attribute from the list, and fill in the configuration:
- Name: Name of the mapper, for example,
position. - User Attribute: Name of the user attribute, for example,
position. - Token Claim Name: Name of the claim to insert into the token, for example,
position. - By default, this attribute will be included in the UserInfo, which API7 Enterprise uses to obtain user attributes. For example:
{
  "email":"johndoe@api7.ai",
  "email_verified":false,
  "name":"John Doe",
  "preferred_username":"johndoe",
  "sub":"b724c7ed-ad74-4330-9365-e599fdfbffcc",
  ...
  "position":"admin"
} - Name: Name of the mapper, for example,
In API7 Dashboard, you can use $.position, Exact Match, admin mapping rule. See the API7 Dashboard Configuration for configuration steps.
Configure via Group Membership
-
Navigate to Groups in Keycloak.
-
Create a new group, for example,
admin. -
Add the user to this group.
-
Navigate to Client Scopes and select a scope to which you want to add a mapper, for example,
profile. Note that the selected scope should be configured in the API7 Dashboard Request Scope. -
Add a mapper by configuration. Select Group Membership from the list, and fill in the configuration:
- Name: Name of the mapper, for example,
groups. - Token Claim Name: Name of the claim to insert into the token, for example,
groups. - By default, this attribute will be included in the UserInfo, which API7 Enterprise uses to obtain user attributes. For example:
{
  "email":"johndoe@api7.ai",
  "email_verified":false,
  "name":"John Doe",
  "preferred_username":"johndoe",
  "sub":"b724c7ed-ad74-4330-9365-e599fdfbffcc",
  ...
  "groups": ["/admin"]
} - Name: Name of the mapper, for example,
In API7 Dashboard, you can use $.groups[*], Contains String, admin as the mapping rule. See the API7 Dashboard Configuration for configuration steps.
This section describes configuration in Microsoft Entra ID (Azure AD). If you are using a different identity provider (IdP), refer to your IdP's documentation and adjust the configuration accordingly.
You can use user attribute or group membership for mapping.
Configure as a User Attribute
- In Microsoft Entra ID, go to Users and add
adminas the job title for users who should later have the API7 admin role. - In your enterprise application, navigate to the single sign-on tab and edit the Attributes & Claims.
- Select Add new claim. Configure the name as
position, select Attribute as the source, and useuser.jobtitleas the Source attribute.
This assigns the position attribute with the value admin in the SAML assertion for these users. In API7 Dashboard, you can use position, Exact Match, admin mapping rule. See the API7 Dashboard Configuration for configuration steps.
Configure via Group Membership
- In Microsoft Entra ID, go to Groups and create a new security group called
admin. Note down the group ID, for example,40cec5d2-72f2-43f5-b096-b4189012a386. - Add users to the group. Members in this group should later have the API7 admin role.
- In your enterprise application, navigate to the single sign-on tab and edit the Attributes & Claims.
- Select Add a group claim. Select Security groups as the type of groups, and use
Group IDas the Source attribute.
This creates a new claim with the name http://schemas.microsoft.com/ws/2008/06/identity/claims/groups.
In API7 Dashboard, you can use http://schemas.microsoft.com/ws/2008/06/identity/claims/groups, Exact Match in Array, 40cec5d2-72f2-43f5-b096-b4189012a386 mapping rule. See the API7 Dashboard Configuration for configuration steps.
API7 Dashboard Configuration
Role Mapping
- Select Organization from the top navigation bar, then choose Settings.
- Select the login option.
- Enable Role Mapping.
- Fill in the configuration:
- Internal Role: The role in API7 Enterprise to assign. For example,
Super Admin. - Role Attribute: The JSONPath to the corresponding attribute in the IdP. For example,
$.position.- In LDAP, the attribute should correspond to an attribute in the user entry.
- In OIDC, the attribute should correspond to a claim in the UserInfo.
- In SAML, the attribute should correspond to an attribute in the SAML assertion.
- Operation: The comparison method used to match the attribute value. For example,
Exact Match. - Role Value: The value of the IdP attribute. For example,
admin.
- Click Enable.
Now all users with the position attribute set to admin in the IdP will automatically be assigned the Super Admin role upon their next login.
Note that role mapping is dynamic. If a user's attribute changes in the IdP, their role will be automatically updated based on the role mapping rules the next time they log in to API7 Enterprise.
Permission Boundary Mapping
- Select Organization from the top navigation bar, then choose Settings.
- Choose the login option.
- Enable Permission Boundary Mapping.
- Fill in the configuration:
- Permission Policy: The permission policy to assign in API7 Enterprise. For example, you can create a policy such as
Admin License Restricted, which grants full resource access while restricting license updates; and apply the policy to this field. - Permission Boundary Attribute: The JSONPath to the corresponding attribute in the IdP. For example,
$.position.- In LDAP, the attribute should correspond to an attribute in the user entry.
- In OIDC, the attribute should correspond to a claim in the UserInfo.
- In SAML, the attribute should correspond to an attribute in the SAML assertion.
- Operation: The comparison method used to match the attribute value. For example,
Exact Match. - Permission Boundary Value: The value of the IdP attribute. For example,
admin.
- Click Enable.
Now all users with the position attribute set to admin in the IdP will be automatically assigned the Admin License Restricted permission boundary upon their next login.
Note that permission boundary mapping is dynamic. If a user's attribute changes in the IdP, their permission boundary will be automatically updated based on the mapping rules the next time they log in to API7 Enterprise.
Synchronize User Data from IdP (SCIM)
SCIM (System for Cross-domain Identity Management) is a protocol that can be used to synchronize user and group information from an Identity Provider (IdP) to API7 Enterprise. This eliminates the need to manually manage users and groups across multiple systems, saving time and reducing the risk of errors.
With SCIM Provisioning, API7 Enterprise automatically synchronizes user data whenever a new user is registered or deleted in your IdP.
- Select Organization from the top navigation bar, then choose Settings.
- Enable SCIM Provisioning.
- Copy the
API7 SCIM Endpoint URLandSCIM Token. - Configure SCIM in your IdP, if supported.
Delete a Login Option
Deleting a login option will remove all users associated with that option in API7 Dashboard.
- Select Organization from the top navigation bar, then choose Users.
- Check if there are any users still using this login option. If yes, notify them first.
- Select Organization from the top navigation bar, then choose Settings.
- Click Delete of the target login option.
Additional Resources
- Key Concepts
- Getting Started
- Reference