Autoscale APISIX Gateway (AWS EC2)
Autoscaling is a mechanism that automatically adjusts the resources available to the gateway, ensuring consistent performance under varying traffic loads.
This guide walks you through deploying APISIX in decoupled mode on EC2, configuring an Auto Scaling Group (ASG) for the APISIX gateway (also referred to as APISIX Data Plane or DP), defining scaling policies, and validating scaling behavior with a simple load test so your gateway can automatically respond to traffic changes.
Prerequisites
- An AWS account.
- Sufficient IAM permissions to create and manage the following AWS resources:
- EC2 instances
- Auto Scaling Groups
- Launch Templates
- Security Groups
- Ensure you have a VPC configured in the target AWS region, with the necessary subnets for your EC2 instances.
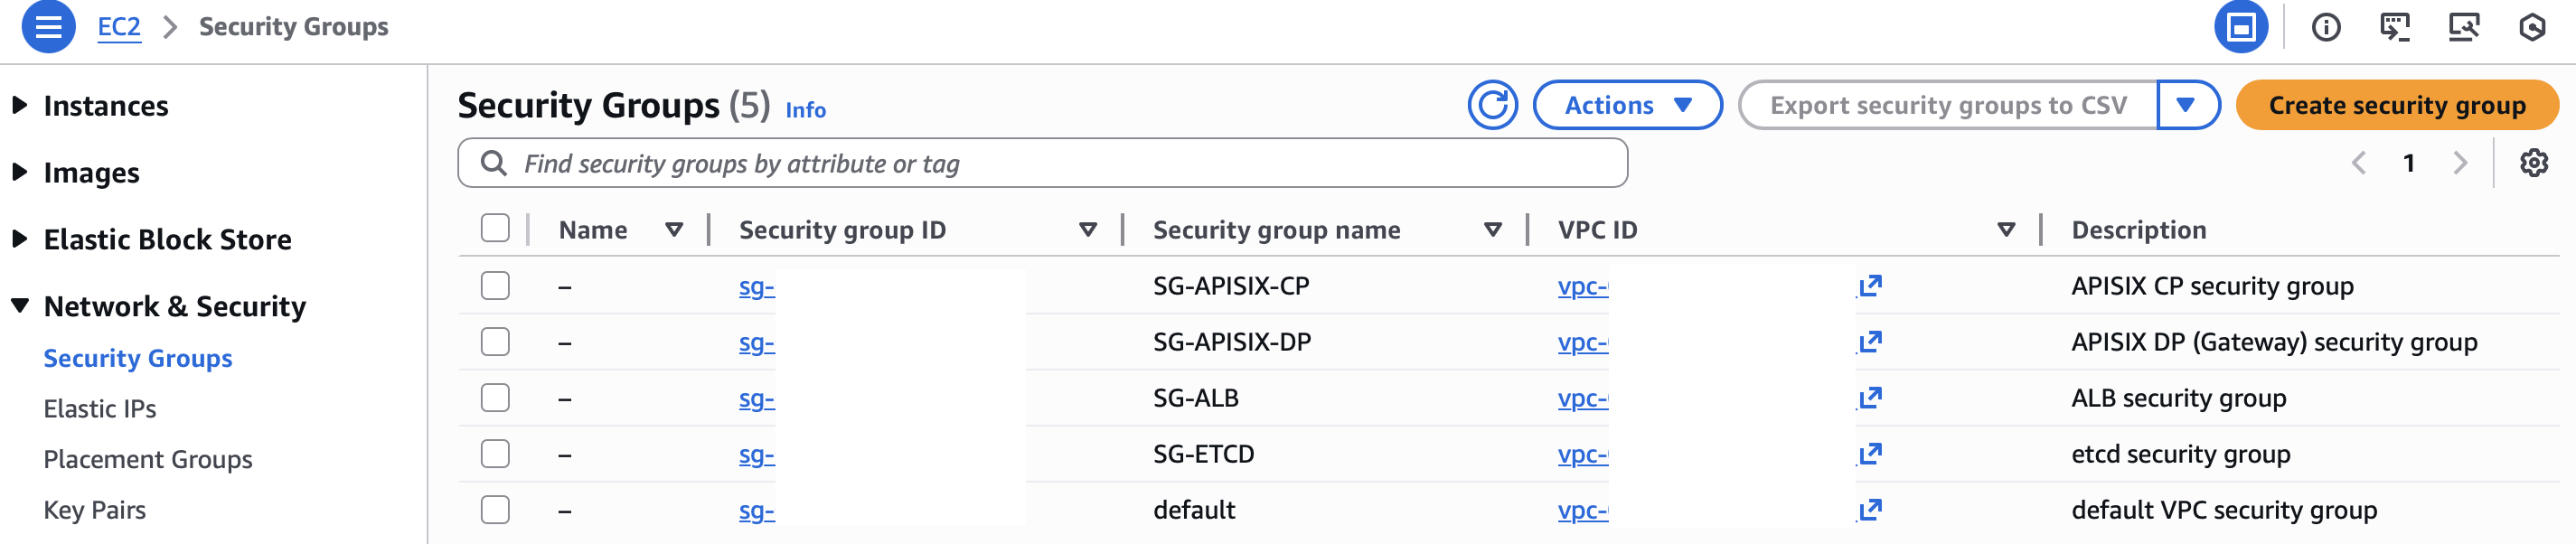
Configure Security Groups
This diagram visualizes traffic between APISIX and its supporting components, highlighting the purpose of each security group and the rules that need to be configured:
The following security group configurations are provided for reference. They follow a least-privilege principle and assume the presence of an ALB for distributing traffic to APISIX DP instances. You should adapt these rules to fit your own network and security requirements.
In the AWS Console, navigate to EC2 > Security Groups. Create the following security groups and configure their inbound and outbound rules:
1. Application Load Balancer (ALB) Security Group
- Inbound
- HTTP
80and HTTPS443from0.0.0.0/0(anywhere)
- HTTP
- Outbound
- Custom TCP
9080to APISIX DP security group
- Custom TCP
2. APISIX Control Plane (CP) Security Group
- Inbound
- SSH
22from a trusted source, such as a bastion host or your own IP range - TCP
9180from a trusted source, such as a bastion host or your own APISIX Admin IP range
- SSH
- Outbound
- Custom TCP
2379to ETCD security group - HTTP
80and HTTPS443to0.0.0.0/0(anywhere) for package installation and pulling the APISIX image
- Custom TCP
3. APISIX Data Plane (DP) Security Group
- Inbound
- SSH
22from a trusted source, such as a bastion host or your own IP range - Custom TCP
9080from ALB security group
- SSH
- Outbound
- Custom TCP
2379to ETCD security group - HTTP
80and HTTPS443to0.0.0.0/0(anywhere)
- Custom TCP
4. ETCD Security Group
- Inbound
- SSH
22from a trusted source, such as a bastion host or your own IP range - Custom TCP
2379from APISIX CP security group - Custom TCP
2379from APISIX DP security group
- SSH
- Outbound
- HTTP
80and HTTPS443to0.0.0.0/0(anywhere) for downloading etcd
- HTTP
The installation steps download packages, the etcd release, and the APISIX container image. Ensure that each selected subnet provides controlled outbound Internet access. Private subnets require a NAT gateway or equivalent egress path. Public subnets require a route to an Internet gateway and a public IP address on each instance that downloads these dependencies.
Launch EC2 Instances
In this section, you will launch EC2 instances and install etcd and the APISIX CP.
This section walks you through installing a single etcd instance and a single APISIX CP instance for simplicity, as the guide focuses on DP autoscaling. In production, it is recommended to run multiple etcd nodes in a cluster to ensure high availability and fault tolerance.
The installation uses Ubuntu EC2 instances on amd64 architecture. If you choose a different Linux distribution or architecture, adjust the installation scripts accordingly.
Instead of manually creating APISIX DP instances, you will later define a launch template and use an ASG to automatically create and scale APISIX DP instances.
etcd
Navigate to EC2 and launch an EC2 instance to host etcd with the following configurations:
- AMI (Amazon Machine Image): Select Ubuntu. You may use a different Linux distribution if preferred, but ensure the installation steps are adjusted accordingly.
- Instance type: Select a size suitable for your workload.
- Key pair: Choose an existing key pair or create a new one. This key is required to connect to the EC2 instance via SSH. If you proceed without a key pair, you can still connect to the instance using the AWS Console “Connect” option, but SSH access from your local machine will not be available.
- Network settings: Choose the VPC and select the existing etcd security group.
Review your configuration and launch the instance.
After the instance is launched, make a note of its private IP, which will be used by etcd and APISIX for communication:
# Replace with the private IP of your etcd instance
ETCD_INSTANCE_PRIVATE_IP=172.31.19.201
Connect to the instance (using SSH or the AWS Console "Connect" option) and run the following commands to install etcd:
# Download and extract etcd
ETCD_VERSION='3.5.32'
wget https://github.com/etcd-io/etcd/releases/download/v${ETCD_VERSION}/etcd-v${ETCD_VERSION}-linux-amd64.tar.gz
tar -xvf etcd-v${ETCD_VERSION}-linux-amd64.tar.gz

# Copy binaries to /usr/bin
cd etcd-v${ETCD_VERSION}-linux-amd64
sudo cp -a etcd etcdctl /usr/bin/

# Start etcd
nohup etcd \
  --name s1 \
  --data-dir /tmp/etcd-data \
  --listen-client-urls http://0.0.0.0:2379 \
  --advertise-client-urls http://${ETCD_INSTANCE_PRIVATE_IP}:2379 \
  >/tmp/etcd.log 2>&1 &
APISIX CP
Navigate to EC2 and launch an EC2 instance to host APISIX CP with the following configurations:
- AMI (Amazon Machine Image): Select Ubuntu. You may use a different Linux distribution if preferred, but ensure the installation steps are adjusted accordingly.
- Instance type: Select a size suitable for your workload.
- Key pair: Choose an existing key pair or create a new one. This key is required to connect to the EC2 instance via SSH. If you proceed without a key pair, you can still connect to the instance using the AWS Console “Connect” option, but SSH access from your local machine will not be available.
- Network settings: Choose the VPC and select the existing APISIX CP security group.
Review your configuration and launch the instance.
Connect to the instance (using SSH or the AWS Console "Connect" option). Install Docker to run APISIX:
sudo apt-get update
sudo apt-get install -y docker.io
sudo systemctl enable --now docker
Create a directory for the APISIX configuration:
sudo mkdir -p /etc/apisix
sudo vi /etc/apisix/config.yaml
Create /etc/apisix/config.yaml to configure this instance as the control plane and connect it to etcd:
deployment:
  role: control_plane
  role_control_plane:
    config_provider: etcd
  etcd:
    host:
      - http://172.31.19.201:2379  # Replace with the private IP of your etcd instance
  admin:
    admin_key:
      - name: admin
        key: 'Sup3rs3cretWr1teK3y'  # Replace with your admin key
        role: admin
Start the APISIX control plane with host networking so that its Admin API port is available on the EC2 instance:
sudo docker run -d \
  --name apisix-cp \
  --restart unless-stopped \
  --network host \
  -v /etc/apisix/config.yaml:/usr/local/apisix/conf/config.yaml:ro \
  apache/apisix:3.17.0-ubuntu
Create a Launch Template
In this section, a launch template is used to define how APISIX DP instances are created. It contains the instance configuration—such as the AMI, instance type, security groups, and startup scripts—that the ASG uses to launch and manage DP instances.
Using a launch template ensures that all DP instances are created consistently and allows the ASG to automatically add or remove instances as traffic changes.
Navigate to EC2 > Launch Templates and create a launch template with the following configurations:
- Auto Scaling guidance: Enable this option to indicate the template will be used by an ASG.
- AMI (Amazon Machine Image): Select Ubuntu. You may use a different Linux distribution if preferred, but ensure that the user data script is adjusted accordingly.
- Instance type: Select a size suitable for your workload.
- Network settings: Select the existing APISIX DP security group.
- Advanced details > CloudWatch monitoring: Enable detailed monitoring so that the CPU target-tracking policy receives one-minute metrics. Detailed monitoring incurs additional charges.
- Advanced details > User data: Paste in the script below.
#!/bin/bash
set -e

# Replace with the private IP of your etcd instance
ETCD_IP="172.31.19.201"
APISIX_IMAGE="apache/apisix:3.17.0-ubuntu"

# Install and start Docker
apt-get update
apt-get install -y docker.io
systemctl enable --now docker

# Create the APISIX configuration
mkdir -p /etc/apisix

cat >/etc/apisix/config.yaml <<EOF
deployment:
  role: data_plane
  role_data_plane:
    config_provider: etcd
  etcd:
    host:
      - http://${ETCD_IP}:2379
EOF

# Start APISIX as a data plane
docker run -d \
  --name apisix-dp \
  --restart unless-stopped \
  --network host \
  -v /etc/apisix/config.yaml:/usr/local/apisix/conf/config.yaml:ro \
  ${APISIX_IMAGE}
Review your configuration and create the template.

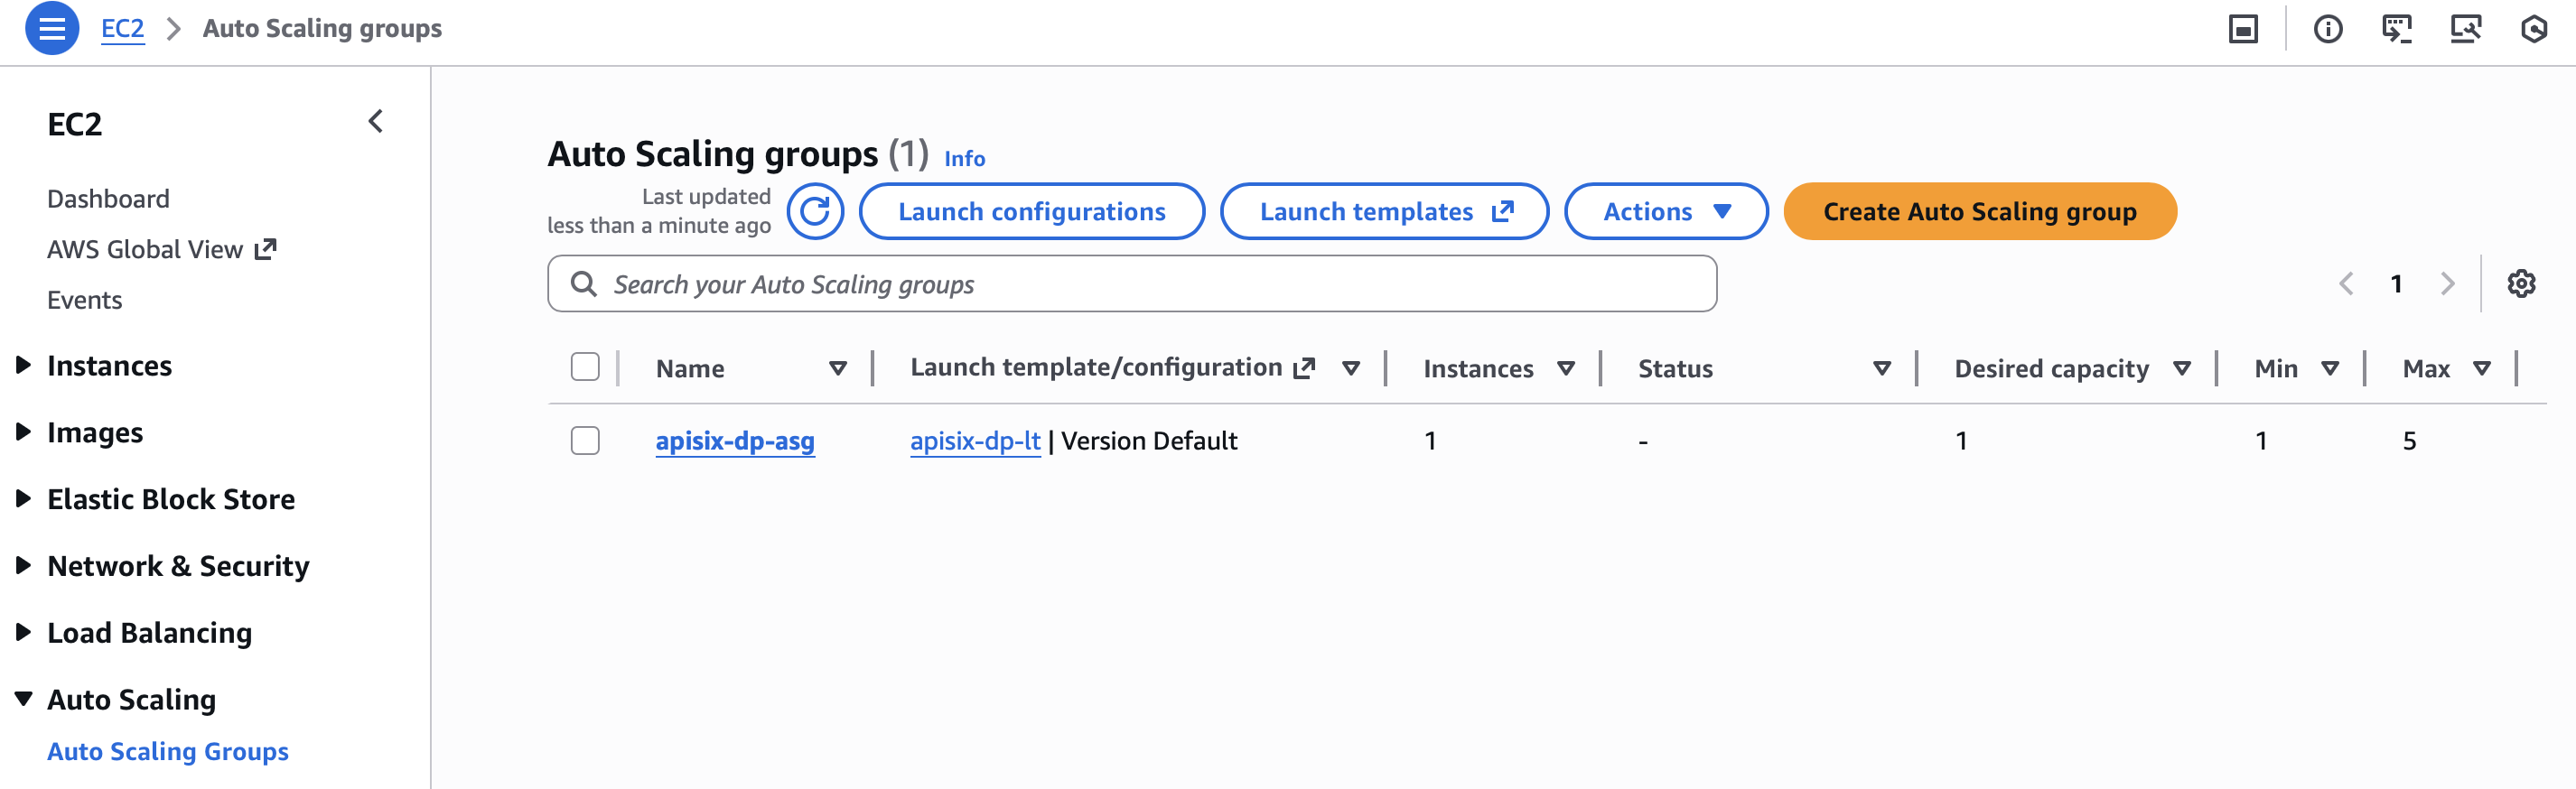
Create an Auto Scaling Group (ASG)
An Auto Scaling Group (ASG) automatically adjusts the number of EC2 instances in your deployment based on demand. By using an ASG, you can ensure that your APISIX DP (gateway) scales out during high traffic periods and scales in when traffic decreases, maintaining consistent API performance.
Navigate to EC2 > Auto Scaling Groups and create an ASG with the following configurations:
- Launch Template: Select the launch template for APISIX DP instances created in the last step.
- Network Settings: Select the appropriate VPC, Availability Zones, and subnets. If you use an ALB, every Availability Zone selected here should also be enabled on the ALB.
- Load Balancer: Select No Load Balancer if a load balancer is not currently available, or choose the appropriate load balancer and target groups if they have been configured.
- Group size: Set the Desired capacity to 1 (adjust as needed based on your workload).
- Scaling:
- Set the Min desired capacity to 1 and the Max desired capacity to 5 (adjust as needed based on your workload).
- Select Target tracking scaling policy
- Scaling policy name:
Scale on CPU - Target value:
50. This means ASG will add APISIX DP instances when CPU exceeds 50% and remove instances when CPU drops below 50%.
- Scaling policy name:
Review your configuration and create the ASG.
After the ASG is created, you should see the ASG start a new EC2 instance for APISIX DP to meet the desired capacity.
Verify CP and DP Connectivity
Connect to the EC2 instance for APISIX CP (using SSH or the AWS Console "Connect" option).
In the instance, create an example route using the mocking plugin so that requests to /200 always return a 200 response without forwarding to any upstream:
curl "http://127.0.0.1:9180/apisix/admin/routes" -X PUT \
  -H "X-API-KEY: Sup3rs3cretWr1teK3y" \
  -d '{
    "id": "mocking200",
    "uri": "/200",
    "plugins": {
      "mocking": {
        "response_status": 200,
        "response_example": "200 OK from mocking plugin"
      }
    }
  }'
Next, connect to the EC2 instance for APISIX DP (using SSH or the AWS Console "Connect" option).
In the instance, send a request to the /200 route:
curl "http://127.0.0.1:9080/200" -i
You should receive an HTTP/1.1 200 OK response.
The /200 endpoint can later be used for ALB health checks. Alternatively, you can enable APISIX's Status API (default port 7085) and use the /status endpoint for health checks.
Configure Application Load Balancer (ALB)
An Application Load Balancer (ALB) distributes incoming traffic and performs health checks to ensure traffic is only routed to healthy instances.
Although this guide later verifies autoscaling by directly applying CPU load to APISIX DP instances rather than through an ALB, it includes ALB configuration instructions in this section for completeness. Users who deploy APISIX behind an ALB can examine instructions in this section to ensure proper traffic routing to ASG-managed gateway instances and optionally use ALB-based CloudWatch metrics for scaling.
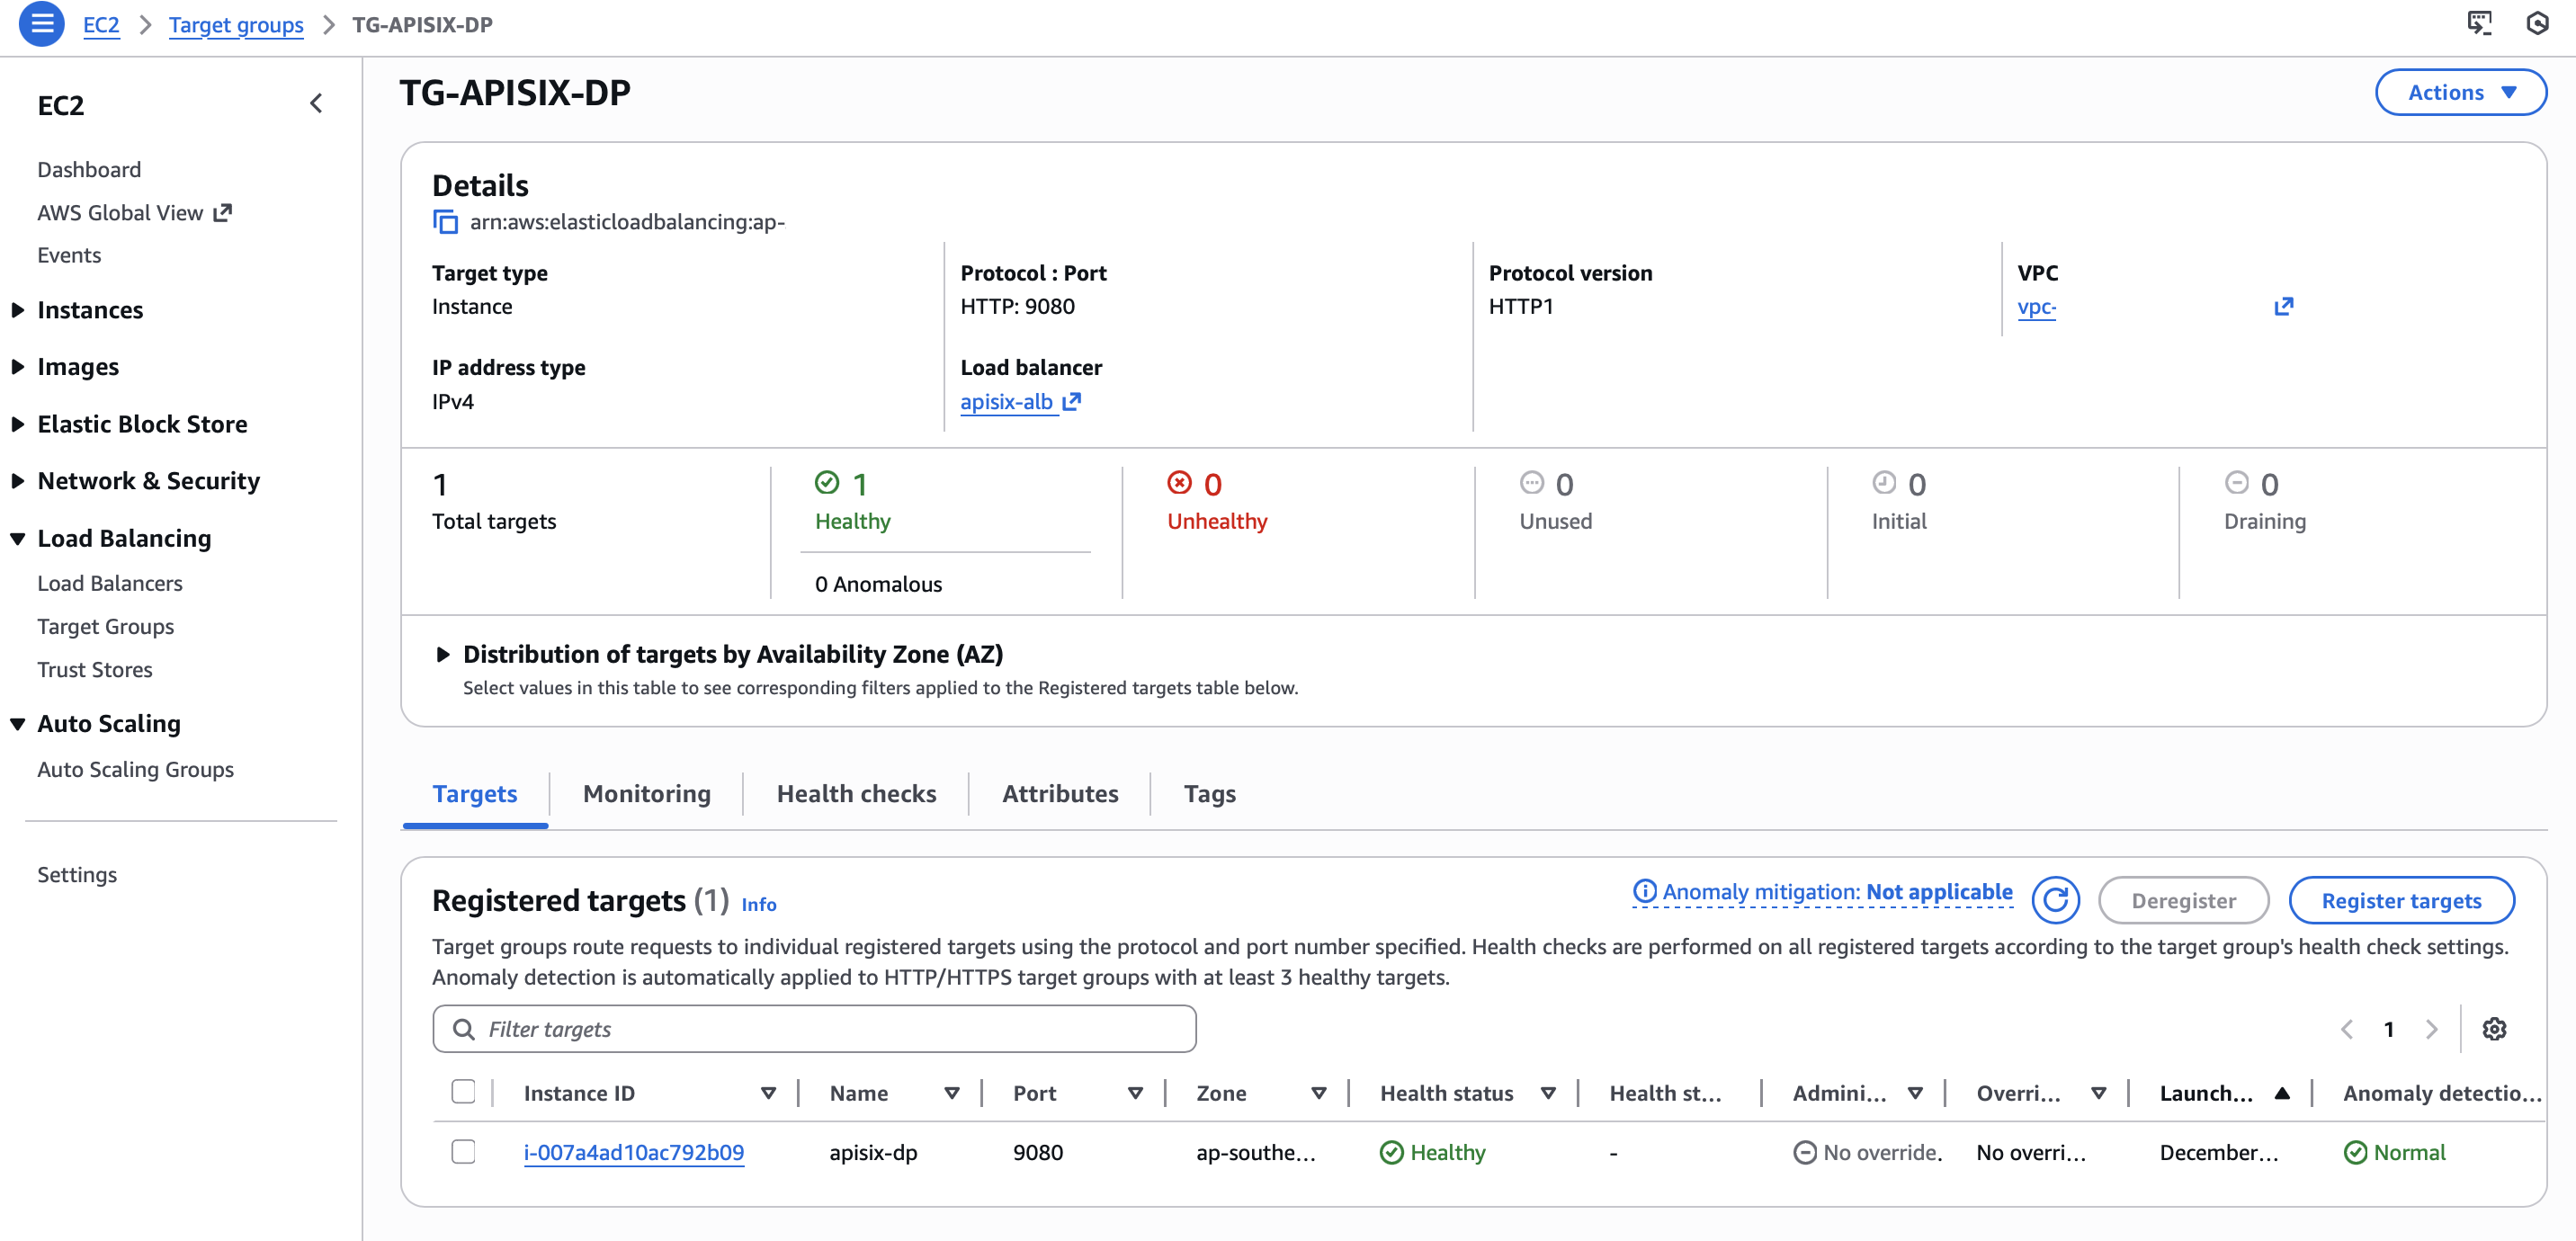
Create a Target Group
Create a target group that the ALB will use to route traffic to APISIX DP instances.
Navigate to EC2 > Target Groups and create a target group with the following configurations:
- Target type: Instance
- Protocol: HTTP
- Port:
9080 - VPC: Select the same VPC as your ASG.
- Health check path:
/200(or another valid health check endpoint exposed by APISIX) - Register targets: Do not register specific instances manually. The ASG will handle instance registration after the target group is attached.
Complete the target group creation and note the target group name, as it will be referenced when attaching the ALB to the ASG.
Create an ALB
Navigate to EC2 > Load Balancers and create an ALB with the following configurations:
- Scheme: Internet-facing
- IP address type: IPv4.
- Network mapping:
- Select the same VPC used by the ASG.
- Choose at least two Availability Zones and their corresponding subnets. Enable every Availability Zone that the ASG can use; otherwise, a DP instance launched into a different zone remains registered but does not receive traffic from the ALB.
- Security groups: Select the existing ALB security group.
- Listeners and routing:
- Create an HTTP listener on port
80(or HTTPS on port443if TLS is configured). - For the default action, forward traffic to the APISIX DP target group created earlier.
- Create an HTTP listener on port
Review your configuration and create the ALB.
Attach Target Group to ASG
Attach the target group to the ASG so that newly started APISIX DP instances will be automatically registered with the target group.
- Navigate to Auto Scaling Groups and select the APISIX DP ASG.
- Edit the Load balancer target groups under Integrations > Load balancing section.
- Select Attach to an existing load balancer.
- Attach the APISIX DP target group created earlier and save the change.
- Enable Elastic Load Balancing health checks for the ASG and set a health check grace period long enough for the instance initialization, container image pull, and APISIX startup to finish.
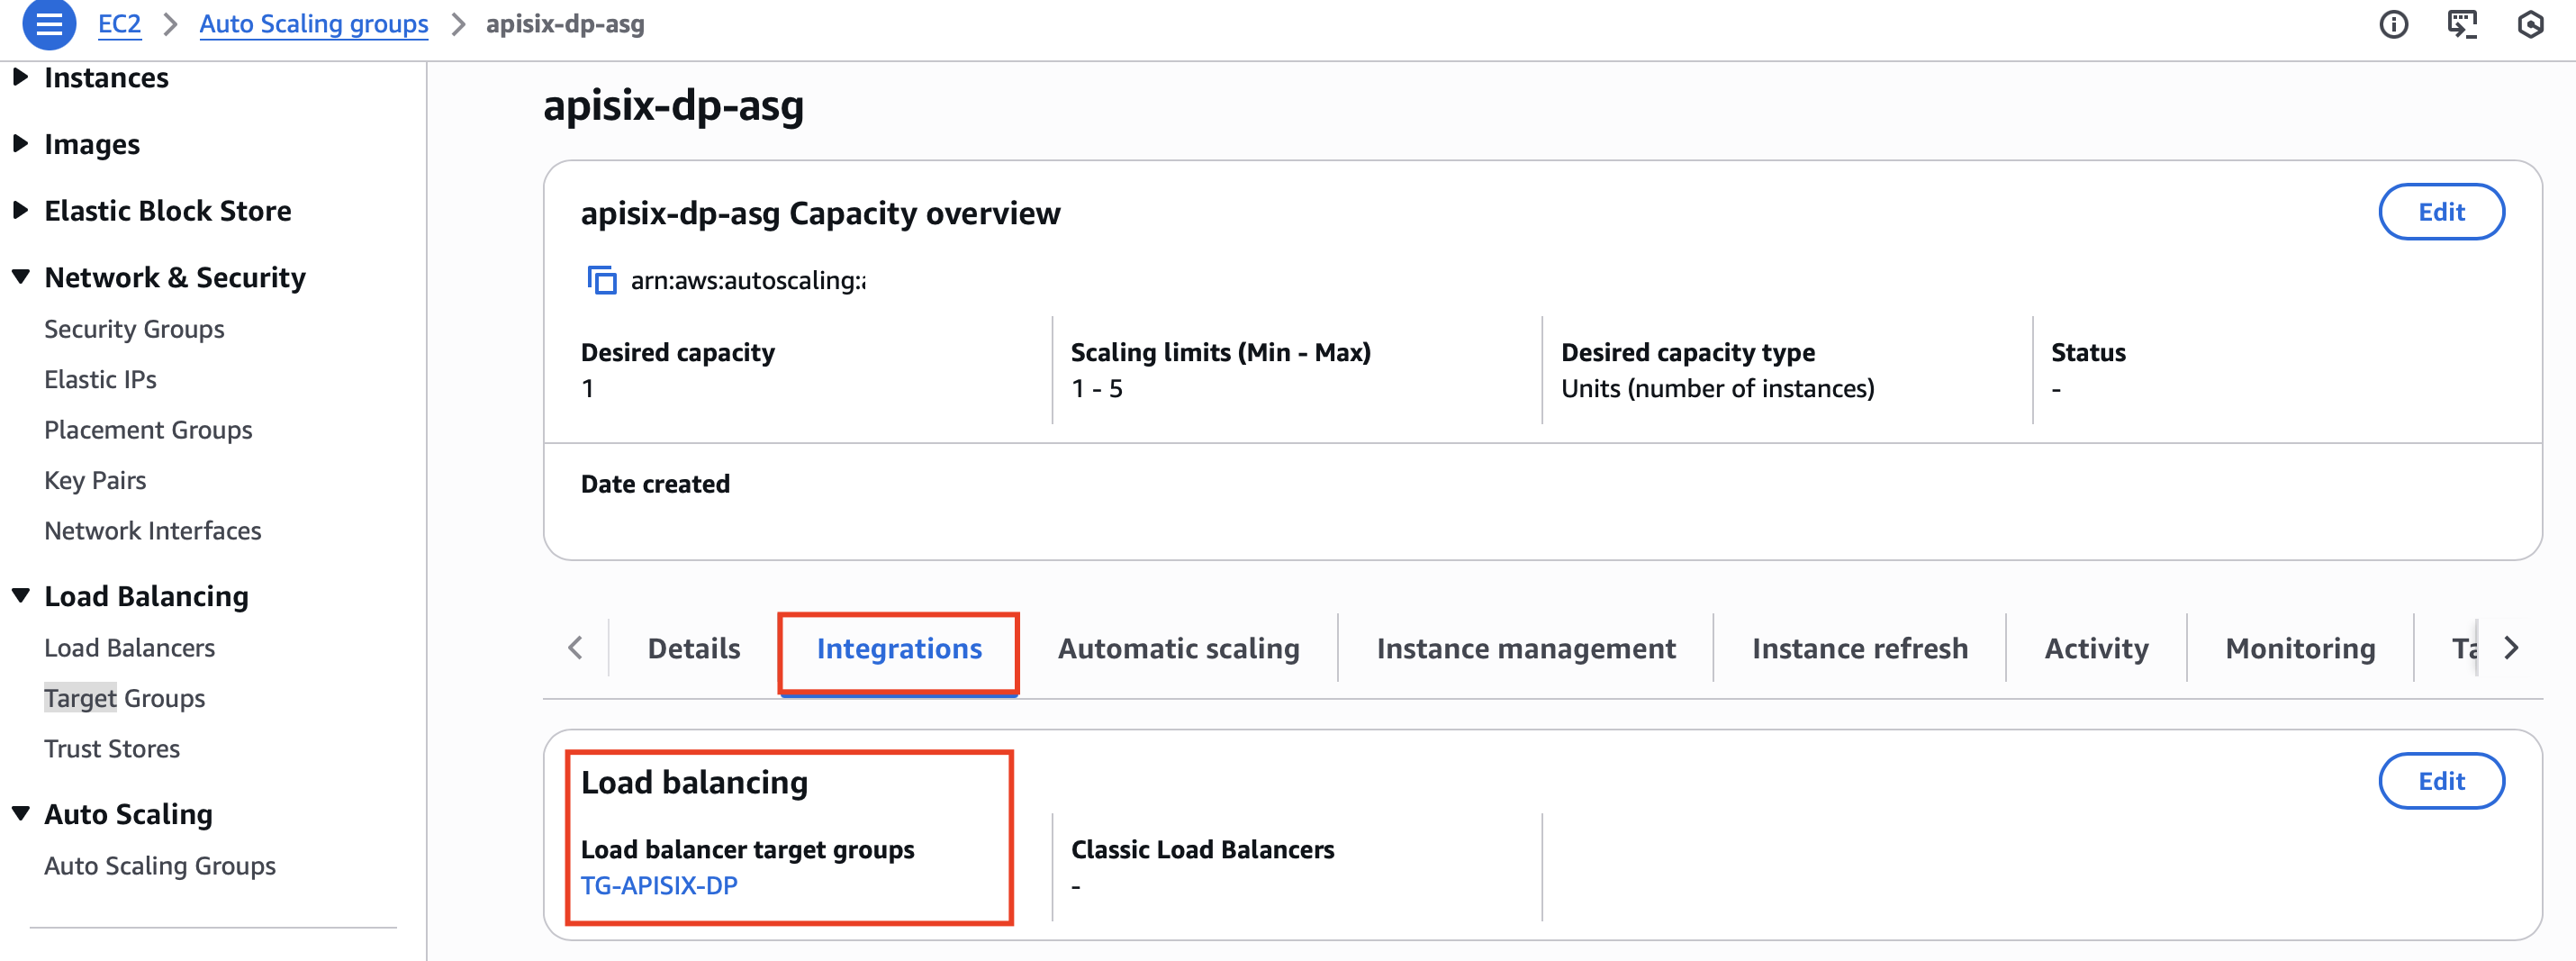
Once attached, the ASG will automatically register new APISIX DP instances with the target group and remove instances when they are terminated or scaled in.
Verify ALB Routing
The ALB only routes traffic to healthy targets. To ensure your APISIX DP is reachable, check the health status of the target in the ALB target group:
Next, navigate to the ALB details to find its DNS name, for instance:
apisix-alb-xxxxxxxxx.ap-southeast-2.elb.amazonaws.com
From your local machine, send a request to the health check route (or any route) to verify that traffic is correctly routed through the ALB:
curl "http://apisix-alb-xxxxxxxxx.ap-southeast-2.elb.amazonaws.com/200" -i
If everything is configured correctly, you should receive a 200 OK response.
Verify Autoscaling
To confirm that your ASG for APISIX DP works correctly, you can simulate high CPU load on a DP instance using the stress utility. This allows you to observe whether new DP instances are automatically launched when CPU usage exceeds the scaling threshold.
Connect to the DP instance (using SSH or the AWS Console "Connect" option) and run the following commands to install stress:
sudo apt update
sudo apt install -y stress
Check the number of CPU cores available:
nproc
Suppose there are 2 CPU cores available. Apply CPU load to both cores for 600 seconds (10 minutes):
stress --cpu 2 --timeout 600 &
To observe scaling while the stress command is running:
-
Navigate to CloudWatch > Metrics and select the
CPUUtilizationmetric for the APISIX DP ASG. You should see the average CPU utilization gradually increase to above 50%.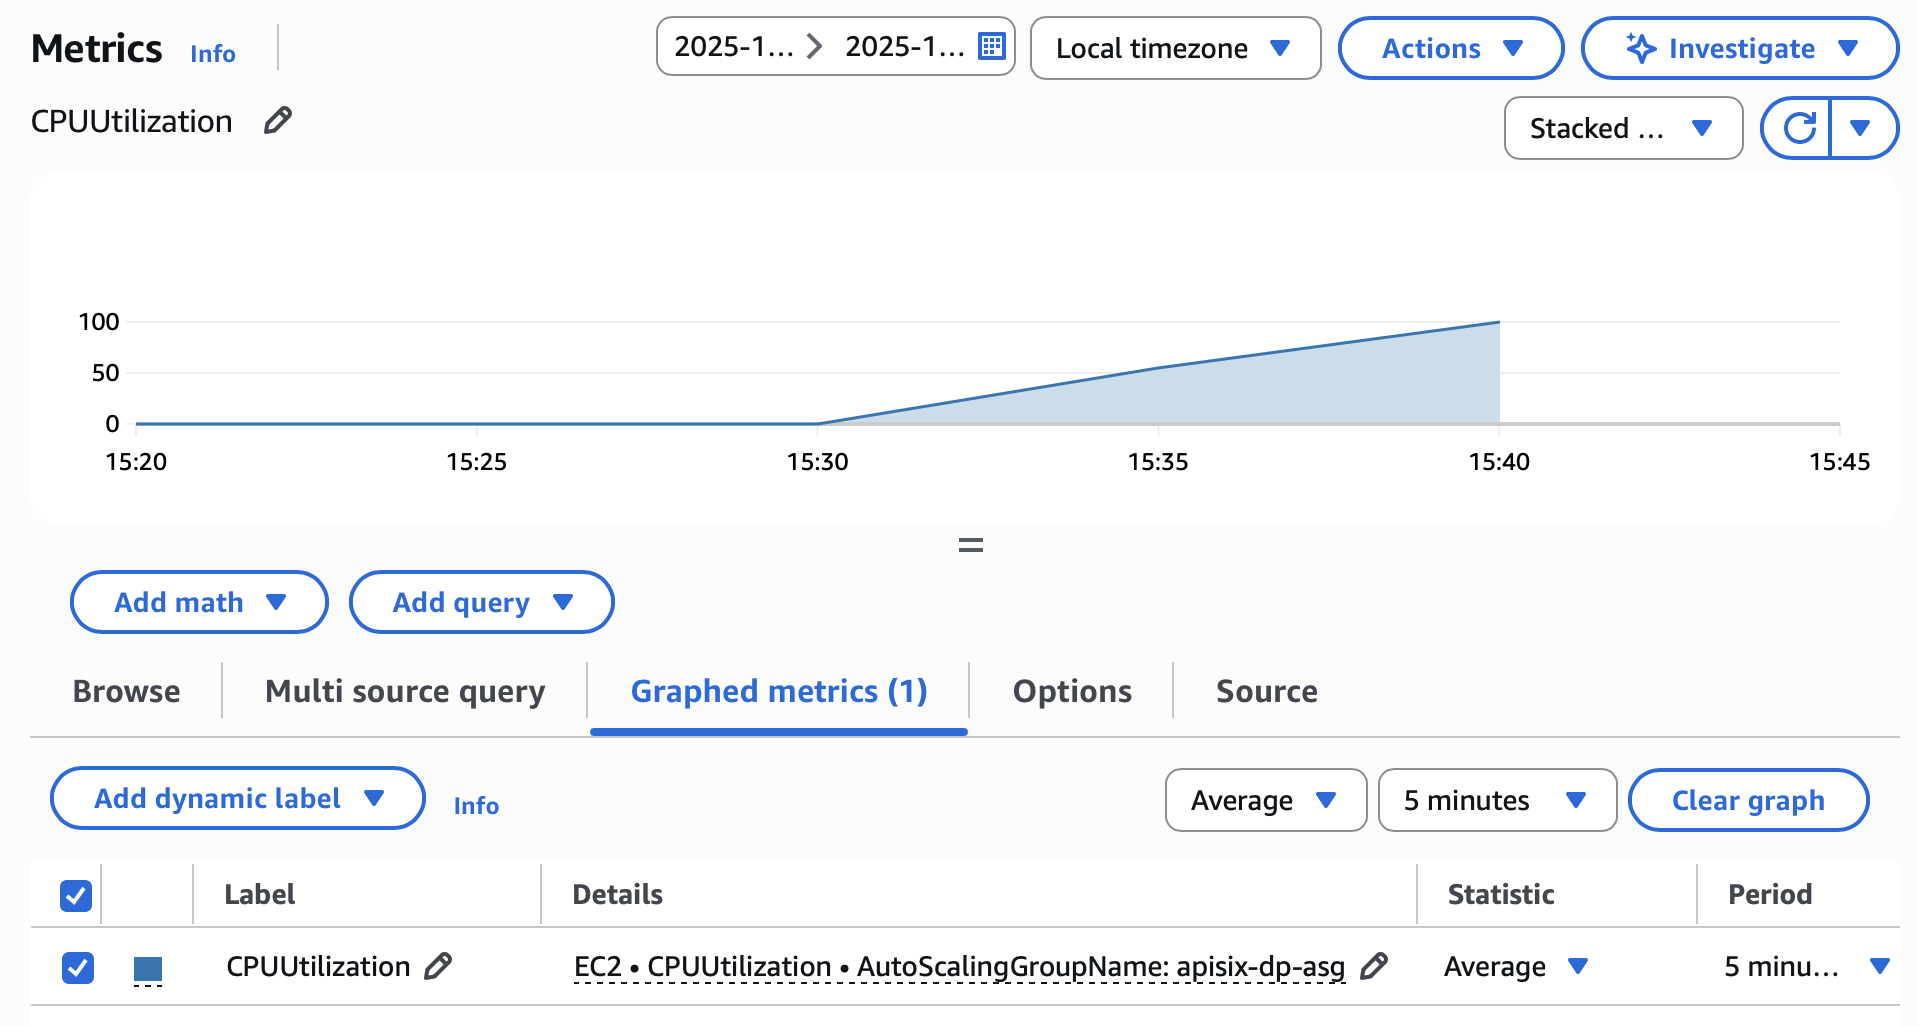
-
Navigate to the APISIX DP ASG and monitor the Instances and Desired capacity values. You should see the desired capacity increase and new DP instances launch. The exact capacity depends on the observed average CPU utilization and does not necessarily reach the maximum capacity.

When the stress command finishes running, you should see the CPU utilization decreases over time. After the scale-in evaluation and cooldown period, the ASG gradually terminates excess instances.

This confirms that APISIX DP instances are automatically scaled by the ASG based on CPU load.
Clean Up
To avoid ongoing charges, remove the resources created in this guide when you no longer need them:
- Delete the ASG and wait for its DP instances to terminate.
- Delete the ALB and its target group.
- Delete the DP launch template.
- Terminate the CP and etcd instances.
- Delete the security groups after all attached resources and network interfaces have been removed.
Also check for retained EBS volumes, Elastic IP addresses, and CloudWatch alarms associated with the deployment, and remove any that are no longer needed.
Next Steps
In this guide, you have learned how to implement autoscaling for APISIX gateway instances based on CPU utilization on EC2. You are encouraged to further explore other metrics and strategies to optimize autoscaling for your workloads. For more information, see Dynamic scaling for Amazon EC2 Auto Scaling.