How to Deploy Apache APISIX
This guide will help you to deploy Apache APISIX and connect it to API7 Cloud with the help of Cloud CLI.
We suggest you read How does Apache APISIX connect to API7 Cloud before you go head, which introduces principles about the communication between Apache APISIX and API7 Cloud and why we use Cloud CLI to deploy Apache APISIX.
Install and configure Cloud CLI
You can check Cloud CLI Releases to download the Cloud CLI
according to the operating system and architecture. Of course, you can also build it from the source code
or use go get to install it (Cloud CLI was written in Go). See Installation for more details.
The matrix for the OS and arch is as follows:
| - | Mac | Linux |
|---|---|---|
| amd64 | ✅ | ✅ |
| arm64 | ✅ | ✅ |
The following command downloads the Cloud CLI 0.8.0 for a Linux x86_64 machine:
curl https://github.com/api7/cloud-cli/releases/download/0.8.0/cloud-cli-linux-amd64-0.8.0.gz -sLo - | gzip -d > cloud-cli
After you have downloaded it, do not forget to make it executable:
chmod a+x cloud-cli
Now you can configure it with a Personal Access Token, see Configure Cloud CLI for the details of the configuring.
Cloud CLI saves the token in the $(HOME)/.api7cloud, so if you switch the user (e.g., root),
you need to re-configure it or specify the HOME environment variable to the previous user's HOME directory (But be careful with the permission).
Deploy Apache APISIX
Cloud CLI supports deploying Apache APISIX on a few different platforms. This section will show you the way for Docker, Kubernetes, and Bare Metal.
The deployment involves some download operations through the Internet. If you see
errors with keywords like connection refused and EOF.
Please check your Internet connection and retry the command.
You can specify the API7 Cloud API Server address with the API7_CLOUD_ADDR env. With the help of this env, you can use a proxy server to access it.
On Docker
Cloud CLI supports deploying Apache APISIX on Docker. Please make sure you have installed Docker on the target machine.
Also, see Deploy Apache APISIX on Docker for more details.
cloud-cli deploy docker \
  --apisix-image apache/apisix:2.15.0-centos \
  --name my-apisix
The above command deploys an Apache APISIX container with the
apache/apisix:2.15.0-centos image, the container name is my-apisix.
If you see the following output, then the deployment is successful:
Congratulations! Your APISIX instance was deployed successfully
Container ID: 1b2e54380cdc
APISIX ID: 4189c82c-fdf1-40f2-87e2-9a7bb6ad5ed7
The Container ID and APISIX ID are randomly generated so that you might see different
values on your machine. But if you need to specify the APISIX ID, you can
use the --apisix-id option.
Note, as we just said, Cloud CLI will expose the HTTP and HTTPS ports to the host, so basically
you cannot deploy multiple containers on the same machine due to the port conflict. A way to solve
this problem is customizing the Apache APISIX configuration file by specifying the --apisix-config
option, see config-default.yaml
to learn the settings.
If you have more requirements on the Docker container level, try to use the --docker-run-arg option to pass
native docker run options. For example, the following command mounts the /etc/hosts file to the
container and runs it in the background.
cloud-cli deploy docker \
  --apisix-image apache/apisix:2.15.0-centos \
  --name my-apisix \
  --docker-run-arg --detach \
  --docker-run-arg -v=/etc/hosts:/etc/hosts:ro
On Kubernetes
Cloud CLI uses the Apache APISIX Helm Chart to deploy Apache APISIX on Kubernetes. It uses:
Please ensure you've installed them (on the same machine with Cloud CLI) before going ahead.
Also, see Deploy Apache APISIX on Kubernetes for more details.
cloud-cli deploy kubernetes \
  --name my-apisix \
  --namespace apisix-ns \
  --replica-count 3 \
  --apisix-image apache/apisix:2.15.0-centos \
  --helm-install-arg --version=1.3.0
We created a helm release my-apisix in the namespace apisix in the above command. The helm release
contains:
- A Kubernetes Deployment,
with three replicas, and the image is
apache/apisix:2.15.0-centos. - A Kubernetes Service,
which type is
NodePort. - Some ConfigMap and Secrets to store the essential configuration and certificates.
If you see the following output, then the deployment is successful:
Congratulations! Your APISIX cluster was deployed successfully on Kubernetes.
The Helm release name is: my-apisix
The APISIX Deployment name is: "my-apisix"
The APISIX Service name is: "my-apisix-gateway"

Workloads:
Pod Name: my-apisix-5f667fd7db-cfdh7 APISIX ID: 3bfd270a-bb42-4314-ad68-ef2b250d93c1
Pod Name: my-apisix-5f667fd7db-qzg6l APISIX ID: 09e63a87-3bb4-4073-bf5c-208928e90885
Pod Name: my-apisix-5f667fd7db-wwsc2 APISIX ID: 3e9d112d-164f-4ddb-b815-ef236b195e2e
The Pod Name and APISIX ID are randomly generated so that you might see different
values in your try.
If you have more requirements on the Kubernetes deployment level, try to use --helm-install-arg
option to pass native helm install options. For example, the following command specifies a
custom helm values.yaml.
/etc/hosts file to the container and run it in the background.
cloud-cli deploy kubernetes \
  --name my-apisix \
  --namespace apisix \
  --replica-count 3 \
  --apisix-image apache/apisix:2.15.0-centos \
  --helm-install-arg --version=1.3.0 \
  --helm-install-arg --values=/path/to/values.yaml
KUBECONFIG env is respected when deploying on Kubernetes.
On Bare Metal
Cloud CLI also supports deploying Apache APISIX on bare metal.
This functionality is not perfect yet. You can only use it on CentOS 7. Please use containerized environments if this condition cannot be met.
cloud-cli deploy bare --apisix-version 2.15.0
The above command will deploy Apache APISIX on your local machine (the Apache APISIX home path will be
/usr/local/apisix). If you see the following output, your deployment is successful:
Congratulations! Your APISIX instance was deployed successfully
APISIX ID: 4189c82c-fdf1-40f2-87e2-9a7bb6ad5ed7
The APISIX ID is randomly generated so that you might see different values in your try.
If you want to assign a specific APISIX ID, try to use the --apisix-id option.
You can also specify the Apache APISIX configuration file with the --apisix-config option,
see the config-default.yaml
to learn the settings.
How to check Apache APISIX running status
You can see the status of Apache APISIX in the Gateway Instances section (on the Overview page).
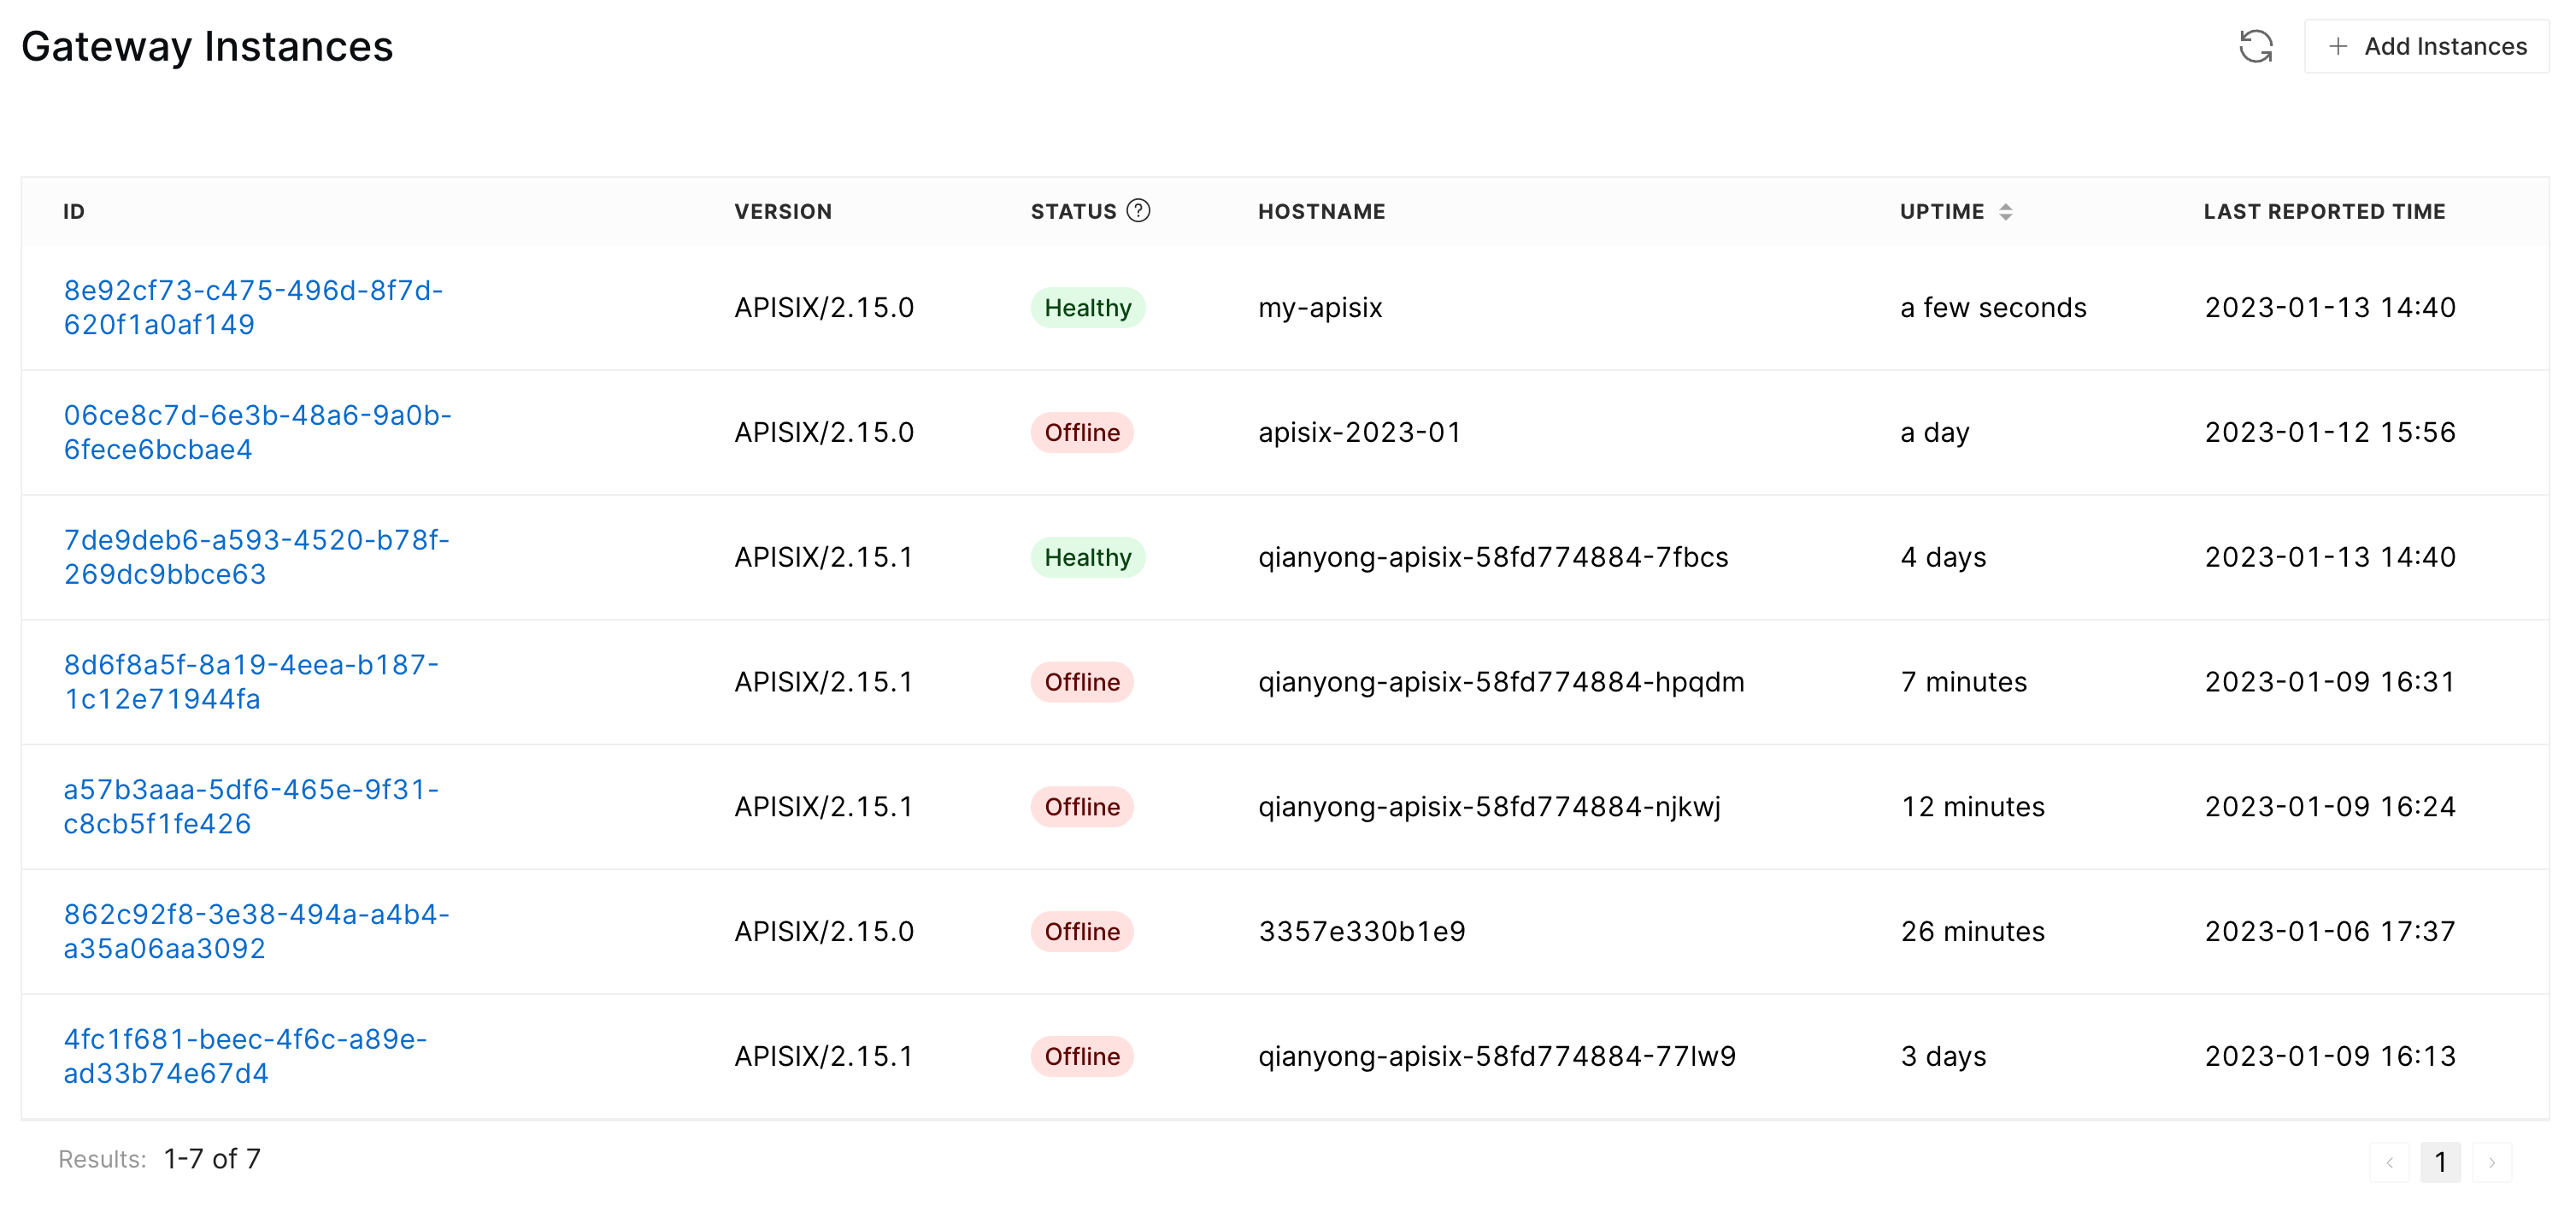
In this list, we can see the following fields:
ID: The Apache APISIX IDVERSION: The version of Apache APISIX- Status : The communication status between Apache APISIX and API7 Cloud
HOSTNAME: The hostname of the machine or container where the Apache APISIX instance is runningUPTIME: The running time of this instanceLAST REPORTED TIME: The last time Apache APISIX sends a heartbeat to API7 Cloud
The IP address you see is the IP address of the machine or container, not the public IP address.
Status
The communication between Apache APISIX and API7 Cloud might change during the instance lifetime. You can check if the instance is healthy according to the status.
Healthymeans the running status of the instance is normal.Only Heartbeatmeans that although the instance keeps connected with API7 Cloud by the heartbeat probes, the configuration delivery fails.Lost Connectionmeans the last time API7 Cloud saw this instance had been more than 30s but less than 2 hours.Offlinemeans the elapsed time since API7 Cloud has seen this instance is more than 2 hours. In such a case, API7 Cloud will remove the instance entry after seven days if the instance still doesn't connect to API7 Cloud.
API7 Cloud removes the dead instances from the list after seven days.
Stop Apache APISIX
You can also use Cloud CLI to stop Apache APISIX instances.
cloud-cli stop docker --name my-apisix
cloud-cli stop kubernetes --name my-apisix --namespace apisix
cloud-cli stop bare
Stop you Apache APISIX instances is a dangerous operation. Make sure they don't proxy your traffic before you stop them.