Proxy Azure OpenAI Requests
Azure OpenAI provides access to OpenAI models hosted on Microsoft Azure.
This guide shows how to use the ai-proxy plugin to send Chat Completions and Responses API requests to Azure OpenAI. APISIX attaches the Azure API key and deployment name so that clients do not need to provide provider credentials or select the deployment directly.
The openai-compatible provider uses a configured upstream endpoint. Configure a separate APISIX route for each Azure OpenAI API path.
Prerequisite(s)
- Install Docker.
- Install cURL to send requests for validation.
- Follow the Getting Started Tutorial to start an APISIX instance in Docker or on Kubernetes.
- If Admin API key authentication is enabled, export a valid key as
ADMIN_API_KEY. - Have an Azure subscription with permission to create or use an Azure OpenAI resource and deploy a model.
Create a Model Deployment
Follow the Microsoft documentation to create an Azure OpenAI resource and deploy a model. To use both APIs in this guide, select a deployment supported by Chat Completions and the Responses API, and confirm that the resource region supports the Responses API.
Configure network access so that APISIX can reach the Azure OpenAI endpoint. Use private connectivity or restrict public access to trusted egress addresses according to your environment.
After the deployment is ready, record the following values:
- The Azure OpenAI resource name.
- An API key for the resource.
- The model deployment name. This can differ from the underlying model name.
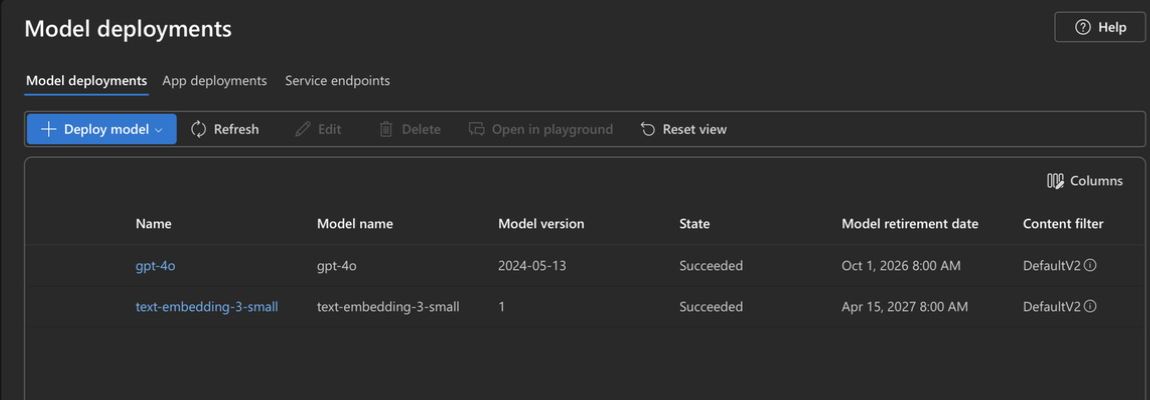
In Microsoft Foundry, open Deployments and confirm that the model deployment state is Succeeded:
Export the values and API endpoints as environment variables:
export AZURE_OPENAI_API_KEY="<your-api-key>"
export AZURE_OPENAI_DEPLOYMENT="<your-deployment-name>"
export AZURE_OPENAI_CHAT_ENDPOINT="https://<your-resource-name>.openai.azure.com/openai/v1/chat/completions"
export AZURE_OPENAI_RESPONSES_ENDPOINT="https://<your-resource-name>.openai.azure.com/openai/v1/responses"
If the selected model is marked as limited access, complete any required approval process described in the Microsoft limited-access documentation.
Verify Azure OpenAI Directly
Verify the deployment, credentials, and both API endpoints before configuring APISIX.
- Chat Completions
- Responses API
curl -i "${AZURE_OPENAI_CHAT_ENDPOINT}" -X POST \
  -H "Content-Type: application/json" \
  -H "api-key: ${AZURE_OPENAI_API_KEY}" \
  --data-binary @- <<EOF
  {
    "model": "${AZURE_OPENAI_DEPLOYMENT}",
    "messages": [
      {
        "role": "user",
        "content": "Respond with the word ready."
      }
    ]
  }
EOF
curl -i "${AZURE_OPENAI_RESPONSES_ENDPOINT}" -X POST \
  -H "Content-Type: application/json" \
  -H "api-key: ${AZURE_OPENAI_API_KEY}" \
  --data-binary @- <<EOF
  {
    "model": "${AZURE_OPENAI_DEPLOYMENT}",
    "input": "Respond with the word ready."
  }
EOF
Each request should return an HTTP 200 response containing model output.
Create Routes to Azure OpenAI
APISIX identifies Chat Completions requests from the messages field. It identifies Responses requests from the input field together with an incoming URI ending in /v1/responses. Azure OpenAI uses deployment-specific endpoints, so each route also overrides the corresponding upstream endpoint.
Create one route for Chat Completions and another for the Responses API:
- Admin API
- ADC
Create the Chat Completions route:
curl "http://127.0.0.1:9180/apisix/admin/routes" -X PUT \
  -H "X-API-KEY: ${ADMIN_API_KEY}" \
  -H "Content-Type: application/json" \
  --data-binary @- <<EOF
  {
    "id": "azure-openai-chat",
    "uri": "/azure-openai/chat/completions",
    "methods": ["POST"],
    "plugins": {
      "ai-proxy": {
        "provider": "openai-compatible",
        "auth": {
          "header": {
            "api-key": "${AZURE_OPENAI_API_KEY}"
          }
        },
        "options": {
          "model": "${AZURE_OPENAI_DEPLOYMENT}"
        },
        "override": {
          "endpoint": "${AZURE_OPENAI_CHAT_ENDPOINT}"
        }
      }
    }
  }
EOF
Create the Responses API route:
curl "http://127.0.0.1:9180/apisix/admin/routes" -X PUT \
  -H "X-API-KEY: ${ADMIN_API_KEY}" \
  -H "Content-Type: application/json" \
  --data-binary @- <<EOF
  {
    "id": "azure-openai-responses",
    "uri": "/azure-openai/v1/responses",
    "methods": ["POST"],
    "plugins": {
      "ai-proxy": {
        "provider": "openai-compatible",
        "auth": {
          "header": {
            "api-key": "${AZURE_OPENAI_API_KEY}"
          }
        },
        "options": {
          "model": "${AZURE_OPENAI_DEPLOYMENT}"
        },
        "override": {
          "endpoint": "${AZURE_OPENAI_RESPONSES_ENDPOINT}"
        }
      }
    }
  }
EOF
❶ Configure any client-facing path for Chat Completions. APISIX identifies the format from the messages field alone.
❷ Configure a client-facing path for Responses requests. The path can have a custom prefix, but it must end in /v1/responses. APISIX identifies the format from this suffix together with the input field.
❸ Use openai-compatible for the Azure OpenAI v1 APIs.
❹ Attach the Azure OpenAI API key in the api-key header.
❺ Set the model option to the Azure deployment name. APISIX adds it to every request body.
❻ Set the complete upstream endpoint for the API used by the route.
services:
  - name: Azure OpenAI Service
    routes:
      - uris:
          - /azure-openai/chat/completions
        methods:
          - POST
        name: azure-openai-chat
        plugins:
          ai-proxy:
            provider: openai-compatible
            auth:
              header:
                api-key: ${AZURE_OPENAI_API_KEY}
            options:
              model: ${AZURE_OPENAI_DEPLOYMENT}
            override:
              endpoint: ${AZURE_OPENAI_CHAT_ENDPOINT}
      - uris:
          - /azure-openai/v1/responses
        methods:
          - POST
        name: azure-openai-responses
        plugins:
          ai-proxy:
            provider: openai-compatible
            auth:
              header:
                api-key: ${AZURE_OPENAI_API_KEY}
            options:
              model: ${AZURE_OPENAI_DEPLOYMENT}
            override:
              endpoint: ${AZURE_OPENAI_RESPONSES_ENDPOINT}
❶ Configure any client-facing path for Chat Completions. APISIX identifies the format from the messages field alone.
❷ Configure a client-facing path for Responses requests. The path can have a custom prefix, but it must end in /v1/responses. APISIX identifies the format from this suffix together with the input field.
❸ Use openai-compatible for the Azure OpenAI v1 APIs.
❹ Attach the Azure OpenAI API key in the api-key header.
❺ Set the model option to the Azure deployment name. APISIX adds it to every request body.
❻ Set the complete upstream endpoint for the API used by the route.
Synchronize the configuration to APISIX:
adc sync -f adc.yaml
The route configurations contain the Azure API key. When data encryption with a keyring is enabled, APISIX encrypts the key before saving the routes to etcd. Configure a custom keyring in production.
Verify the Routes
Send non-streaming and streaming requests in both API formats to verify the routes.
Send a Chat Completions Request
Send a request with a list of messages. The request does not need to include the Azure deployment name because APISIX adds the configured value:
curl -i "http://127.0.0.1:9080/azure-openai/chat/completions" -X POST \
  -H "Content-Type: application/json" \
  -d '{
    "messages": [
      {
        "role": "system",
        "content": "You explain technical concepts concisely."
      },
      {
        "role": "user",
        "content": "Explain what an API gateway does in one sentence."
      }
    ]
  }'
You should receive an HTTP 200 response containing an assistant message in choices:
{
  "choices": [
    {
      "message": {
        "role": "assistant",
        "content": "An API gateway routes, secures, and manages requests between clients and backend services."
      }
    }
  ]
}
Stream a Chat Completions Request
Send a streaming request:
curl "http://127.0.0.1:9080/azure-openai/chat/completions" -X POST \
  --no-buffer \
  -H "Content-Type: application/json" \
  -d '{
    "stream": true,
    "messages": [
      {
        "role": "user",
        "content": "Count from one to five."
      }
    ]
  }'
❶ Disable cURL output buffering so that it displays each event as it arrives.
❷ Request a streaming response from Azure OpenAI.
Azure OpenAI returns partial message deltas as server-sent events and ends the Chat Completions stream with a data: [DONE] event.
Send a Responses API Request
Send a request with separate instructions and input. APISIX adds the configured deployment name:
curl -i "http://127.0.0.1:9080/azure-openai/v1/responses" -X POST \
  -H "Content-Type: application/json" \
  -d '{
    "instructions": "You explain technical concepts concisely.",
    "input": "Explain what an API gateway does in one sentence."
  }'
You should receive an HTTP 200 response containing typed items in output:
{
  "status": "completed",
  "output": [
    {
      "type": "message",
      "role": "assistant",
      "content": [
        {
          "type": "output_text",
          "text": "An API gateway routes, secures, and manages requests between clients and backend services."
        }
      ]
    }
  ]
}
Stream a Responses API Request
Send a streaming request:
curl "http://127.0.0.1:9080/azure-openai/v1/responses" -X POST \
  --no-buffer \
  -H "Content-Type: application/json" \
  -d '{
    "stream": true,
    "input": "Count from one to five."
  }'
❶ Disable cURL output buffering so that it displays each event as it arrives.
❷ Request a streaming response from Azure OpenAI.
The Responses API stream uses typed server-sent events, including response.output_text.delta events for generated text and a final response.completed event.
APISIX detects both event-stream formats and uses a 10-millisecond flush interval for downstream output by default.
The proxy-buffering plugin is not required for ai-proxy streaming. It controls the standard NGINX upstream path, which ai-proxy does not use for provider requests. To change how often ai-proxy flushes streaming output, configure streaming_flush_interval_ms. Set it to 0 to flush each upstream chunk synchronously.
Clean Up
Delete both APISIX routes when you no longer need them:
curl "http://127.0.0.1:9180/apisix/admin/routes/azure-openai-chat" -X DELETE \
  -H "X-API-KEY: ${ADMIN_API_KEY}"

curl "http://127.0.0.1:9180/apisix/admin/routes/azure-openai-responses" -X DELETE \
  -H "X-API-KEY: ${ADMIN_API_KEY}"
Remove the credentials and endpoint values from the shell:
unset AZURE_OPENAI_API_KEY AZURE_OPENAI_DEPLOYMENT
unset AZURE_OPENAI_CHAT_ENDPOINT AZURE_OPENAI_RESPONSES_ENDPOINT
If you used ADC, remove the API key from adc.yaml or protect the file according to your organization's secret-handling policy.
If you created an Azure deployment or resource only for this guide, delete it from Azure to avoid further charges.
Next Steps
You have now configured APISIX to authenticate and send Chat Completions and Responses API requests to Azure OpenAI.
You can add rate limiting to control model request volume.