Manage Secrets in HashiCorp Vault
HashiCorp Vault is a centralized platform for managing secrets and encryption across different environments and applications. It provides a unified secrets management for storing and accessing, such as API keys, passwords, certificates, and more.
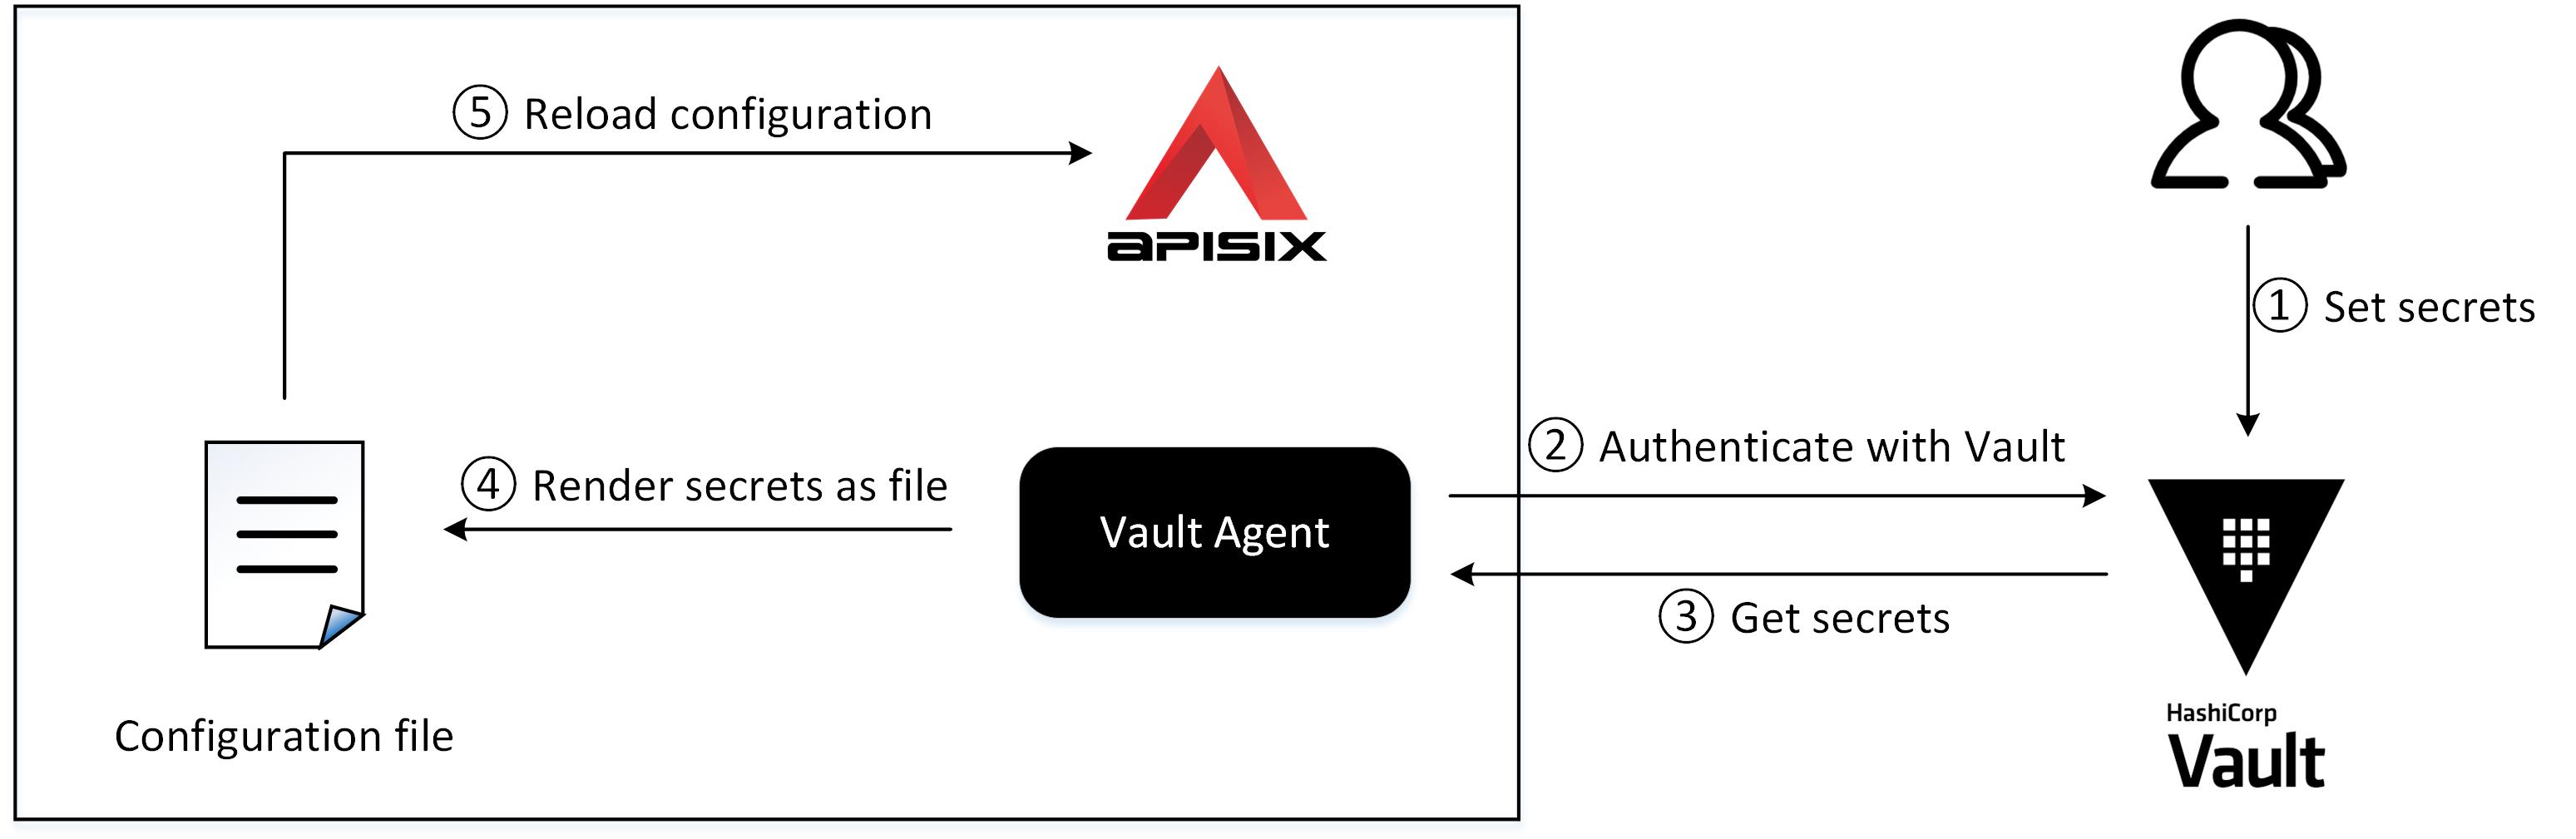
APISIX supports storing sensitive data in the configuration file as secrets, such as admin_key, etcd username, password.
This guide will show you how to configure HashiCorp Vault as a secrets manager, then store the APISIX admin_key in Vault and reference the key in APISIX configuration file.
Prerequisite(s)
- Install Docker.
- Install cURL to send requests to the services for validation.
- Install ZIP to unzip the Vault binary from the official distributed zipped file.
- Follow the Getting Started tutorial to start a new APISIX instance in Docker.
Configure Vault Server
Start a Vault instance in dev mode in Docker named apisix-quickstart-vault with the token apisix-quickstart-vault-token. The exposed port is mapped to 8200 on the host machine:
docker run -d --cap-add=IPC_LOCK \
    -e 'VAULT_DEV_LISTEN_ADDRESS=0.0.0.0:8200' \
    -e 'VAULT_ADDR=http://127.0.0.1:8200' \
    -e 'VAULT_DEV_ROOT_TOKEN_ID=apisix-quickstart-vault-token' \
    -e 'VAULT_TOKEN=apisix-quickstart-vault-token' \
    --network=apisix-quickstart-net \
    --name apisix-quickstart-vault \
    -p 8200:8200 hashicorp/vault:1.21.4
APISIX needs permission to access Vault and retrieve secrets. You should create a policy file in HashiCorp Configuration Language (HCL) to generate a Vault access token for APISIX.
Create a Vault policy file named apisix-policy.hcl in the Vault instance to grant read permission of the path secret/ to APISIX. You can put secrets under the path secret/ to allow APISIX to read them:
docker exec apisix-quickstart-vault /bin/sh -c "echo '
path \"secret/data/*\" {
    capabilities = [\"read\"]
}
' > /etc/apisix-policy.hcl"
Apply the policy file to the Vault instance:
docker exec apisix-quickstart-vault vault policy write apisix-policy /etc/apisix-policy.hcl
Next, generate the access token attached to the newly defined policy for APISIX to access Vault:
docker exec apisix-quickstart-vault vault token create -policy="apisix-policy"
Every execution of the above command will generate a different token. If successful, the output should be similar to the following:
Key                  Value
---                  -----
token                hvs.CAESIHUznrV4wgcifUia0FROd6iprK7NjipAiHBYwiZDQP9TGh4KHGh2cy5ndHc5dzBPbXd5Y1pzblZXd2ZuQXA3ZHI
token_accessor       YY4iCj2lICDNd50ZJDsBjvZK
token_duration       768h
token_renewable      true
token_policies       ["apisix-policy" "default"]
identity_policies    []
policies             ["apisix-policy" "default"]
Copy the value of token and create a file named apisix-vault-token to store it in the APISIX instance:
docker exec apisix-quickstart /bin/sh -c "echo '
hvs.CAESIHUznrV4wgcifUia0FROd6iprK7NjipAiHBYwiZDQP9TGh4KHGh2cy5ndHc5dzBPbXd5Y1pzblZXd2ZuQXA3ZHI
' > /usr/local/apisix/conf/apisix-vault-token"
Vault Agent uses the token apisix-vault-token to authenticate with Vault in the next step.
Configure Vault Agent
Vault Agent is a client daemon that runs with your applications and automates authentication with Vault and token renewal. It acts as a proxy for Vault's API and renders Vault secrets as files.
Sensitive configurations in APISIX can be stored in the Vault, and then the Vault Agent reads them and inject them into the APISIX configuration file, such as the admin_key.
Download the Vault binary and copy it into the APISIX instance:
export VAULT_VERSION=1.21.4
VAULT_MACHINE_ARCH="$(uname -m)"
case "$VAULT_MACHINE_ARCH" in
  x86_64) export VAULT_ARCH=amd64 ;;
  aarch64 | arm64) export VAULT_ARCH=arm64 ;;
  *) echo "Unsupported architecture: $VAULT_MACHINE_ARCH" >&2; exit 1 ;;
esac
wget "https://releases.hashicorp.com/vault/${VAULT_VERSION}/vault_${VAULT_VERSION}_linux_${VAULT_ARCH}.zip"
unzip "vault_${VAULT_VERSION}_linux_${VAULT_ARCH}.zip"
docker cp vault apisix-quickstart:/usr/local/bin/
Create a file in APISIX instance named vault-agent-apisix.hcl to configure how the Vault Agent accesses the server and renders the secrets.
docker exec apisix-quickstart /bin/sh -c "echo '
pid_file = \"./pidfile\"

vault {
  address = \"http://apisix-quickstart-vault:8200\"
  retry {
    num_retries = 5
  }
}

auto_auth {
  method {
    type   = \"token_file\"
    config = {
      token_file_path = \"/usr/local/apisix/conf/apisix-vault-token\"
    }
  }
}

listener \"tcp\" {
  address = \"127.0.0.1:8100\"
  tls_disable = true
}

template {
  source      = \"/usr/local/apisix/conf/config.ctmpl\"
  destination = \"/usr/local/apisix/conf/config.yaml\"
}
' > /usr/local/apisix/conf/vault-agent-apisix.hcl"
❶ Vault address
❷ Token for authentication
❸ Vault Agent daemon listening attributes
❹ Template file for rendering
❺ Rendered APISIX configuration file
Vault Agent injects secrets into the APISIX configuration file config.yaml according to the template file config.ctmpl after it is started. Both files are stored in the APISIX default configuration path /usr/local/apisix/conf/.
Store a Secret
Create a secret adminKey=apisix-quickstart-key and store it in the path secret/apisix/ of Vault:
docker exec apisix-quickstart-vault vault kv put secret/apisix adminKey=apisix-quickstart-key
The expected response is similar to the following:
=== Secret Path ===
secret/data/apisix

======= Metadata =======
Key                Value
---                -----
created_time       2023-03-15T11:42:17.123175125Z
custom_metadata    <nil>
deletion_time      n/a
destroyed          false
version            1
Use the Secret
Create an APISIX template configuration file named config.ctmpl in the APISIX instance. Populate the admin_key using Consul Template syntax, which will be replaced with secret/apisix/adminKey at runtime.
docker exec apisix-quickstart /bin/sh -c "echo '
deployment:
  role: traditional
  role_traditional:
    config_provider: etcd
  admin:
    allow_admin:
      - 0.0.0.0/0
    admin_key:
      -
        name: admin
        key: {{ with secret \"secret/apisix\"}} {{ .Data.data.adminKey }} {{ end }}
        role: admin
plugin_attr:
  prometheus:
    export_addr:
      ip: 0.0.0.0
      port: 9091
' > /usr/local/apisix/conf/config.ctmpl"
The following command starts the Vault Agent daemon in the APISIX instance with the configuration file vault-agent-apisix.hcl created above. The Agent will retrieve the secret admin_key and injects it into the APISIX configuration file config.yaml.
docker exec -d apisix-quickstart vault agent -config=/usr/local/apisix/conf/vault-agent-apisix.hcl
Reload the APISIX container for configuration changes to take effect:
docker exec apisix-quickstart apisix reload
Validate
To verify that the new admin_key is in effect:
- Request Admin API with the correct
admin_key:
curl -i "http://localhost:9180/apisix/admin/routes" -H 'X-API-KEY: apisix-quickstart-key'
The expected response is similar to the following:
HTTP/1.1 200 OK
...
- Request Admin API with a wrong
admin_key:
curl -i "http://localhost:9180/apisix/admin/routes" -H 'X-API-KEY: wrong-key'
The expected response is similar to the following:
HTTP/1.1 401 Unauthorized
...
Next Steps
APISIX supports Vault as the backend to manage other types of secrets, such as JWT tokens and certificates. For other secrets-management backends, see Manage Secrets in AWS and Manage Secrets in GCP.