Set Up SSO with Google
OpenID Connect (OIDC) is a simple identity layer on top of the OAuth 2.0 protocol. It allows clients to verify the identity of end users based on the authentication performed by the identity provider, as well as to obtain basic profile information about end users in an interoperable and REST-like manner.
Google Identity offers a suite of identity and access management tools, enabling secure user authentication and access control. With APISIX and Google, you can implement OIDC-based authentication processes to protect your APIs and enable single sign-on (SSO).
The guide will show you how to integrate APISIX with Google's OAuth 2.0 APIs to implement SSO, using the authorization code flow.
Prerequisite(s)
- Install Docker.
- Install cURL to send requests to the services for validation.
- Follow the Getting Started tutorial to start a new APISIX instance in Docker or on Kubernetes.
- Have a Google account.
Configure Google Credentials
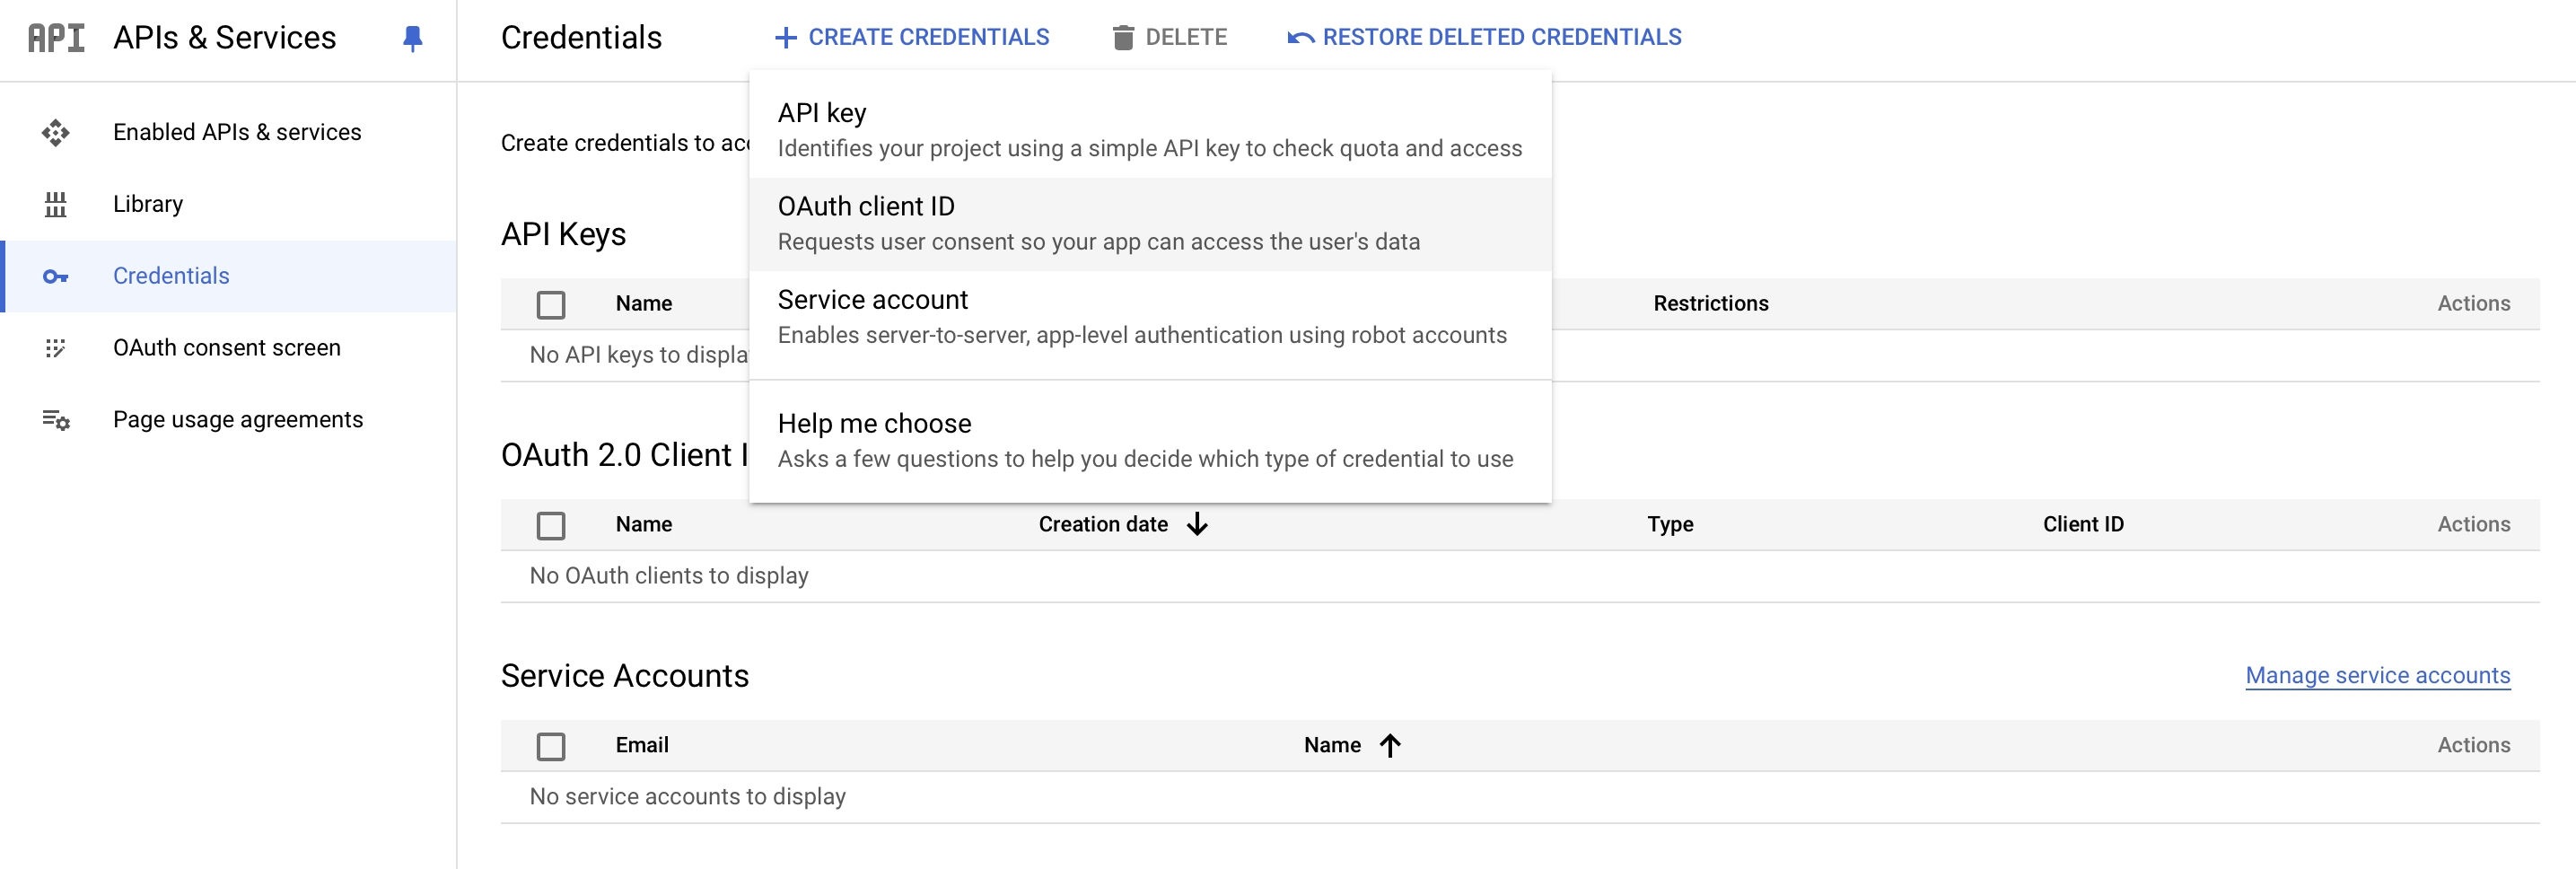
Go to the Credentials page in Google API console and create a new credential of type OAuth client ID:

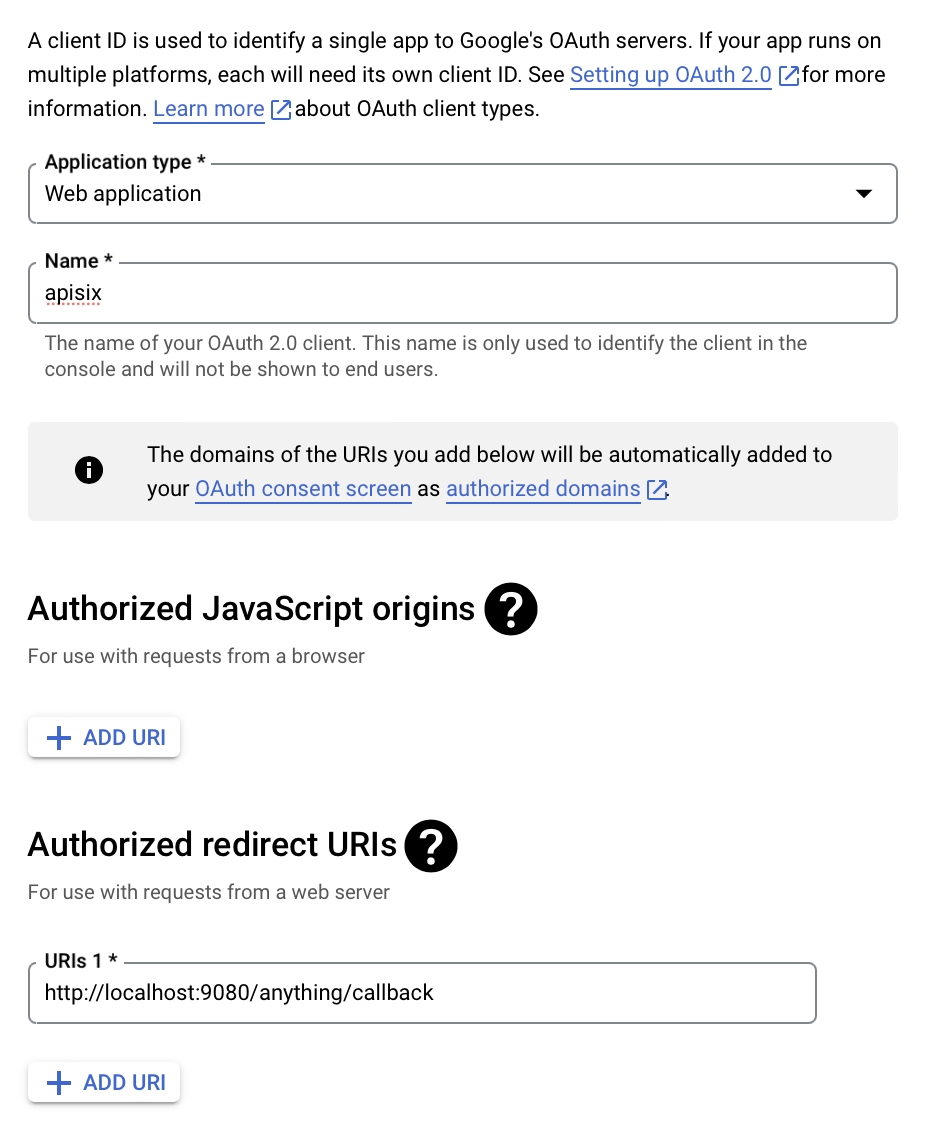
Configure the details for the client:
- Select the Web application as the Application type.
- Enter the name of the client, for example,
apisix. - Enter the callback URL
http://localhost:9080/anything/callback.

Finish the creation.
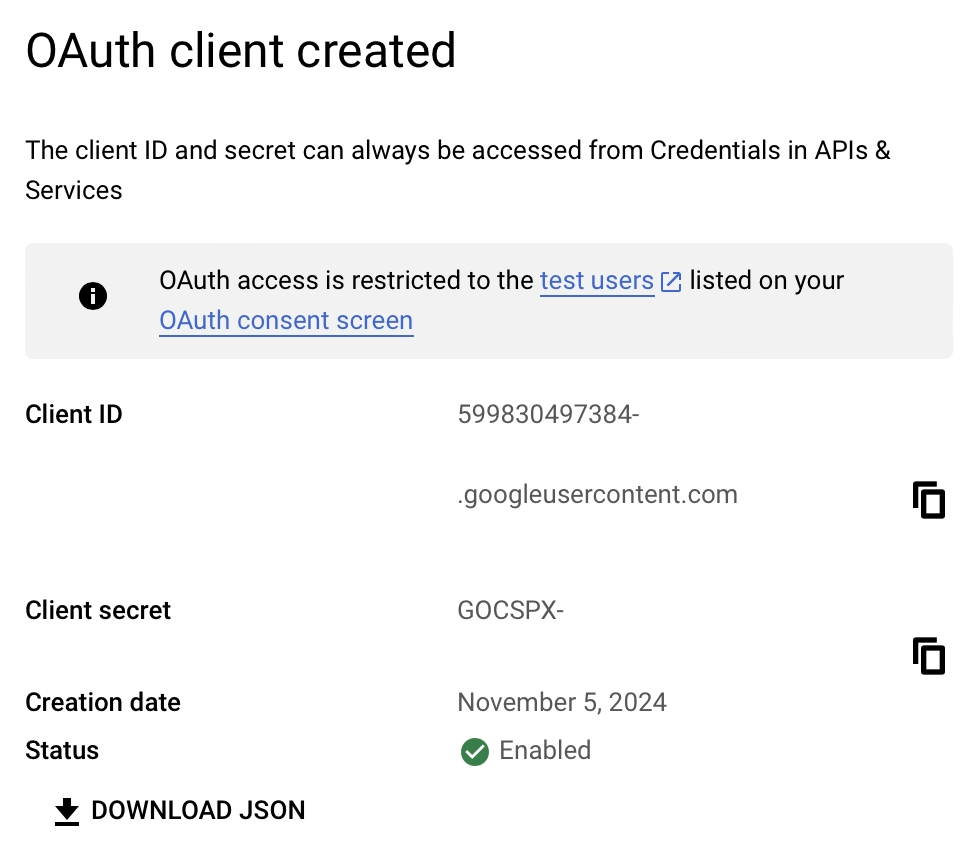
Copy the generated client ID and secret:

Save the client ID and secret to environment variables:
# replace with your values
export OIDC_CLIENT_ID=590838497384-v1v8tta846d4iki47kuaa5mompqio.apps.googleusercontent.com
export OIDC_CLIENT_SECRET=bSaINfMk1YknmtXvo8lKkfeY0iwpr9c0
Create a Route in APISIX
Create a route with openid-connect plugin as such:
- Admin API
- ADC
- Ingress Controller
curl -i "http://127.0.0.1:9180/apisix/admin/routes" -X PUT -d '
{
  "id": "auth-with-oidc",
  "uri":"/anything/*",
  "plugins": {
    "openid-connect": {
      "bearer_only": false,
      "session": {
        "secret": "f86cf31663a9c9fa0a28c2cc78badef1"
      },
      "client_id": "'"$OIDC_CLIENT_ID"'",
      "client_secret": "'"$OIDC_CLIENT_SECRET"'",
      "discovery": "https://accounts.google.com/.well-known/openid-configuration",
      "scope": "openid profile",
      "redirect_uri": "http://localhost:9080/anything/callback"
    }
  },
  "upstream":{
    "type":"roundrobin",
    "nodes":{
      "httpbin.org:80":1
    }
  }
}'
❶ bearer_only: Set to false for authorization code grant.
❷ session.secret: Replace with your key used for session encryption and HMAC operation. Required when bearer_only is false.
❸ client_id: Google OAuth client ID.
❹ client_secret: Google OAuth client secret.
❺ discovery: URI to Google discovery document.
❻ redirect_uri: URI to redirect to after authentication with Google OAuth.
services:
  - name: httpbin Service
    routes:
      - uris:
          - /anything/*
        name: auth-with-oidc
        plugins:
          openid-connect:
            bearer_only: false
            session:
              secret: "f86cf31663a9c9fa0a28c2cc78badef1"
            client_id: "590838497384-v1v8tta846d4iki47kuaa5mompqio.apps.googleusercontent.com"
            client_secret: "bSaINfMk1YknmtXvo8lKkfeY0iwpr9c0"
            discovery: "https://accounts.google.com/.well-known/openid-configuration"
            scope: openid profile
            redirect_uri: "http://localhost:9080/anything/callback"
    upstream:
      type: roundrobin
      nodes:
        - host: httpbin.org
          port: 80
          weight: 1
❶ bearer_only: Set to false for authorization code grant.
❷ session.secret: Replace with your key used for session encryption and HMAC operation. Required when bearer_only is false.
❸ client_id: Google OAuth client ID.
❹ client_secret: Google OAuth client secret.
❺ discovery: URI to Google discovery document.
❻ redirect_uri: URI to redirect to after authentication with Google OAuth.
Synchronize the configuration to APISIX:
adc sync -f adc.yaml
- Gateway API
- APISIX CRD
apiVersion: apisix.apache.org/v1alpha1
kind: PluginConfig
metadata:
  namespace: ingress-apisix
  name: auth-plugin-config
spec:
  plugins:
    - name: openid-connect
      config:
        bearer_only: false
        session:
          secret: f86cf31663a9c9fa0a28c2cc78badef1
        client_id: 590838497384-v1v8tta846d4iki47kuaa5mompqio.apps.googleusercontent.com
        client_secret: bSaINfMk1YknmtXvo8lKkfeY0iwpr9c0
        discovery: https://accounts.google.com/.well-known/openid-configuration
        scope: openid profile
        redirect_uri: http://localhost:9080/anything/callback
---
apiVersion: v1
kind: Service
metadata:
  namespace: ingress-apisix
  name: httpbin-external-domain
spec:
  type: ExternalName
  externalName: httpbin.org
---
apiVersion: gateway.networking.k8s.io/v1
kind: HTTPRoute
metadata:
  namespace: ingress-apisix
  name: auth-with-oidc
spec:
  parentRefs:
  - name: apisix
  rules:
  - matches:
    - path:
        type: PathPrefix
        value: /anything/*
    filters:
    - type: ExtensionRef
      extensionRef:
        group: apisix.apache.org
        kind: PluginConfig
        name: auth-plugin-config
    backendRefs:
    - name: httpbin-external-domain
      port: 80
apiVersion: apisix.apache.org/v2
kind: ApisixUpstream
metadata:
  namespace: ingress-apisix
  name: httpbin-external-domain
spec:
  externalNodes:
  - type: Domain
    name: httpbin.org
---
apiVersion: apisix.apache.org/v2
kind: ApisixRoute
metadata:
  namespace: ingress-apisix
  name: auth-with-oidc
spec:
  ingressClassName: apisix
  http:
    - name: auth-with-oidc
      match:
        paths:
          - /anything/*
      plugins:
      - name: openid-connect
        enable: true
        config:
          bearer_only: false
          session:
            secret: f86cf31663a9c9fa0a28c2cc78badef1
          client_id: 590838497384-v1v8tta846d4iki47kuaa5mompqio.apps.googleusercontent.com
          client_secret: bSaINfMk1YknmtXvo8lKkfeY0iwpr9c0
          discovery: https://accounts.google.com/.well-known/openid-configuration
          scope: openid profile
          redirect_uri: http://localhost:9080/anything/callback
      upstreams:
      - name: httpbin-external-domain
❶ bearer_only: Set to false for authorization code grant.
❷ session.secret: Replace with your key used for session encryption and HMAC operation. Required when bearer_only is false.
❸ client_id: Google OAuth client ID.
❹ client_secret: Google OAuth client secret.
❺ discovery: URI to Google discovery document.
❻ redirect_uri: URI to redirect to after authentication with Google OAuth.
Apply the configuration to your cluster:
kubectl apply -f oidc-route.yaml
Verify
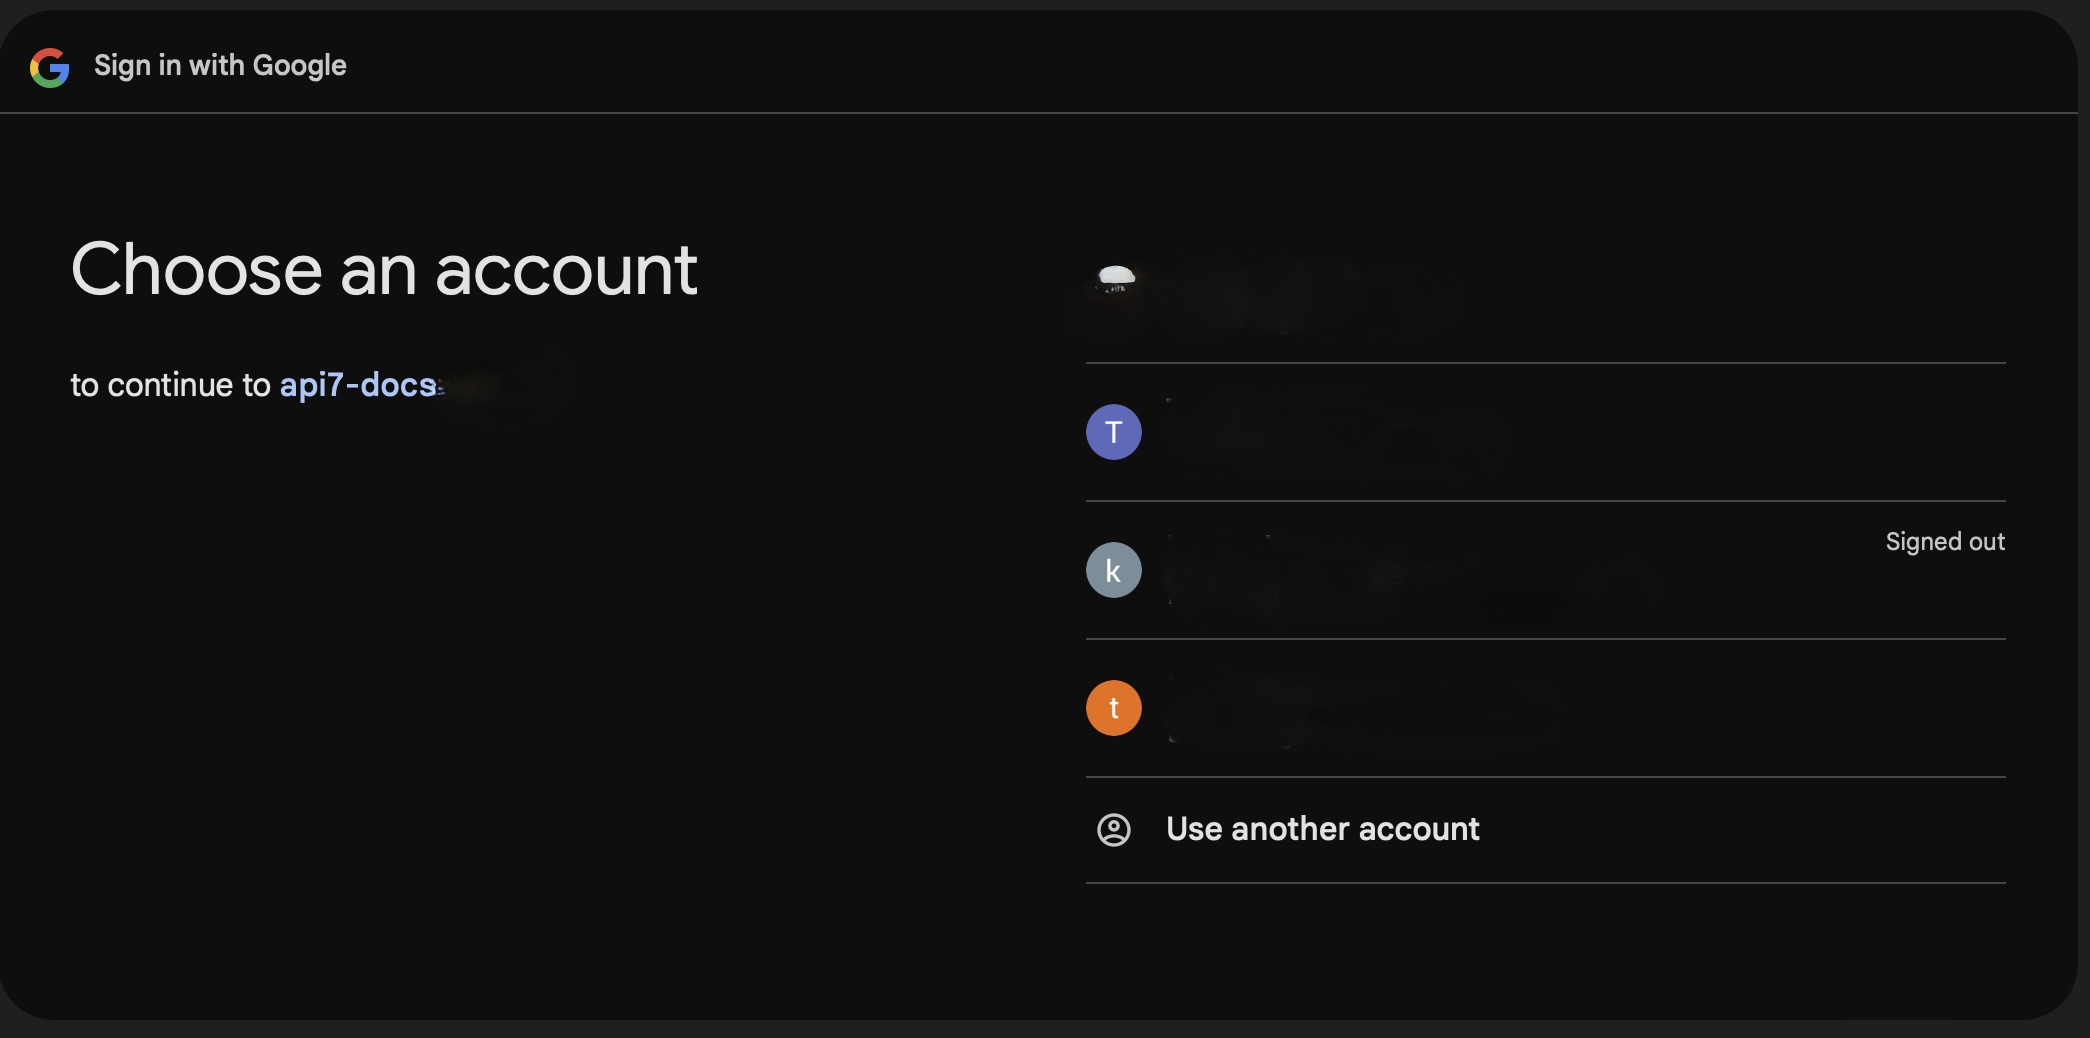
Navigate to http://localhost:9080/anything/test in browser. You should be redirected to Google's log-in page:

Once logged in, the request will be forwarded to httpbin.org and you should see a response similar to the following in browser:
{
  "args": {},
  "data": "",
  "files": {},
  "form": {},
  "headers": {
    "Accept": "text/html..."
    ...
  },
  "json": null,
  "method": "GET",
  "origin": "127.0.0.1, 122.71.24.81",
  "url": "http://127.0.0.1/anything/test"
}
Next Steps
APISIX supports the integration with more OIDC identity providers, such as Keycloak, Authgear, Microsoft Entra ID, and Auth0.
In addition, APISIX also supports built-in authentication approaches such as key authentication, basic authentication, JWT authentication, and HMAC authentication.