
Set Up SSO with Okta
OpenID Connect (OIDC) adds an identity layer to OAuth 2.0, allowing applications to verify an end user's identity and obtain basic profile information from an identity provider (IdP). In a single sign-on (SSO) deployment, users authenticate through the IdP and can access connected applications without signing in separately to each one.
Okta is a cloud-based identity and access management platform that can serve as the centralized IdP. It manages users, application assignments, and authentication and access policies. In this integration, Apache APISIX delegates browser authentication to Okta before proxying requests to an upstream service.
The guide shows how to configure APISIX and Okta for the OIDC Authorization Code flow with Proof Key for Code Exchange (PKCE). When a request does not have a valid APISIX session, APISIX redirects the browser to Okta. After successful authentication, APISIX exchanges the authorization code for tokens, creates a browser session, and resumes the original request.
Prerequisite(s)
- Install Docker.
- Install cURL and OpenSSL.
- Follow the Getting Started tutorial to start APISIX with Docker.
- Have administrator access to an Okta organization.
- If you plan to use ADC, install and configure ADC before continuing.
- If you use the Admin API examples and authentication is enabled, export an admin-role key as
ADMIN_API_KEY. Configure the key underdeployment.admin.admin_key. The Docker quickstart disables authentication for local evaluation; keep it enabled in production.
Configure Okta
Create an OIDC web application in Okta, then save its domain and client credentials for the APISIX route.
Create an App Integration
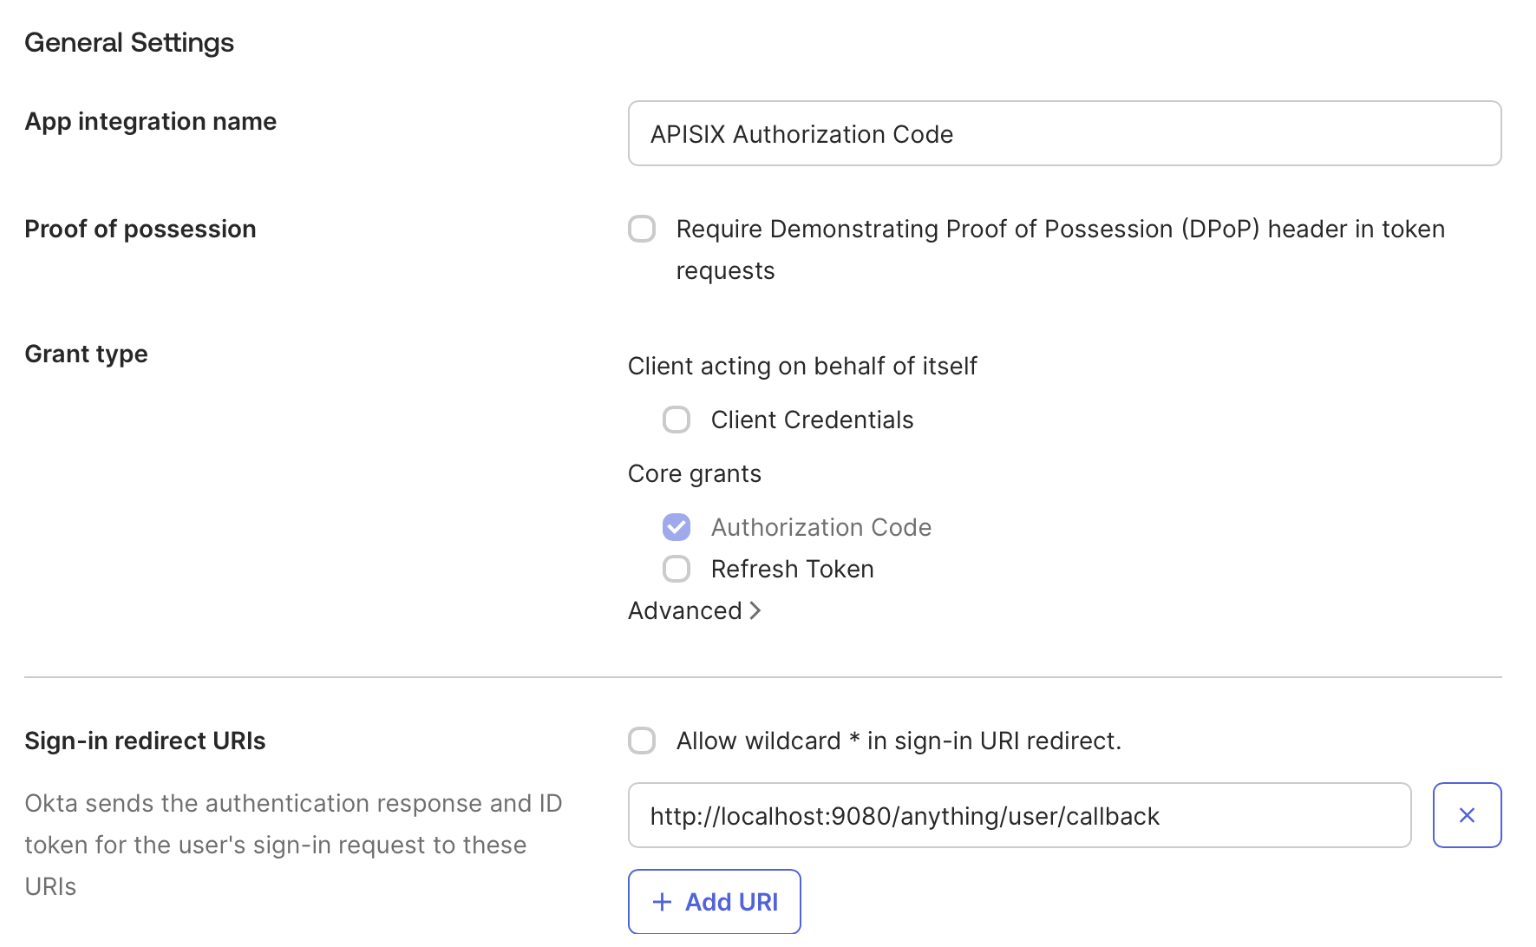
In the Admin Console, select Applications and Resources → Applications → Create App Integration. Select OIDC - OpenID Connect, select Web Application, and then select Next.
Configure the application:
- Enter
APISIX Authorization Codeas the app integration name. - Keep Authorization Code selected. Clear other grant types.
- Replace the default sign-in redirect URI with
http://localhost:9080/anything/user/callback. - Under Controlled access, select Allow everyone in your organization to access for this local test. For production, grant access only to the users or groups that need the application.
- Select Save.
Save the OIDC Configuration
The Okta Admin Console and OIDC endpoints use different host names. If the Admin Console URL is https://example-admin.okta.com, use example.okta.com for discovery, authorization, and token requests.
On the app's General tab, locate the client ID and client secret. Save the Okta domain, discovery URL, client ID, and client secret to environment variables, replacing the example values:
export OKTA_DOMAIN=example.okta.com
export OKTA_DISCOVERY="https://${OKTA_DOMAIN}/.well-known/openid-configuration"
export OKTA_CLIENT_ID=replace-with-your-client-id
export OKTA_CLIENT_SECRET=replace-with-your-client-secret
Configure APISIX
Configure a route that authenticates browser requests before forwarding them to httpbin.org, a public HTTP request and response service. The /anything/user/* endpoint returns request details for verification.
Generate a unique secret that APISIX will use to encrypt and authenticate the browser session cookie:
export APISIX_SESSION_SECRET="$(openssl rand -hex 32)"
Choose either the Admin API or ADC to configure the route.
- Admin API
- ADC
Create a route that authenticates browser requests with Okta:
curl "http://127.0.0.1:9180/apisix/admin/routes/okta-browser" -X PUT \
  -H "X-API-KEY: ${ADMIN_API_KEY}" \
  --data-binary @- <<EOF
{
  "uri": "/anything/user/*",
  "plugins": {
    "openid-connect": {
      "client_id": "$OKTA_CLIENT_ID",
      "client_secret": "$OKTA_CLIENT_SECRET",
      "discovery": "$OKTA_DISCOVERY",
      "scope": "openid profile",
      "redirect_uri": "http://localhost:9080/anything/user/callback",
      "bearer_only": false,
      "use_pkce": true,
      "session": {
        "secret": "$APISIX_SESSION_SECRET"
      },
      "set_access_token_header": false,
      "set_id_token_header": false,
      "set_userinfo_header": false
    },
    "proxy-rewrite": {
      "headers": {
        "remove": ["Cookie"]
      }
    }
  },
  "upstream": {
    "type": "roundrobin",
    "nodes": {
      "httpbin.org:80": 1
    }
  }
}
EOF
❶ discovery: URI of the Okta organization authorization server's OIDC discovery document.
❷ redirect_uri: URI where Okta returns the browser after authentication. It must match the sign-in redirect URI configured in Okta.
❸ bearer_only: Set to false so that APISIX starts the browser authentication flow when a request does not have a valid session.
❹ use_pkce: Set to true to send an S256 PKCE challenge during authorization.
❺ set_access_token_header, set_id_token_header, and set_userinfo_header: Set to false to prevent APISIX from adding the access token, ID token, and user information to upstream request headers.
❻ proxy-rewrite.headers.remove: Includes Cookie to remove the entire header before proxying the request, including the APISIX session cookie. Review this setting if the upstream application requires cookies.
Create an adc.yaml file with the same route configuration:
services:
  - name: okta-sso
    routes:
      - name: okta-browser
        uris:
          - /anything/user/*
        plugins:
          openid-connect:
            client_id: "${OKTA_CLIENT_ID}"
            client_secret: "${OKTA_CLIENT_SECRET}"
            discovery: "${OKTA_DISCOVERY}"
            scope: openid profile
            redirect_uri: http://localhost:9080/anything/user/callback
            bearer_only: false
            use_pkce: true
            session:
              secret: "${APISIX_SESSION_SECRET}"
            set_access_token_header: false
            set_id_token_header: false
            set_userinfo_header: false
          proxy-rewrite:
            headers:
              remove:
                - Cookie
    upstream:
      type: roundrobin
      nodes:
        - host: httpbin.org
          port: 80
          weight: 1
❶ discovery: URI of the Okta organization authorization server's OIDC discovery document.
❷ redirect_uri: URI where Okta returns the browser after authentication. It must match the sign-in redirect URI configured in Okta.
❸ bearer_only: Set to false so that APISIX starts the browser authentication flow when a request does not have a valid session.
❹ use_pkce: Set to true to send an S256 PKCE challenge during authorization.
❺ set_access_token_header, set_id_token_header, and set_userinfo_header: Set to false to prevent APISIX from adding the access token, ID token, and user information to upstream request headers.
❻ proxy-rewrite.headers.remove: Includes Cookie to remove the entire header before proxying the request, including the APISIX session cookie. Review this setting if the upstream application requires cookies.
ADC reconciles services as desired state. The label selector limits this example to its own labeled resources. Preview the scoped changes and confirm that they contain no unintended updates or deletions:
adc diff -f adc.yaml \
  --include-resource-type service \
  --label-selector docs-example=okta-sso
Synchronize the reviewed service configuration:
adc sync -f adc.yaml \
  --include-resource-type service \
  --label-selector docs-example=okta-sso
The file keeps the client secret as an environment-variable reference. Do not add credentials to the file or commit them to source control.
Verify Authentication
Navigate to http://localhost:9080/anything/user/get in a browser. APISIX redirects you to Okta. If you do not have an active Okta session, Okta prompts you to sign in.
Complete the Okta sign-in if prompted. After successful authentication, Okta returns the browser to APISIX, and APISIX forwards the request to httpbin.org. You should see a response with fields similar to these:
{
  "args": {},
  "data": "",
  "files": {},
  "form": {},
  "headers": {
    "Accept": "text/html,application/xhtml+xml,application/xml;q=0.9,*/*;q=0.8",
    "Accept-Encoding": "gzip, deflate",
    "Accept-Language": "en-CA,en-US;q=0.9,en;q=0.8",
    "Host": "localhost",
    "Priority": "u=0, i",
    "Sec-Fetch-Dest": "document",
    "Sec-Fetch-Mode": "navigate",
    "Sec-Fetch-Site": "cross-site",
    "Upgrade-Insecure-Requests": "1",
    "User-Agent": "Mozilla/5.0 (Macintosh; Intel Mac OS X 10_15_7) AppleWebKit/605.1.15 (KHTML, like Gecko) Version/18.6 Safari/605.1.15",
    "X-Amzn-Trace-Id": "Root=1-...",
    "X-Forwarded-Host": "localhost:9080"
  },
  "json": null,
  "method": "GET",
  "origin": "192.168.155.1, xxx.xxx.xxx.xxx",
  "url": "http://localhost:9080/anything/user/get"
}
Header values and the reported origin address vary by browser and network environment.
The upstream request headers should not include the APISIX session cookie, access token, ID token, or user-information header. Reload the page to verify that APISIX reuses the browser session without redirecting you to Okta.
Next Steps
You have now configured APISIX to authenticate browser requests with Okta. See the openid-connect plugin reference for more configuration options.